
Owner's Manual


Page 11
Cleaning & Sanitizing
DISASSEMBLY & CLEANING
1. Turn slicer off.
2. Turn slice thickness dial clockwise past zero (0) until it stops so table covers
knife edge.
3. Unplug power cord.
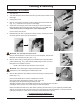
4. Remove food chute’s end weight. Hold end weight and unscrew slide rod
(Fig. 11-1). Pull slide rod out of pivot of end weight.
5. Continue by removing the food chute, loosening the food chute release
knob that fastens the food chute to the chute arm (Fig. 11-2). Note: The
chute release knob is not designed to come completely off.
Lift food chute off chute arm.
6. Disassemble food chute. Using knob on back of chute, unscrew food chute
into three separate pieces (see photos below).
BE ALERT. The next step will expose knife.
7. Remove knife sharpener. Loosen screw on neck of sharpener, then lift knife
sharpener off and away from slicer (Fig. 11-3).
8. Remove knife cover by rotating knife cover release knob counterclockwise
until it releases (Fig. 11-4), while carefully holding edge of knife cover and
lifting knife cover upward to remove.
NOTE: Slicer will not start with knife cover removed.
BE ALERT. Slicer knife edge is exposed. Always be aware of the
placement of your hands/ngers in relationship to knife.
9. Remove slice deector. Slice deector can be removed by loosening screw
knobs (Fig. 11-4).
Place all removable parts in a three compartment sink with
warm water and a mild detergent solution; soak, clean, and
thoroughly scrub all surfaces using a solution of mild
detergent and warm water. Removable parts include: food chute and all of its parts,
end weight, slide rod, knife cover, knife sharpener and slice deector
Rinse removable parts with fresh, clean water. Following the instructions on your quaternary sanitizer label,
soak the food chute and all of its parts, knife cover, knife sharpener and slice deector in a proper solution of
quaternary sanitizer for a minimum of two minutes. Allow these parts to air dry.
An important step to kill bacteria is to
allow the parts to air dry before reinstalling!
Figure 11-1
Figure 11-2
Figure 11-3
Figure 11-4