
Use and Care


Page 15
SHARPENINGTHEKNIFE-(RegularProcedure)
1. Plug in and select the start button on the slicer.
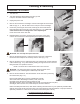
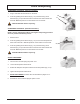
2. Push the grinding stone button #2 (Fig. 15-1) and the honing stone
button #3 (Fig. 15-2) at the same time so both stones make contact with
the knife. Maintain pressure on the buttons for 5-10 seconds.
TURNSLICEROFFbeforeinspecting.
SHARPENINGTHEKNIFE-(ExtendedProcedure)
NOTE:Usetheextendedprocedureiftheregularsharpeningprocedure
doesnotproducesatisfactoryresults.
1. Start the slicer.
2. Push the grinding stone button #2 (Fig. 15-1) so the stone sharpens the
back side of the knife. Maintain pressure on the button for 30 seconds.
3. Push the grinding stone button #2 (Fig. 15-1) and the honing stone
button #3 (Fig. 15-2) at the same time so both stones make contact with
the knife. Maintain pressure on the buttons for 5 seconds.
TURNSLICEROFFbeforeinspecting.
AFTERSHARPENING
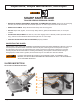
1. Turn the slicer off and unplug the power cord.
2. Loosen the sharpener release knob.
3. Rotate the sharpener and place it back in its stored position (Fig. 15-3).
4. Tighten the sharpener release knob.
5. Clean and sanitize the entire slicer as described on pages 10-13.
6. Reinstall the food chute and plug the power cord in.
KnifeSharpening
Figure 15-2
#3
Figure 15-1
#1
#2
Figure 15-3