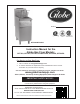
Serial #: GFF35G/GFF35PG Instruction Manual for the Globe Gas Fryer Models: GFF35G, GFF50G, GFF80G and GFF35PG, GFF50PG, GFF80PG For Service on Your Gas Fryer: 1. Visit our website at www.globefoodequip.com 2. Or call the Globe Service Department at 937-299-8625 and ask for contact information for your local service company. Visit our website for information on additional products available from Globe. www.globefoodequip.
Index ATTENTION OWNERS AND OPERATORS.................................................................................................................5 UNPACKING & INSTALLATION............................................................................................................................... 6-9 WARNINGS & SAFEGUARDS FOR OPERATION....................................................................................................10 OPERATING INSTRUCTIONS...........................................
Attention Owners and Operators Globe’s equipment is designed to provide safe and productive processing, cooking and warming of food products as long as the equipment is used in accordance with the instructions in this manual and is properly maintained. Unless the operator is adequately trained and supervised, there is a possibility of serious injury and fire.
Unpacking & Installation TO AVOID SERIOUS PERSONAL INJURY AND PROPERTY DAMAGE: • ALWAYS install equipment in a work area with adequate light and space. • ONLY operate on a solid, level, nonskid surface that is nonflammable and away from sinks and water hazards. • NEVER bypass, alter or modify this equipment in any way from its original condition. Doing so may create hazards and will void warranty. GAS and GAS PRESSURE This unit is factory supplied in Natural Gas or LP gas.
Unpacking & Installation LEG INSTALLATION 1. Open the fryer door assembly. 2. Remove 16 screws and 16 nuts from the four base plates attached to the bottom of the floor flyer. 3. Raise the fryer to allow access for the four legs to be screwed into the four base plates. 4. Attach leg or caster (4) to base plate (4) with four screws and four nuts. NOTE: Install the screws from the bottom side of the fryer. Make sure that the nuts are installed on the inside of the floor flyer cabinet.
Unpacking & Installation CLEARANCE AND VENTILATION Improper ventilation can result in personal injury or death. Ventilation that does not properly remove flue products can cause headaches, drowsiness, nausea, or could result in death. It is recommended that a canopy extend 6’’ past the appliance and the bottom edge be located 6’6’’ from the floor. Filters should be installed at an angel of 45º or more from the horizontal.
Unpacking & Installation 5. After connecting the gas supply, check that the fryer is level. Use a long level four ways; across the front and rear of the fry tank and along each side. 6. The supplied gas pressure regulator is factory set at 4’’ Natural gas W.C. or 10’’ for LP gas. 7. It is recommended that with LP gas that an additional gas regulator (owner supplied) be installed between the fryer and gas tank. 8.
Warnings and Safeguards for Operation TO AVOID SERIOUS PERSONAL INJURY AND PROPERTY DAMAGE: All mobile fryers must be restrained to prevent tipping in order to avoid splashing of hot liquid. Equipment must be restrained per local code. Read the Unpacking and Installation section throughly before installing. For your safety, do not store or use gasoline or other flammable vapors or liquids in the vicinity of this or any, other appliances. Keep the area free and clear of combustible.
Operating Instructions FILLING FRY TANK (CAUTION: NEVER LIGHT PILOT OR TURN BURNERS ON WITH EMPTY TANK) First Use: Prepping the fryer for use Before the fryer can be put to use, the fry tank needs to be burned in. To “Burn in” the fry tank for use, refer to the cleaning section and follow the instructions for cleaning the Fry Tank. 1. Close the drain valve before filling the fry tank. 2. Fill the fry tank approximately 3/4’’ below the full line. The fry compound will expand as it is heated.
Operating Instructions Normal Use of the Fryer: For normal operation, once the fryer is turned on for the first time each day, allow 6-10 minutes for the frying compound/oil to come up to the desired temperature. Never cover or touch the flue when the fryer is on. The flue becomes very hot. Doing so can result in severe burns. 1. Place product in the basket for frying. No more than 1/2 full - Do NOT over fill the baskets. Fill baskets away from fryer or place on nesting hooks only.
Operating Instructions INSTRUCTION FOR DRAINING OIL Allow the fryer and fryer oil to cool completely before draining. Never drain oil while the fryer is on or the oil is hot, doing so can result in severe burns. NOTE: Attached to the inside of the main door, a drain extension pipe has been provided. See Figure 13-1 1. Screw the drain extension pipe into the main drain valve. 2. Once secured, use the red handle; slowly pull the red handle counterclockwise to release the oil.
Cleaning Instructions • DO NOT use any abrasive or flammable cleaning fluids. • DO NOT hose down, immerse or pressure wash any part of the fryer. • NEVER use a scrubber pad, steel wool or abrasive material, or cleaners containing chlorine, iodine and ammonia or bromine chemicals as these will deteriorate the stainless steel and shorten the life of the unit. IF CLEANING ALL THE FRYER’S SURFACES, THE MAIN GAS VALVE MUST BE SWITCHED TO THE CLOSED POSITION.
Cleaning Instructions RECOMMENDED CLEANING (CONTINUED) PART Fry Tank REQUIRED ACTION Wait until the fryer and the oil are completely cool. Turn thermostat knob to OFF position. Turn the safety control valve to OFF position. FREQUENCY Weekly or As Needed Remove fryer baskets and basket support rack. (Clean these parts separately) Strain the frying compound/oil into a clean container. Make sure there is NO compound/oil left in fry tank.
Troubleshooting ISSUE Burners do not come on Pilot light not staying lit Pilot produces carbon deposits Burners produces carbon deposits CAUSE SOLUTION Gas supply to unit off Open valve Safety control valve is in OFF or PILOT position Turn safety control valve to ON Pilot light not lit Ignite pilot light Thermostat not ON Turn ON thermostat Safety control valve is in OFF position Turn safety control valve to PILOT position Pilot gas not adjusted properly Call for service Gas supply to unit
Troubleshooting ISSUE Excessive smoke and or darkening of frying compound CAUSE SOLUTION Fryer temperature is too high Adjust the fryer temperature Fryer compound/oil is old and full of food particles Strain or skim compound/oil Change compound oil completely Use a quality oil Improper preparation on food Check to see if food is breaking down.
Limited Warranty Globe Food Equipment Company (“GFE”) warrants to the original purchaser of new equipment that said equipment, when installed in accordance with our instructions within North America and subjected to normal use, is free from tank defects in material or workmanship for a period of 2 years with full fryer to be replaced or repaired at Globe’s discreation. The labor warranty is two year from original installation or 18 months from actual factory shipment date whichever date occurs first.