GloPhone User Guide GloPhone Version 3.0 Document Version 2.2.
Copyright 2004 TheGlobe.com, 110 East Broward Blvd, 14th Floor, Fort Lauderdale, FL 33301. All rights reserved. Voiceglo is a registered trademark of TheGlobe.com. GloPhone is a trademark belonging to TheGlobe.com. Linux is a registered trademark of Linus Torvalds. Macintosh is a registered trademark of Apple Computer, Inc. Bluetooth is a trademark owned by Bluetooth SIG, Inc. Microsoft and Outlook are registered trademarks of Microsoft Corporation in the United States and other countries.
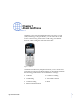
Chapter 1 About GloPhone •••••• GloPhone is a browser-based telephone that uses Voice over IP (VoIP) technology. Using GloPhone, you can make calls to and receive calls from any phone in the world using your Internet browser, while surfing the web at the same time. Figure 1. GloPhone GloPhone includes many telephone features you are used to and some that are unique to GloPhone.
System Requirements The following is required to use GloPhone: • Computer running Windows 2000, Windows Millennium (Me), ® ® or Windows XP. ® • Your PC’s microphone an speakers.
Chapter 2 Getting Started Checking Your Audio Equipment Before you begin using GloPhone, be certain that your audio equipment is connected properly. Microphone and Speakers If you are using your PC’s microphone and speakers with GloPhone, follow these steps. 1 Click the Windows Start button. 2 Click Programs > Accessories> Entertainment > Sound Recorder. Figure 5.
USB Phones and Bluetooth Headsets If you are using a USB Phone or a USB Bluetooth Enabled Headset, follow the manufacturer’s instructions for installing and troubleshooting these products. Downloading Additional GloPhone Numbers You can have up to 6 GloPhone accounts per PC. When you start GloPhone, if you have more than one GloPhone account, a pop-up window opens and you can select the account phone number you want to use. 2 ©2003-2004 Voiceglo.
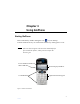
Chapter 3 Using GloPhone Starting GloPhone Start CentComm by double-clicking the icon ( ) on your desktop. Launch GloPhone from your CentComm interface by clicking Place a Call. If the icon does not appear on the menu bar immediately after you activated the software, reboot your PC and open the browser again. Your GloPhone Number Status Indicator Status Display Window Contol Buttons Alpha-Numeric Keypad Figure 7.
The components of the GloPhone are described below. • Your GloPhone Number • Status Display Window Provides information related to GloPhone calls. It contains the Status Indicator and the controls for viewing Missed, Received, and Dialed calls. When you dial a phone number it appears in the status display window. When you receive an incoming call, the caller’s phone number appears in the status display window. • Status Indicator Indicates the state of the GloPhone.
Using GloPhone Moving GloPhone Click the top or side of GloPhone and drag it to any part of your window that suits your needs. Making Phone Calls There are multiple ways to make calls with GloPhone. It does not matter which method you use, and you can use a combination of each to make calls. Each method is described below. You must dial a “1” before dialing any GloPhone, mobile, and landlinebased numbers in the US and Canada.
2 Click Talk. 3 When you are finished talking, click End to end the call. Using Keyboard Keys You can also use your keyboard keys to dial phone numbers. 1 Press the appropriate numeric keys to dial a number. The numbers you dial appear in the status display window. If you make a mistake while dialing, press BACKSPACE to delete the numbers one at a time, or press ESC to clear all the numbers and start over. 2 Press ENTER to place the call.
Using GloPhone GloPhone pops up and places the call. 3 When you are finished talking, click End, or Press ESC on your keyboard to end the call. Dialing US and Canadian Numbers You must dial a “1” before dialing any GloPhone, mobile, and landline-based numbers in the US and Canada. For example: 140755555551234. Dialing International Numbers For international calls, dial 011+ the country code + the phone number. For example: 01144008755554562.
Placing Calls on Hold While on a call, click Hold. To return to the call (take the call off Hold), click Hold again. Conference Calls You can have up to 6 people, including yourself, on a single conference call. To begin a conference call: 1 Call the first person you want to invite to the conference, and ask that person to hold. 2 Click Flash and call the next person. 3 When that person answers, click Conference. All three of you can now speak to each other.
Using GloPhone When the incoming call occurs: 1 Click Talk to answer the call. 2 Click Conference to add the caller to the conference call. You can add a total of 6 callers, including yourself, to a conference call. 2 If you do not want a new caller to join the conference, click Talk when you are finished speaking to the caller. You are returned to your conference call. 2 Linking Conference Calls You can link your GloPhone conference call to another GloPhone conference call.
2 Call the person who is already participating in a separate conference call. 3 When the person answers, click Conference. Participants of both conference calls can now speak to each other. Ending Calls When you are finished talking to a caller, click End on GloPhone, or press ESC on your keyboard to end the call. Redialing Missed and Recent Calls You can view a list of missed and recent calls in the status display window and redial those numbers with the click of a button.
Using GloPhone 2 Click the phone icon to select the phone type. 3 Use the up and down arrows to scroll up and down the list of calls for that type. 4 Click Talk or the phone icon when the number you want to call is displayed on the screen. 5 When you are finished talking, click End, or Press ESC on your keyboard to end the call. Using the GloPhone Telephone Features GloPhone includes many traditional phone features you are already used to with your landline and mobile phones.
Call Waiting If someone calls you while you are already on a call, GloPhone beeps, and the new caller’s telephone number is displayed in the GloPhone window. To answer the incoming call, click Talk. To return to your original call, click Talk again. You must have a GloPhone service plan that includes Call Waiting to use this feature. Call Forwarding You can forward your GloPhone calls to another phone number (GloPhone, landline, or mobile). To forward calls: 1 Click Forward Calls.
Using GloPhone After a few seconds, you will hear an automated voice attendant repeat the number you just dialed. Your incoming calls are now forwarded to that number. Disabling Call Forwarding Before you can receive calls on your GloPhone again, you must disable the call forwarding feature. Click Forward Calls. GloPhone displays “Call Ringing” in the display window and then “Call Answered.” You will hear a beep. GloPhone displays “Call disconnected by remote” and then “Ready for call.
Removing the Do Not Disturb Setting To remove the Do Not Disturb setting: 1 Right-click the GloPhone status icon in the Windows Task Bar. 2 Select DND (Do Not Disturb). The GloPhone status icon returns to the default setting.
Using GloPhone Hiding GloPhone There are multiple ways to hide GloPhone. Click , or Double-click the icon on your desktop, or Click the icon in your browser. This hides GloPhone, but you can still receive calls. Closing GloPhone Right-click the status icon in the Windows Task Bar, and select Exit. Figure 28.Right-click the status icon This closes the GloPhone program.
Chapter 5 GloPhone Skins •••••• You can customize the look of your GloPhone with a new skin. A skin is a graphic or audio file used to change the appearance of the GloPhone user interface. The skin concept is comparable to changing the face plate and ring tones on your mobile phone. Just like a mobile phone, the appearance of the user interface changes, but the GloPhone functionality does not. Figure 29. Examples of skins you can download Our skins are free, so download a new skin as often as you want.
Downloading Skins You can download the skins from our web site. If you have more than one GloPhone number, when you change the skin, it changes for all GloPhone account numbers. To download a skin: 1 Type www.skins.glophone in your internet browser’s Address line and press ENTER. 2 Click Download Now next to the skin you want. The skin downloads and installs itself automatically. GloPhone then closes and reopens, and you will see the new skin.