Model #: Serial #: Model GSP30B SLP-V Lite Software User Guide for Globe Label Printing Scale Model GSP30B For Service on Your Scale 1. Visit our website at www.globefoodequip.com 2. Or call the Globe Service Department at 937-299-8625 and ask for contact information for your local service company. - IMPORTANT SAFETY NOTICE This manual contains important safety instructions which must be strictly followed when using this equipment.
Table of Contents ScaleLink Pro 5 Lite 1. Update Date and Time on Scale...............................................................................................................6 2. Store Settings...........................................................................................................................................7 3. Add a New PLU........................................................................................................................................9 4. Find a PLU...
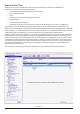
ScaleLink Pro 5 Lite ScaleLink Pro 5 Lite is a software utility used to set up and maintain the data on the GSP30B scale. ScaleLink Pro 5 Lite includes the following features. • Visual interface for creating and editing the scale’s data. • Store name and address • PLUs • Search function for quickly locating the desired PLU • Keyboard presets • Print scale keyboard templates • Scale data can be sent to and read from the scale via the Ethernet PC connection or a USB device.
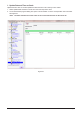
1. Update Date and Time on Scale Update Date and Time on Scales updates the date and time on all currently on-line scales. 1. Select Update Date and Time on Scale from the Tools drop down menu. 2. A Command Status progress dialog box opens to show whether or not the send operation was successful. See Figure 6-1 Note: The date and time sent to the scales is the current date and time on the server PC.
2. Store Settings Store Settings are used to add, edit and delete store name and address records. In most cases only a single store name and address is used. Multiple store name and address records are used when packing for more than one store. 1. Select Store Settings from the Auxiliary Data drop down menu. See Figure 7-1. 2. Select New from the Store Settings tool bar.
3. Key in the store name and address in the Name and Address fields. See Figure 8-1. Save New Left/Right Arrows Back Figure 8-1 The operation and explanation of each Store Settings dialog button and field is described below: Operation Explanation Store No. Specifies the store number. If you change the Store No field, the data will be saved as a new store. Any existing store with the same number is overwritten. Store Name, Store Address Enter the store name and address in these areas.
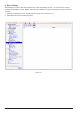
3. Add a New PLU Add/Modify/Delete PLUs is used to create new PLUs, edit PLUs and delete PLUs. This opens a dialog for you to enter the PLU number. The number defaults to the next unused PLU number. If you wish to use a different number, enter an unused number, then press Return or click New to open the PLU Edit dialog. 1. Select Add/Modify/Delete PLUs from the Daily Operation drop down menu. See Figure 9-1.
2. Select the New button. The PLU screen will display. See Figure 10-1. Note: If you enter the number of an existing PLU, the data for that PLU is displayed. Otherwise, a new PLU is created and the initial values of the fields in the lower half of the dialogs are set to their default values. The default PLU number can be changed to a different PLU number. A warning message will open asking to confirm the PLU number change. Note: The cursor is initially positioned in the Product Description field.
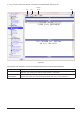
3. Key in the PLU description in the Product Description field. See Figure 11-1. 4. Select or key in the PLU Settings in the PLU Settings field and then select the Save button. 5. Select the Back button to return to PLU list. Save New Display next or previous PLU PLU description field Character Map Back Active/ Inactive Font settings for description text } Select to display list of options Figure 11-1 Page 11 PLU settings. Use the Tab key or mouse to select a field.
4. Find a PLU If you know the PLU number Enter the PLU number in the PLU No. field. The specified PLU appears selected in the PLU list . If you know some or all of the PLU name The PLU name is the first line of the PLU description that appears on the label. Enter the initial characters of the PLU name in the Search field. The PLU list displays only those PLUs with names that start with the entered text. For example, entering “BEEF” displays all PLU names starting with the word “beef”.
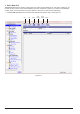
5. Edit PLU 1. Select Add/Modify/Delete PLUs from the Daily Operations drop down menu. 2. Select a PLU from the PLU list. See Figure 13-1.
3. Select the Edit button or double-click on a PLU to display the PLU Edit window. See Figure 14-1. 4. Update the fields and select the Save button. Note: The New button in the PLU Edit window is used to select the next free PLU number. The default PLU number can be changed to a different PLU number. A warning message will open asking to confirm the PLU number change. PLU will not be created until the Save button has been selected. 5. Select the Back button to return to the PLU screen.
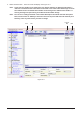
6. Delete PLU 1. Select Add/Modify/Delete PLUs from the Daily Operation drop down menu and select PLU to delete. 2. Select Delete button. A dialog opens asking whether or not to delete the PLU. Screen will display: This will delete the selected PLU. Do you wish to proceed? See Figure 15-1. 3. Select Yes to delete or No to cancel. Note: To delete multiple PLUs at once refer to Scale Communication, Delete Records.
7. Setting Up Ingredient Labels (E13 only) Setting up ingredient labels requires the use of ScaleLink Pro 5 Lite and ScaleLink Pro 5 Maintenance Utility Software. 1. Install the ScaleLink Pro 5 Lite and ScaleLink Pro 5 Maintenance Utility Software on your computer following the guidelines in the “Quick Start Guide for GSP30B Scale”. 2. Connect the scale to PC following the guidelines in the “Quick Start Guide for GSP30B Scale”. 3.
1. Double click on a PLU or select the Edit button to add ingredient information to a PLU (E13 only). 2. Key in the ingredients in the Product Description box and select the Save button (E13 only). Refer to Figure 17-1.
Entering the PLU description and ingredients (Ingredients - E13 label only) The large field in the middle of the PLU Edit dialog box contains the PLU description. Click on the field to set the input focus and use the mouse or arrow keys to move the cursor. Use the operations described below to enter or modify the description text. Operation Explanation Insert text Position the cursor at the desired location and enter text from the keyboard.
8. Preset Keys Scale preset keys can be assigned in a two-step process. First define the keyboard settings for a keyboard. Then the keyboard can be assigned to any number of scales. Select UNI-3 Presets from the Preset Keys drop down menu to add, edit and delete the keyboards in the software database. See Figure 19-1. New Edit Scale IP Address Delete * Keyboard Type Field Status Field *GSP30B uses “Bench” type keyboard. (“Hanging” type will not work with the GSP30B scale.
8.1 Defining Keyboards The keys on the GSP30B keyboard can be assigned to particular PLUs, tare weights, and various other functions. The scale keyboard has a shift key, so you can define two meanings for each key. These are called the upper (standard) and lower (shift key pressed) keys respectively. See Figure 20-1. Note: Different scale models have different keyboard layouts (GSP30B scale is Bench-84 keys only).
Operation Keyboard layout area Page 21 Explanation Double click on a key, or select Edit Key from the Keyboard menu Open a dialog box to edit the key settings. Press DELETE, or select Delete Key from the Keyboard menu Delete the selected key Drag a key Move the key to a new position. Hold down the CTRL key to copy instead of moving the key.
8.2 Edit Preset Key The Edit Preset Key dialog box specifies the upper and lower presets and the keysheet printing format for a specific key. See Figure 22-1. Figure 22-1 The operation and explanation of each Edit Preset Key field is described below: Operation Explanation Key Type Select the key meaning from the combo box (Not all options are available with the GSP30B Scale). Data Some key types such as PLU have an associated data value (the PLU number in this case).
9. Scale Communication 9.1 Scale Network Status Used to check the status of the scales connected to the network. If using the client-server version of ScaleLink Pro 5 Lite, right click on the SLP Server icon in the system tray (bottom right of your Windows screen) shown below to show a warning if any scales are off-line or have an error. See Figure 23-1. You can use this to quickly spot scale problems, even when not using ScaleLink Pro 5 Lite.
The operation and explanation of each Scale Network Status dialog box is described below: Operation Explanation Test Link Sends a signal to the selected scales to check whether they are currently connected. The Connected? column updates accordingly. Enable/Disable Enables or disables the selected scales. Clear Waiting Data Clears all waiting data from the send queues of the selected scales.
9.2 Send and Receive Send and Receive is used when a change within ScaleLink Pro 5 is made (such as changing the price for a PLU), the data is passed to the ScaleLink Pro 5 server where it is updated in the database and added to the queue for sending to each scale. No special operation is required by the user to make sure the data is sent to the scales. See Figure 25-1. Blocks of data can also be sent (specified by record number range) to the scale.
The operation and explanation of each Send & Receive Scale Data dialog button is described below: Operation Explanation Send to Scale Sends data to the scale(s) selected in the Scale field. The Send/Delete Data field specifies the type of data to send and the Send/Delete Record Range fields specify the record number range. Receive from Scale Receives data from the scale selected in the Scale field. Data can only be received from one scale at a time.
9.2.1 Bulk Send and Receive Bulk Send and Receive is used to send different types of data to the scale in a single operation. This is mainly intended for use when setting up a new scale on the network. See Figure 27-1. Select Bulk Block of Data in the Data Type field to send or receive all data, then select All Data in the Mode field. If you only want to transfer specific types of data, select Custom (Select Data Below) and then select the types of data to transfer.
9.3 Delete Records Delete Records allows you to delete a specified range of records from any of the ScaleLink Pro 5 Lite database tables. See Figure 28-1. Delete Range Delete All Select pulldown arrow to choose Data to Delete Figure 28-1 The operation and explanation of each Delete Records dialog button is described below: Operation Explanation Delete Range Deletes a range of records from the database and scales. The Data to Delete field specifies the type of data to delete.
10. Database Utilities Restore Restore Load Load Main Backup Database Production Database Database File File Figure 29-1 The operation and explanation of each Database Utilities dialog button is described below: Operation Backup Database Explanation Makes an immediate backup of the main, production, and sales database files for the database selected on the left. The operation is the same as for an automatic backup.
ScaleLink Pro 5 Lite Maintenance Utility Note: ScaleLink Pro 5 Lite must be closed before opening ScaleLink Pro 5 Lite Maintenance Utility. You cannot run both programs at the same time. ScaleLink Pro 5 Lite Maintenance Utility is a program that provides functions for maintenance and remote diagnostics of a network of Globe scales. 1. Scale Network Monitor The Scale Communication Status Monitor window shown below opens automatically when you start ScaleLink Pro 5 Lite Maintenance Utility.
The operation and explanation of each ScaleLink Pro 5 Lite Maintenance Utility tool bar button is described below. To get access, select from the pull down menus or select a button to open the applicable dialog box. Operation Load Library File Shows a File Open dialog to select a scale configuration library file. Open a library file to open the scale configuration library window that shows the label format and associated data for a library file.
2. Configuration Library The Configuration Library opens the Master Library window that displays the label format and logos for different scale models. See Figure 32-1. For instructions on how to setup an Ingredient Label, refer to section ScaleLink Pro 5 Lite, Setting up Ingredients Labels.
3. Scale Communications The Scale Communication Status Monitor window displays the current status of each scale in the network. See Figure 33-1.
The operation and explanation of each Scale Communication Status Monitor tool bar button is described below. Operation Scale ID Status Explanation Shows the scale name specified in the Scale setup. Shows the scale link number. The number is only used within ScaleLink Pro 5 Lite Maintenance Utility to identify the scale. Shows the current operation status of the scale. Operation mode Shows that the scale is turned on, connected to the network, and ready for use.
4. Backup and Restore Scale Data Backing up the scale using ScaleLink Pro 5 Lite Maintenance Utility reads all the data from the scale and saves the backup information in a backup file (*.abk). The actual data depends on the scale model. See Figure 35-1. Figure 35-1 The operation and explanation for each Backup and Restore Scale Data button is described below: Operation Page 35 Explanation Backup Select to start backup from the scale.
4.1 Backing up Data from a Scale 1. Make sure the scale is plugged in, turned on and there is nothing on the weigh platter. 2. Select the scale from the left side of the screen. Details of the most recent backup for that scale will display on the right side of the screen. See Figure 36-1. Backup Figure 36-1 3. Select the Backup button. A file Save As dialog opens to specify the file in which to save the scale data. Select a file and click the Save button or assign the backup a new name. 4.
4.2 Restoring Data to a Scale 1. Make sure the scale is plugged in, turned on and there is nothing on the weigh platter. 2. Select the scale from the icons on the left side of the screen. The Backup File field at the bottom right of the screen displays the currently selected backup file (typically, the most recent backup for that scale). 3. Select the Browse button to select a different file to restore to the scale. 4. Select the View Summary button to view a summary of the backup file contents.
6. Select one of the Restore Mode options to specify the type of restore to perform. See Figure 38-1. Note: Globe Food Equipment recommends that you ALWAYS choose “Special full restore” for ALL restore operations. At the very least, make sure the “Scale Configuration” box in column 2 is ALWAYS checked. 7. Select OK to start data transfer to the scale. Note: A dialog box will appear displaying the progress of data transfer. The transfer can take a few minutes, depending on the volume of data on the scale.
5. Communications with Scale 5.1 Send to Scale Send to Scale sends the updated label formats and associated data from the Master Library to the scale(s). 1. Select Tools, Configuration Library from the menu or select the Configuration Library icon from the tool bar. The Master Library will display. See Figure 39-1. Figure 39-1 2. Select the scale from the Master Library. 3. Select Comms, Send to Scale, All Data in Database from the menu or select the Send to Scale icon from the tool bar.
4. Select the scales that you would like to update. 5. Select the Select button to send data to scales. Note: The Scales Comms Progress window will open. Data will be updated to the scale and then the Scales Comms Progress window will close. See Figure 40-1.
6. Receive from Scale Receive from Scale opens a dialog for receiving the label format and associated data from the scale. 1. Select Comms, Receive From Scale from the menu or select the Receive From Scale icon from the tool bar. The Select Scales window will display. See Figure 41-1. Select Figure 41-1 1. Select the scales from the Select Scales window. 2. Select the Select button to receive label formats and associated scale data from the scale. The Receive Data from Scale dialog box will display.
3. Select the applicable fields that apply and select the OK button. Note: The Scales Comms Progress window will open. Data will be updated to the scale and then the Scales Comms Progress window will close. See Figure 42-1.