
Owner's Manual


Page 11
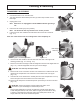
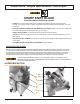
6. Use the food chute handle to tilt food chute and chute arm to the right to the
cleaning position (Fig. 11-1 and Fig. 11-2).
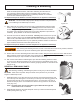
7. Remove food chute end weight. Hold end weight and unscrew end weight slide rod
(Fig. 11-4). Pull end weight slide rod out of pivot of end weight.
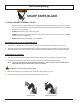
BE ALERT. The next step will expose knife.
8. Remove knife cover. Push down on knife cover release lever. Hold the knife cover
release lever and pull knife cover forward to remove knife cover from top pin
(Fig. 11-5).
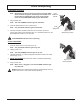
9. Hold the knife cover release lever. Carefully tilt knife cover and pull knife cover up
and to the right to remove the knife cover from bottom pins.
10. Remove knife sharpener. Pull knife sharpener up and away to remove from slicer
(Fig. 11-6).
BE ALERT. Slicer knife edge is exposed. Always be aware of the
placement of your hands/ngers in relationship to knife.
Place all removable parts in a three compartment sink with warm water and
a mild detergent solution; soak, clean, and thoroughly scrub all surfaces using
a solution of mild detergent and warm water. Removable parts include: end
weight, slide rod, knife cover and knife sharpener.
Cleaning & Sanitizing
DISASSEMBLY & CLEANING
1. Push STOP button to turn off knife motor.
2. Turn slice thickness dial clockwise past zero (0) until it stops so table covers
knife edge.
3. Unplug power cord.
Note: When slicer is unplugged the white POWER indicator light will go
out.
4. Pull food chute toward you (home position).
Note: The food chute will only tilt back in the “home” position.
5. Loosen the food chute release knob that fastens the food chute to the slicer
(Fig. 11-3).
Note: The chute release knob is not designed to come completely off.
Figure 11-4
Figure 11-3Figure 11-2 Cleaning Position
Figure 11-1
Figure 11-6
Figure 11-5
End Weight
Slide Rod