
Operator's Manual


5
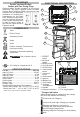
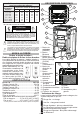
RADIO ASSEMBLY
WARNING
Recharge only with the charger
specied for the battery. For spe-
cic charging instructions, read the operator’s
manual supplied with your charger and battery.
Power
The MILWAUKEE M12 ™ Radio + Charger can be
powered by MILWAUKEE M12™ Li-Ion battery packs
or a standard wall outlet. When plugged into a wall
outlet, the battery bay will charge MILWAUKEE
M12™ Li-Ion battery packs (see Charger Operation).
Inserting/Removing Battery Pack
1. To insert the battery pack, slide it into the battery
bay.
2. To remove the battery pack, pull the battery pack
o of the bay.
Low Battery Indicator
When the radio is powered by a battery pack and
its charge falls below 10%, the low battery indicator
is displayed.
Battery Pack Protection
To protect the life of the battery pack, the radio will
shut o when the battery’s charge becomes too low.
If this happens, plug Radio + Charger into a 120V
outlet and charge the battery pack according to
Charger Operation.
Installing an Auxiliary Device
Open the auxiliary compartment to connect an MP3
player, CD player, or other audio device using the
stereo auxiliary jack.
RADIO OPERATION
WARNING
Always remove battery pack before
changing or removing accesso-
ries. Only use accessories specically recom-
mended for this radio. Others may be hazardous.
To reduce the risk of re or electric shock, do not
expose this radio to rain or moisture.
Turning On/O and Controlling Volume
Plug the cord into an appropriate AC outlet or install
a battery pack.
Press and hold the On/O button until the radio
turns on or o. The radio station (frequency) is dis-
played. To display the time, press the CLOCK button.
Volume is restored to the last setting.
NOTE: When the Radio + Charger is running on
battery power, the display will dim after 5 minutes to
reduce power use.
Use the Volume up and down buttons to increase or
decrease the volume.
Setting the Clock
1. Press and hold the CLOCK button until the hour
begins to ash.
2. Use the ◄ and ► buttons to change the hour.
3. Press the CLOCK button again. The minutes will
begin to ash. Use the ◄ and ► buttons to change
the minutes.
4. Press the CLOCK button again to save.
EQ Adjustment
To manually adjust the Bass/Treble sound, press and
hold the MODE button. Use the ◄ and ► buttons to
set the bass sound. Press the MODE button again
and use the ◄ and ► buttons to set the treble sound.
Selecting Band
Push the MODE button to select FM, AM, or AUX.
Tuning and Seeking
Press the ◄ and ► buttons to move up and down
the band. Press, hold, and release the ◄ and ►
buttons to SEEK through the band. When a station
is found, the SEEK will stop.
PRESET Stations
To set the PRESET stations:
1. Tune to desired station.
2. Press and hold the PRESET button until the PRE-
SET indicator on the display begins to ash.
3. Use the ◄ and ► buttons to select the PRESET
location for the station. Five locations (1-5) are
available for both AM and FM.
4. Press the PRESET button to save the location.
To tune to a PRESET station:
Press and release the PRESET button to step
through the PRESET stations.
Using the Stereo AUX Jack
1. Open the Auxiliary Compartment
2. Plug the auxiliary device into the Stereo AUX jack.
3. Use the MODE button to select AUX.
4. Start the auxiliary device.
Using Bluetooth
To enter the Bluetooth mode, press the button.
Pairing
• If no Bluetooth device is connected, Bluetooth
pairing will begin automatically and the
icon will
ash on the display.
• The radio will continue to search for a signal for
3 minutes.
• While the
is flashing, select "M12 Radio +
Charger" on the Bluetooth capable device.
• Once the device has successfully paired with the
radio, the
will be shown on the radio's display.
Connecting
To enter the Bluetooth mode, press the button.
When the radio locates a paired Bluetooth device,
the will stop ashing.
If connection is lost between the radio and the Blue-
tooth device, the radio will try to reconnect automati-
cally for up to 3 minutes.
Controlling
When streaming music through to the radio via a
Bluetooth device, use the
button. Use the ◄ and
► to move through the tracks.