
Operator's Manual


6
Using the Stereo AUX Jack
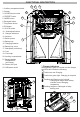
1. Open the Auxiliary Compartment
2. Plug the auxiliary device into the Stereo AUX jack.
3. Use the MODE button to select AUX.
4. Start the auxiliary device.
Using Bluetooth
To enter the Bluetooth mode, press the button, or
press the MODE button to cycle through to Bluetooth.
Pairing
• If no Bluetooth device is connected, Bluetooth
pairing will begin automatically and the
icon
will ash on the display.
• The radio will continue to search for a signal for
3 minutes.
• To manually pair a device, press and hold bluetooth
button until the begins to ash.
• While the
is ashing, select "Milwaukee" on
the Bluetooth capable device.
• Enter PIN "0000".
• Once the device has successfully paired with the
radio, the
will be shown on the radio's display.
Connecting
To enter the Bluetooth mode, press the button, or
press the MODE button to cycle through to Bluetooth.
When the radio locates a paired Bluetooth device,
the
will be shown on the radio's display.
If connection is lost between the radio and the Blue-
tooth device, the radio will try to reconnect automati-
cally for up to 3 minutes.
Controlling
When streaming music through to the radio via a
Bluetooth device, use the
button to start and
pause the music. Use the ◄ and ► to move through
the tracks.
CHARGER OPERATION
WARNING
Charge only MILWAUKEE M18™
Lithium-Ion battery packs in the
MILWAUKEE Li-Ion Battery Charger. Other types
of batteries may cause personal injury and dam-
age. Battery pack and charger are not compatible
with V™-technology or NiCd systems.
When to Charge MILWAUKEE Li-Ion
Battery Packs
Remove the battery pack from the tool for charging
when convenient for you and your job. MILWAUKEE
batteries do not develop a "memory" when charged
after only a partial discharge. It is not necessary to run
down the battery pack before placing it on the charger.
• Use the Fuel Gauge to determine when to charge
your MILWAUKEE Li-Ion battery pack.
• You can "Top-O" your battery pack's charge before
starting a big job or long day of use.
• The only time it is necessary to charge the
MILWAUKEE Li-Ion battery pack is when the battery
pack has reached the end of its charge. To signal
the end of charge, power to the tool will drop quickly,
allowing you just enough power to nish making a
cut, drilling a hole, or driving a fastener. Charge the
battery pack as needed.
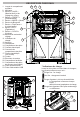
How to Charge the Battery Pack
Plug the Radio + Charger into a 120V outlet. The
battery packs will not charge if the Radio + Charger
is not plugged in. Place the battery pack onto the bay
by sliding the pack on from the top of the bay. The
red light will turn on, either ashing (pack is too hot
or cold) or continuous (pack is charging).
• A fully discharged pack with an internal temperature
between 32°F and 104°F will charge in 30 to 185
minutes, depending on the battery pack.
• Heavily cycled batteries may take longer to charge
completely.
• The Fuel Gauge lights on the battery pack are
displayed as the pack is being charged, indicating
how fully charged the pack is.
• After charging is complete, the continuous green
light will turn on and the fuel gauge will turn o.
• The charger will keep the battery pack fully charged
if it is left on the charger.
• If the light indicator ashes red and green, check
that the battery pack is fully seated into the bay. Re-
move the pack and reinsert. If the problem persists,
contact a MILWAUKEE service facility.
• If the light indicator does not come on, check that
the battery pack is fully seated into the bay. Remove
the pack and reinsert. If the light indicator still does
not come on, contact a MILWAUKEE service facility.
Charging a Hot or Cold Battery Pack
The Red Flashing Indicator light on the charger in-
dicates that the battery pack temperature is outside
the charging range. Once the battery pack is within
the acceptable range, normal charging will take place
and the red light will be continuous. Hot or cold bat-
teries may take longer to charge.
Li-Ion Charging Status
Battery Pack
Temperature
Red Charger
Indicator Light
Charging Status
Too Hot
Normal Range
Too Cold
Fast Flashing
Continuous
Fast Flashing
Not charging
Normal charging
Not charging
MAINTENANCE
WARNING
To reduce the risk of injury, always
unplug the charger and remove the
battery pack from the charger or tool before
performing any maintenance. Never disassemble
the tool, battery pack or charger. Contact a
MILWAUKEE service facility for ALL repairs.
Maintenance and Storage
Store your charger in a cool, dry place.
As a general practice, it is best to unplug battery
chargers and remove battery packs when not in
use. No battery pack damage will occur, however,
if the charger and battery pack are left plugged in.s.
WARNING
To reduce the risk of re, personal
injury, and product damage due to
a short circuit, never immerse your tool, battery
pack or charger in uid or allow a uid to ow
inside them. Corrosive or conductive uids, such
as seawater, certain industrial chemicals, and
bleach or bleach containing products, etc., can
cause a short circuit.
Cleaning
Clean out dust and debris from charger vents and
electrical contacts by blowing with compressed air.
Use only mild soap and a damp cloth to clean the
battery pack and charger, keeping away from all elec-
trical contacts. Certain cleaning agents and solvents
are harmful to plastics and other insulated parts.
Some of these include gasoline, turpentine, lacquer
thinner, paint thinner, chlorinated cleaning solvents,
ammonia and household detergents containing am-
monia. Never use ammable or combustible solvents
around battery packs, charger, or tools.