
User's Manual


10
3 Setup
3.1 General Settings
Access the System Settings by using the Settings icon in the Main Menu. The first screen
shown is the first page of the system setup. The pages of the Settings menu can be
changed by using the on-screen button in the top right corner. To exit the Settings menu
at any time, press the Settings icon in the top left of the screen.
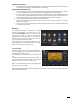
System Settings page one (1/3):
DIM daytime: This option allows the setting of the
illumination level of the display during daytime usage
(vehicle lights off). This level can be set in a value of 1
(lowest) to 5 (highest).
DIM nighttime: This option allows the setting of the
illumination level of the display during nighttime usage
(vehicle lights on). This level can be set in a value of 1
(lowest) to 5 (highest).
AUX Zone: This option selects the AV source for a display
connected to the AV output. The following sources can
be selected: Current/DVD/AUX/OFF. Audio only sources
of Radio/SIRIUSXM/iPod may be selected. Control of most functions must be done from the main screen.
Beep Tone: Turn ON/OFF audible sound when touching the LCD screen. The Beep Tone will also provide
warning of LCD display closing.
Rear View: This option selects whether a rear view camera is connected. When ON the display will
automatically switch to camera mode when the reverse gear is engaged or a trigger signal is received. When
no camera is connected, select OFF.
NOTE: Please use all available safety features and procedures to ensure proper driving to avoid damage and/or
injury.
System Settings page two (2/3):
Temperature: Here the format can be selected how the
XSG2NA-X1S should display the outside temperature
(Fahrenheit or Celcius). This feature is vehicle depending
Compass Display: Here the compass heading format can
be selected. The options are by Direction (N, W, etc) or
bearing (degree notation).
Language: Here the language of the User Interface can
be selected (English, Spanish, French).
Auto Clock Set: This setting allows the selection whether
the time setting should be automatic (based on GPS) or
manually. In case manual is selected, the Time Set option
will be active and can be used to set the correct time.
Standby Screen: Selecting ON, the Infotainment Center will display your clock when the unit is powered off by
pressing the PWR button while the vehicle remains on.
Touch Adjustment: This option allows the user to calibrate the touch screen accuracy. Follow the on-screen
directions step by step to complete the procedure. This procedure is only necessary when the accuracy of the
touch screen is not good.