
User guide


30
9 Vertical - Flue Length, Preparation and Installation
12969
Diagram 9.19
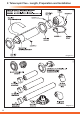
9.12 Flue Installation
Refer to diagram 9.20 and secure the ue adapter in position
on top of the boiler with four screws supplied,
NOTE: The rubber ‘O’ rings of each section should be
lubricated prior to assembly. Do not use mineral oils or
grease, silicon grease or water is recommended.
Secure the rst extension pipe to the ue adapter with the
securing collar supplied by positioning the collar centrally over
the joint, then tighten the two screws on the securing collar,
see diagram 9.21.
Fit more extension pipes as required using the collar and
screws supplied with each extension pipe. To t position the
collar centrally over the joint, tighten the two screws on the
securing collar. Using the holes provided in the securing
collar drill and insert the two self tapping screws supplied, see
diagram 9.22.
The rubber ‘O’ rings of each section should be lubricated prior
to assembly.
NOTE: Do not use mineral oils or grease, silicon grease or
water is recommended.
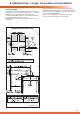
When installing the ue it is recommended that it is supported
every 2 metres and at every bend by a xing bracket.
Project the rise of the ue pipe to roof level and cut a 150mm
hole in the roof.
9.13 Flue Terminal Installation
(a) Pitched Roof
Fit the required pitched roof weather collar over the 150mm
hole in the roof. Make good the tiling or slating around the
collar incorporating the ashing of the weather collar. Position
the angle cap over the weather collar in the correct orientation
to attain the correct angle for your roof.
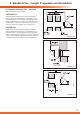
(b) Flat Roof
Fit the aluminium weather collar over the 150mm hole in the
roof ensuring a weather tight seal.
From above carefully place the ue terminal through the
weather collar.
9.14 Flue Terminal to Boiler Connection
Should the clearances above the boiler to roof not allow for
extensions, it is permitted to cut the ue terminal ensuring the
relationship of ue and air duct lengths are retained.