INSTRUCTIONS INSTRUCCIONES MINI SELF WATERING PLANTER RANGE GAMA DE JARDINERAS AUTOREGABLES GAMME DE BOÎTES À AUTO-ARROSAGE BENCH BANCO BANC WALL PARED MURALE RAIL RAMPE glowpear.
CONTENTS CONTENIDOS TABLE DES MATIÈRES 3 SAFETY SEGURIDAD SÉCURITÉ 5 6 7 MINI BENCH Mini Bench Parts List Mini Bench Assembly Instructions 5 6 9 MINI BANCO Mini Banco Listado de Componentes Mini Banco Montaje e Instrucciones 5 6 11 MINI BANC Mini Banco Listado de Componentes Mini Banco Montaje e Instrucciones 13 14 15 21 MINI WALL Mini Wall Parts List Mini Wall Assembly Instructions Mini Wall Mounting Brackets Hole Template 13 14 17 21 MINI PARED Mini Pared Listado de Componentes Mini Pared Monta
SAFETY SEGURIDAD SÉCURITÉ • DO NOT attempt to sit or stand on the planter. • DO NOT attempt to hang or swing from the planter. • Fill only with potting soil and/or other suitable planting mediums. • TAKE CARE when lifting or moving the filled planter. • DO NOT intentionally block the water reservoir drainage points. • DO NOT fit with unauthorised pressure watering devices or irrigation systems.
• CUIDADO al levantar o mover la jardinera llena. • NO bloquee intencionadamente los puntos de drenaje del depósito de agua. • No acople a dispositivos de riego a presión o sistemas de riego no autorizados. • Al montar la jardinera en una pared o balcón, asegúrese SIEMPRE de que el sistema está • adecuadamente fijado con fijaciones mecánicas apropiadas. Si no está seguro busque ayuda profesional. Français • NE TENTEZ PAS de vous asseoir ou de vous tenir debout sur la boîte.
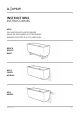
MINI BENCH SELF WATERING PLANTER MINI BANCO JARDINERA AUTOREGABLE MINI BANC BOÎTE À AUTO-ARROSAGE glowpear.
MINI BENCH PARTS LIST MINI BANCO LISTADO DE COMPONENTES LISTE DES PIÈCES MINI BANC Leg ( x 2 ) Apoyos ( x 2 ) Patte ( x 2 ) Planter Body Cuerpo de la Jardinera Boîte Drip Tray Bandeja de Goteo Plateau d’égouttement ACCESSORY BAG BOLSA DE ACCESORIOS SAC D’ACCESSOIRES Fabric Wicking Pouches ( x 2 ) Paquetes de tejido absorbente ( x 2 ) Pochettes en tissu ( x 2 ) Fabric Root Barrier Mat Barrera de Tela para Raíces Tapis barrière de racines en tissu Joiner Tube Tubo de Unión Tube de couplage Joiner Fitt
MINI BENCH ASSEMBLY INSTRUCTIONS 1 2 Turn Planter Body over and align Legs to locating features. Using a Phillips head screwdriver, drive one screw per Leg into the central hole. Do not over-tighten. 3 4 Turn planter over to rest on the Legs and slide Drip Tray into place from front (for indoor use). Unfold Fabric Wicking Pouches and place them into the pockets in the planter base. glowpear.
MINI BENCH ASSEMBLY INSTRUCTIONS NOTE: FOLLOW CAREFULLY TO ENSURE SELF-WATERING IS ACTIVATED. 5 1. Add soil to Fabric Wicking Pouches only. 2. Compact the soil. 3. Wet thoroughly. 6 Unfold Fabric Root Barrier Mat and place inside the planter to completely cover the base. 7 Planter is now ready to fill with soil and plants. Please refer to “Planting and Watering” guide (P. 33). glowpear.
MINI BANCO INSTRUCCIONES DE MONTAJE 1 2 Dele la vuelta al cuerpo de la jardinera y alinee los soportes con las marcas localizadas. Utilizando un destornillador de cabeza Phillips, atornille un tornillo por apoyo en el agujero central. No apriete demasiado. 3 4 Ponga la jardinera boca arriba de nuevo de forma que descanse sobre los apoyos y deslice la bandeja de goteo en su lugar desde el frontal (para uso en interiores).
MINI BANCO INSTRUCCIONES DE MONTAJE NOTA: SÍGALAS CUIDADOSAMENTE PARA ASEGURAR QUE EL RIEGO AUTOMÁTICO SE ACTIVA. 5 1. Añada tierra a los paquetes de tejido absorbente solamente. 2. Compacte la tierra. 3. Riegue abundantemente. 6 Desenvuelva la Barrera de Tela para Raíces y colóquela dentro de la jardinera cubriendo completamente la base. 7 La jardinera está ahora lista para llenarla de tierra y plantas. Por favor mire la guía “Plantación y Riego” (P. 34). glowpear.
MINI BANC INSTRUCTIONS D’ASSEMBLAGE 1 2 Retournez la boîte et alignez les trous des pattes avec les trous de fixation. À l’aide d’un tournevis à tête Phillips, vissez une vis par patte dans le trou de fixation central. Ne serrez pas trop les vis. 3 4 Retournez la boîte afin qu’elle repose sur les pattes et glissez le plateau d’égouttement en place à partir de l’avant (pour un usage intérieur). Dépliez les pochettes en tissu et placez-les dans les emplacements à la base de la boîte. glowpear.
MINI BANC INSTRUCTIONS D’ASSEMBLAGE NOTE : SUIVEZ ATTENTIVEMENT LES INSTRUCTIONS ATTENTIVEMENT AFIN DE VOUS ASSURER QUE L’AUTOARROSAGE FONCTIONNE CORRECTEMENT. 5 1. Ajoutez la terre uniquement aux pochettes en tissu. 2. Compactez la terre. 3. Arrosez abondamment. 6 Dépliez le tapis barrière de racines et placez le à l’intérieur de la boîte afin de complètement recouvrir la base. 7 La boîte est maintenant prête à être remplie avec de la terre et des plantes.
MINI WALL SELF WATERING PLANTER MINI PARED JARDINERA AUTOREGABLE MINI MURAL BOÎTE À AUTO-ARROSAGE glowpear.
MINI WALL PARTS LIST MINI PARED LISTADO DE COMPONENTES LISTE DES PIÈCES MINI MURAL Planter Body Cuerpo de la Jardinera Boîte Wall Bracket ( x 2 ) Soporte de Pared ( x 2 ) Support de fixation ( x 2 ) ACCESSORY BAG BOSA DE ACCESORIOS SAC D’ACCESSOIRES Fabric Wicking Pouches ( x 2 ) Paquetes de Tejido Absorbente ( x 2 ) Pochette en tissu ( x 2 ) Fabric Root Barrier Mat Barrera de Tela para Raíces Tapis barrière de racines en tissu Joiner Tube Tubo de Unión Tube de couplage Joiner Fitting ( x 2 ) Piezas
MINI WALL ASSEMBLY INSTRUCTIONS DISCLAIMER: WALL FIXINGS ARE HIGHLY DEPENDANT ON THE TYPE OF WALL YOU ARE FIXING TO, AND FOR THIS REASON ARE NOT SUPPLIED. PLEASE ALWAYS SEEK EXPERT ADVICE WHEN SELECTING FASTENERS FOR YOUR APPLICATION. 1 2 Carefully plan the position of your planter(s) using the Mounting Template provided on P. 21. Be sure to mount the planters level. Using appropriate fixings, mount the Wall Brackets to the wall in the positions marked. Use a minimum of two fixings per Wall Bracket.
MINI WALL ASSEMBLY INSTRUCTIONS NOTE: FOLLOW CAREFULLY TO ENSURE SELF-WATERING IS ACTIVATED. 5 1. Add soil to Fabric Wicking Pouches only. 2. Compact the soil. 3. Wet thoroughly. 6 7 Unfold Fabric Root Barrier Mat and place inside the planter to completely cover the base. Slide the planter onto the Wall Brackets. 8 9 Using a Phillips head screwdriver, drive one screw per Wall Bracket, from underneath, into the central hole. Do not over-tighten. Planter is now ready to fill with soil and plants.
MINI PARED INSTRUCCIONES DE MONTAJE ADVERTENCIA: LAS FIJACIONES DE PARED SON ALTAMENTE DEPENDIENTES DEL TIPO DE PARED A LA QUE SE ESTÁ FIJANDO Y POR ESTA RAZÓN NO SE SUMINISTRAN. POR FAVOR BUSQUE SIEMPRE ASESORAMIENTO EN LA ELECCIÓN DE LOS ELEMENTOS DE FIJACIÓN PARA SU APLICACIÓN. 1 2 Plantee cuidadosamente la posición de su(s) jardinera(s) utilizando la plantilla de montaje de la P. 21. Asegúrese de montar las jardineras a nivel.
MINI PARED INSTRUCCIONES DE MONTAJE NOTA: SÍGALAS CUIDADOSAMENTE PARA ASEGURAR QUE EL RIEGO AUTOMÁTICO SE ACTIVA. 5 1. Añada tierra a los paquetes de tejido absorbente solamente. 2. Compacte la tierra. 3. Riegue abundantemente. 6 7 Desenvuelva la Barrera de Tela para Raíces y colóquela dentro de la jardinera cubriendo completamente la base. Deslice la jardinera en los Soportes para Pared.
MINI MURAL INSTRUCTIONS D’ASSEMBLAGE EXONÉRATION : LES SUPPORTS DE FIXATION MURALE VARIENT GRANDEMENT SELON LE TYPE DE MUR. PAR CONSÉQUENT, LES SUPPORTS DE FIXATION NE SONT PAS FOURNIS. VEUILLEZ TOUJOURS OBTENIR L’AVIS D’UN EXPERT LORSQUE VOUS CHOISISSEZ VOS SUPPORTS DE FIXATION MURALE. 1 2 Planifiez soigneusement l’emplacement de votre boîte en utilisant le plan de fixation fourni à la P. 21. Assurez-vous de fixer les boîtes à niveau.
MINI MURAL INSTRUCTIONS D’ASSEMBLAGE NOTE : SUIVEZ ATTENTIVEMENT LES INSTRUCTIONS ATTENTIVEMENT AFIN DE VOUS ASSURER QUE L’AUTOARROSAGE FONCTIONNE CORRECTEMENT. 5 1. Ajoutez la terre uniquement aux pochettes en tissu. 2. Compactez la terre. 3. Arrosez abondamment. 6 7 Dépliez le tapis barrière de racines et placez le à l’intérieur de la boîte afin de complètement recouvrir la base. Glissez la boîte sur les fixations murales.
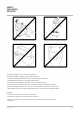
MINI WALL MOUNTING TEMPLATE MINI PARED PLANTILLA DE MONTAJE MINI MURAL PLAN DE SUPPORTS DE FIXATION Single Planter Setup Configuración para una jardinera Installation d’une boîte 2.9” (74mm) 17.7” (450mm) 3.1” (80mm) 4.0” (103mm) 1.8” (46mm) Ground Level Multiple Planter Setup Configuración para multiples jardineras Installation de plusieurs boîtes 5.9” (150mm) glowpear.
MINI RAIL SELF WATERING PLANTER MINI RAIL JARDINERA AUTOREGABLE MINI RAMPE BOÎTE À AUTO-ARROSAGE glowpear.
MINI RAIL PARTS LIST MINI RAIL LISTADO DE COMPONENTES LISTE DES PIÈCES MINI RAMPE Rail Foot ( x 2 ) Pie de Rail ( x 2 ) Vis de la base ( x 2 ) Clamp Knob ( x 2 ) Tuerca de Cruz ( x 2) Bouton de serrage( x 2 ) Clamp Plate ( x 2 ) Placa de Tornillo ( x 2 ) Plateau de serrage ( x 2 ) Planter Body Cuerpo de la Jardinera Boîte Rail Hook ( x 2 ) Enganche de Rail ( x 2 ) Crochet rampe ( x 2 ) Rail Bracket ( x 2 ) Soporte de Rail ( x 2 ) Support rampe ( x 2 ) Wall Bracket ( x 2 ) Soporte de Pared ( x 2 ) Supp
MINI RAIL ASSEMBLY INSTRUCTIONS 2.3” - 3.9” (60-100mm) 0” - 1.6” (0-40mm) 1 2 Align Rail Hook to Rail Bracket either forwards or backwards depending on the width of your rail. Assemble Clamp Plate, from underneath, and screw on the Clamp Knob to lock the bracket range to the width of your rail. 3 4 Locate the Rail Foot and screw into the base of the bracket. Fix the Wall Bracket to the Rail Bracket, using the Rail Bracket Screws provided (x4). Hand tighten until firm.
MINI RAIL ASSEMBLY INSTRUCTIONS NOTE: FOLLOW CAREFULLY TO ENSURE SELF-WATERING IS ACTIVATED. 7 1. Add soil to Fabric Wicking Pouches only. 2. Compact the soil. 3. Wet thoroughly. 8 9 Unfold Fabric Root Barrier Mat and place inside the planter to completely cover the base. Planter is now ready to fill with soil and plants. Please refer to “Planting and Watering” guide (P. 33). 10 When ready, slide the planter onto the Rail Bracket Assembly.
MINI RAIL INSTRUCCIONES DE MONTAJE 2.3” - 3.9” (60-100mm) 0” - 1.6” (0-40mm) 1 2 Alinee el Enganche de Rail con el Soporte de Rail hacia delante o hacia atrás dependiendo de la anchura de su rail. Monte la Placa de Tornillo desde abajo, y atorníllela en la Tuerca de Cruz para bloquear el movimiento del soporte a la anchura de su rail. 3 4 Coloque el Pie de Rail y atorníllelo a la base del soporte. Fije el Soporte de Pared al Soporte de Rail, utilizando los Tornillos de Rail para Soporte (x4).
MINI RAIL INSTRUCCIONES DE MONTAJE NOTA: SÍGALAS CUIDADOSAMENTE PARA ASEGURAR QUE EL RIEGO AUTOMÁTICO SE ACTIVA. 7 1. Añada tierra a los paquetes de tejido absorbente solamente. 2. Compacte la tierra. 3. Riegue abundantemente. 8 9 Desenvuelva la Barrera de Tela para Raíces y colóquela dentro de la jardinera cubriendo completamente la base. La jardinera está ahora lista para llenarla de tierra y plantas. Por favor mire la guía “Plantación y Riego” (P. 34).
MINI RAMPE INSTRUCTIONS D’ASSEMBLAGE 2.3” - 3.9” (60-100mm) 0” - 1.6” (0-40mm) 1 2 Alignez le crochet de rampe au support de rampe vers l’avant ou l’arrière selon la largeur de votre rampe. Assemblez le plateau de serra, par le dessous, et vissez le bouton de serrage afin de fixer la distance de support selon la largeur de votre rampe. 3 4 Trouvez la vis de la base et vissez la à la base du support. Fixez le support de fixation murale au support de la rampe à l’aide des vis de support rampe (x4).
MINI RAMPE INSTRUCTIONS D’ASSEMBLAGE NOTE : SUIVEZ ATTENTIVEMENT LES INSTRUCTIONS ATTENTIVEMENT AFIN DE VOUS ASSURER QUE L’AUTOARROSAGE FONCTIONNE CORRECTEMENT. 7 1. Ajoutez la terre uniquement aux pochettes en tissu. 2. Compactez la terre. 3. Arrosez abondamment. 8 9 Dépliez le tapis barrière de racines et placez le à l’intérieur de la boîte afin de complètement recouvrir la base. La boîte est maintenant prête à être remplie avec de la terre et des plantes.
MULTIPLE PLANTER ASSEMBLY 1 2 Remove factory fitted reservoir plugs from adjoining side using a coin and remove seal washer from plug - Repeat for each planter as required. Reusing the seal washer from the plug, screw in the Joiner Fitting and tighten firmly by hand. 3 4 Push-fit Joiner Tube onto Joiner Fitting. Align planters, bend flexible Joiner Tube around onto second Joiner Tube and push-fit.
MONTAJE DE JARDINERA MÚLTIPLE 1 2 Retire los tapones de depósito de fábrica del lado colindante con una moneda y retire la arandela de sellado del tapón. Repita para cada jardinera según sea necesario. Reutilizando la arandela de sellado del tapón, atornille la Pieza de Unión y apriétela firmemente a mano. 3 4 Ajuste empujando el Tubo de Unión en la Pieza de Unión. Alinee las jardineras y coloque el Tubo de Unión flexible con el Segundo Tubo de Unión y ajuste empujando.
ASSEMBLAGE DE PLUSIEURS BOÎTES 1 2 Retirez les bouchons de réservoir du fabricant sur le côté à l’aide d’une pièce et retirez la rondelle du bouchon. Répétez l’opération pour chaque boîte autant de fois que nécessaire. En réutilisant la rondelle provenant du bouchon, insérez le raccord de couplage et vissez fermement à main. 3 4 Poussez le tube de couplage sur le rapport de couplage. Alignez les boîtes, pliez le tube de raccord et joignez-les boîtes en le poussant sur le second raccord de couplage.
PLANTING AND WATERING 1 2 Add soil mix to Planter (refer to www.glowpear. com for recommendations). Plant seeds or seedlings (refer to www.glowpear. com for recommendations). 3 Apply 1/2 - 3/4 gallons (2 - 3 Litres) of water directly to the soil to “water-in” the new plants. Allow to stand for 1-2 hours before applying further water. 4 5 Once surface watering has drained through the soil media, carefully top up the reservoir via the fill point until the level indicator pops up (shown in point 5).
PLANTACIÓN Y RIEGO 1 2 Añada mezcla de tierra a la Jardinera (vea www.glowpear.com para recomendaciones). Plante semillas o plántulas (vea www.glowpear. com para recomendaciones). 3 Aplique 1/2 - 3/4 galones (2 - 3 litros) de agua directamente en la tierra para regar las nuevas plantas. Espere entre una y dos horas antes de aplicar más agua.
PLANTATION ET ARROSAGE 1 2 Ajoutez le mélange de terre à la boîte (vous référer au www.glowpear.com pour des recommandations). Planter les graines ou les jeunes plants (vous référer au www.glowpear.com pour des recommandations). 3 Arrosez entre un demi et trois quarts de gallon d’eau (entre 2 et 3 litres d’eau) directement le sol afin de fournir l’eau nécessaire aux nouvelles plantes. Laissez reposer entre 1 et 2 heures avant d’arroser davantage.
CARE INSTRUCTIONS INSTRUCTIONES DE CONSERVACIÓN INSTRUCTIONS D’ENTRETIEN Periodic maintenance and cleaning will allow the product to keep its original look and lengthen the duration of its performance. The Glowpear Mini planter is made of HDPE plastic resin that has been UV protected so that it survives outdoor environments. You can clean the plastic surfaces of the planter by hand with soap and warm water.
une quantité minimale d’eau sur une longue période. Dans de telles circonstances, il se peut que vous vouliez changer l’eau du réservoir afin d’éviter que celle-ci ne devienne stagnante. Une fois tous les 3 ou 6 mois devrait suffire. Afin de visiter le réservoir, vous n’avez qu’à retirer un bouchon de chaque bout de la boîte (à l’extérieur) et permettre au contenu du réservoir de s’écouler.