
Manual

Effective 4/2013
For Full Warranty Information Please Visit GlowShift.com
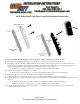
03-09 Dodge Ram Triple Pillar Gauge Pod Installation Instructions
1. Prior to installing this full size gauge pod, be sure that your vehicle does not have side curtain air bags.
2. This gauge pod is a complete replacement and you will have to remove your factory trim with grab handle.
3. Our gauge pods can be painted using ABS plastic paint. If you decide to paint your gauge pod, be sure to scuff the surface of the
pod using a fine grit sand paper, this will allow the paint to properly adhere to the surface of the pod. Before applying paint to the
gauge pod, make sure that it is cleaned off and there is no residue on the pod from scuffing it.
Be advised, if you decide to paint this pod you will not be eligible to return it for a refund.
4. Carefully remove the factory A-pillar from your vehicle.
We strongly recommend referring to your owner’s manual for the proper procedure on removing this piece.
5. Install your gauges into the pod by following the instructions that are included with them.
6. Connect the gauge wires to the power and sensor wires as per the instructions that are included with your gauges.
7. Install the gauge pod to you factory A-pillar using the provided bolt. This bolt installs directly into the threads that your factory trim
screws into.
If you ordered the black version of this pod, GS-363, you will have to drill a hole for the included bolt.
Simply use a scoring tool to line up the location of the bolt and drill with a ¼ inch drill bit.
8. To ensure a proper fit, screw the bolt into the threads but do not completely tighten it. Adjust the gauge pod so that it lines up
correctly and then tighten the bolt.