
Owner manual

7 Color Series Wideband Air/Fuel Ratio Gauge with Data Logging Output
For Product Numbers: GS-C702W, GS-T702W and GS-W702W
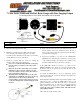
Wire Color Code
Red:
12v Constant Source (+) (un-switched)
Black:
Vehicle Ground ( - )
White:
12v Ignition Source (+) (switched)
Orange:
12v Switched Headlamp Source (+) (optional)
1. Disconnect the negative battery cable.
2. Mount the controller inside the vehicle away from heat,
water, moisture, dirt and all moving parts, in an easily
accessible location. This allows for the unit to be accessible
should calibration need to be performed.
3. Install the provided LSU 4.9 Sensor by welding the
matching exhaust bung to the exhaust pipe.
Note: We recommend using Anti-Seize on the bung
threads so that you can unscrew the sensor when
necessary.
Make sure the location of the bung is no less than a
minimum of 6 inches after the exhaust ports, but
before the catalytic converter, and no more than 36
inches from the last exhaust port.
The bung must be installed to the top or side of the
exhaust pipe at a minimum of 10 degrees for the top
and 15 degrees for the side from a horizontal
position with the electrical connection up to prevent
a collection of liquid at the element during the warm
up phase.
4. Next, route and secure the sensor wire harness from the sensor
into the vehicle, close to the controller’s location. Be sure to
use a grommet when routing the wires through the firewall to
protect them from stripping.
5. Connect the red wire to a positive 12 volt constant (un-
switched) source either directly to the battery or to a fuse panel
on the vehicle. If wiring to an un-fused source, install a 3 amp
fuse inline within 20 inches of the sources connection.
6. The white wire should be connected to a positive 12 volt
ignition (switched) source. It may be connected to the fuse panel,
an accessory wire, or any positive 12 volt source that turns on and
off with the ignition
7. Connect the black wire to any good (unpainted) ground
connection. You may also route a wire directly to the negative side
of the vehicle’s battery.
8. The Night Time Dimming feature decreases the brightness of the
gauge face by 30%. Connect the orange wire to the 12 volt
positive headlamp source. This allows the mode to be activated
when the headlights come on. This step is optional and will not
affect operation of the gauge if it is omitted. NOTE: Do not
connect the orange wire to a dimmer wheel. This will cause the
gauge lighting to flicker.
9. Reconnect the negative battery cable.