Ultracom cxi High Efficiency Condensing Boilers Instructions for Use To be left with the user www.glow-worm.co.uk www.glow-worm.co.
WARNING GAS LEAK OR FAULT Turn off the gas emergency control valve immediately. Eliminate all sources of ignition, i.e.smoking, blowlamps, hot air guns etc. Do not operate electrical lights or switches either on or off. Open all doors and windows, ventilate the area. METAL PARTS This boiler contains metal parts (components) and care should be taken when handling and cleaning, with particular regard to edges.
Ultracom 24cxi G.C. No. 47-019-01 Ultracom 30cxi G.C. No. 47-019-02 Ultracom 38cxi G.C. No. 47-019-03 www.glow-worm.co.
Setting the Programmer Setting the 24 hour Clock Adjusting Temperature Lighting the Boiler User Control Panel Servicing, Maintenance and Spare Parts Boiler Safety Devices Boiler Design and Clearances Important Information 14 13 12 11 10 9 8 7 6 5 Page Advancing the Programmer 15 Contents Fault Finding These instructions are an integral part of the boiler and must, to comply with the current issue of the Gas Safety (Installation and Use) Regulations, be left with the user.
CE Mark Any alteration not approved by Glow-worm, could invalidate the certification, boiler warranty and may also infringe the current issue of the statutory requirements. It is important that no alteration is made to the boiler unless approved, in writing, by Glow-worm. This boiler is certificated to the current issue of EN 483 for performance and safety.
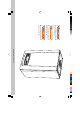
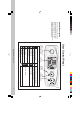
Description *5 600 200 150 CLEARANCES (from casing panels) Boiler Design and Clearances These boilers are designed for use as part of a sealed water central heating system with fully pumped circulation. The pump, expansion vessel and associated safety devices are all fitted within the boiler. The intelligent control system is designed for both simple operation and maximum control. Once the controls are set the boiler operates automatically.
Boiler Shutdown Condensate Drain Blockage Boiler Safety Devices The boiler software is designed to recognise the potential for an overheat lockout and will shutdown before this happens. To restart the boiler, press the reset button, see diagram 2. 7 The safety discharge valve and discharge pipe is fitted to the boiler. If there is any discharge from the pipe, switch off the boiler electrical supply, then call your Installation/Servicing company or Glow-worm service.
Frost Protection Servicing, Maintenance and Spare Parts General Note If the mains electricity and gas services are to be turned off for any long periods during severe weather, it is recommended that the whole system, including the boiler, should be drained to avoid the risk of freezing. Spare Parts The draining, refilling and pressurising MUST be carried out by a competent person, contact your Installation/Servicing company or Glow-worm Service.
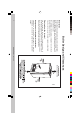
General Description The User Control panel consists of three toggle buttons, a reset button and display, which will indicate with symbols the status of the boiler, refer to diagram 2.
Initial Lighting Constant central heating with domestic hot water. Timed central heating with domestic hot water. 2. Select your required function, refer to diagram 9, press "Mode" repeatedly to scroll through your options and select one of the following:- Note: If the electrical supply has been interrupted for any reason, you may need to set the clock and day before continuing, refer to diagram 5. Lighting the Boiler Remove the cover plate, refer to the fault finding section on page 15 and diagram 8.
Domestic Hot Water Domestic hot water has priority over central heating. The temperature is factory preset to the minimum 40OC, but can be adjusted to a maximum of 62OC as required, refer to diagram 4. Economy Setting The "ECO" setting of 50OC is recommended and ideally suited to normal family use. Central Heating The temperature is factory preset to the minimum 38OC, but can be adjusted to a maximum of 82OC as required, refer to diagram 4.
STEP 1 STEP 2 PROG Press and hold "PROG" 5 secs. the "hours" symbol will flash. Press the "+" or the "-" to set the hour. MODE PROG www.glow-worm.co.uk Press "PROG" to confirm. The process will automatically scroll to minutes, then days (if the installer sets the 7 day function). Set as previously described for hours. STEP 3 MODE Setting the 24 hour Clock To set the clock, refer to diagram 5.
24hr Timed Central Heating Setting the Programmer "Running Time" Indicated by solid squares. Square represents 30 minutes. Press + or - to move the flashing cursor to the desired time. STEP 2 13 Diagram 6 Press "+" to add a time segment or "-" to remove a time segment. STEP 3 To alter the times to suit your requirments, follow "Steps" 1 to 4 Factory preset timed intervals are:ON 6.00 - OFF 8.00 ON 16.00 - OFF 23.00 STEP 1 Flashing cursor.
Advancing the Programmer Advancing the timed central heating programmer ON /OFF times This function will only work when the appliance is in timed operating mode, "Clock symbol". Refer to diagram 2. www.glow-worm.co.uk Diagram 7 Press + and hold for 5 seconds your appliance will operate until the next OFF period, or you can cancel by pressing + for 5 seconds. The activated/deactivated segments will flash for 5 seconds.
Appliance fails to light The boiler will not work without an electrical supply and normal operation of the boiler should resume when the electrical supply is restored. Electrical Supply Failure 3. IMPORTANT: To comply with the water regulations the flexible hose must be disconnected from the double check inlet valve - undo the nut and pull the flexible hose from the valve. 2. Fully open tap "A", then gradually open tap "B" to fill the heating system to a pressure of 1.0bar.
0020020822-02 11.06 Because of our constant endeavour for improvement, details may vary slightly from those shown in these instructions. Glow-worm, Nottingham Road, Belper, Derbyshire. DE56 1JT www.glow-worm.co.