
Instruction Manual

3
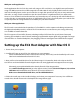
Setting up the EC2 Host Adapter with Mac OS X
1. Power down your computer.
2. Install the EC2 into an open PCIe slot, and power on your computer.
NOTE: On 2008 Mac Pro models, install in 4X PCIe slot only. The 4x slot(s) can be identied by a silk-screen
label on the motherboard between the PCIe slots.
3. Next you’ll need to install the driver for the Silicon Image 3132 controller, which is the chip on the EC2
card. Drivers are downloadable from the Glyph website at: www.glyphtech.com/support/accessories.php
With your audio applications
Audio applications like Pro Tools also work well using our EC2 card. We’ve seen slightly better performance
using a GT 050Q connected via eSATA compared to FireWire 800. It’s only slightly better because the drive
itself is the limiting factor, not the speed of the bus. A single disk spindle can only play so many audio tracks
with edits, so using a faster connection to the drive doesn’t deliver a signicant increase in audio tracks.
However, some FireWire-based audio interfaces and external processors don’t play well with FireWire drives
on the same bus, so connecting your drive via eSATA makes lots of sense. Especially when you need the fast-
est speed possible for storage and the best reliability for your audio interface.
With your video applications
The EC2 card is now included in the purchase of a ForteRAID. In a video capture and editing environment,
the highest bandwidth possible is needed. The EC2 maximizes the connection to your storage, delivering
over 125MB/s of sustained transfer.
The EC2 supports all Serial ATA II features, including 3.0 Gbps SATA II transfer speeds, Native Command
Queuing, port multipliers with FIS-based switching, programmable output signal swing strengths for longer
external cables or extended backplanes, hot plugging, enclosure management and ATAPI device support.
Alternately, you may download the driver directly from the Silicon Image website.
Go to www.siliconimage.com and go to the support section. Find the SiI3132 PCI Express (1x) to 2 Port
SATA 300 and download the correct driver for your version of Mac OS X.
Make sure to download the BASE driver, not the SATARAID5 driver.
4. Follow the install steps in the Installer Package, and reboot your computer if necessary. Your eSATA con-
nected drives should mount on the desktop like the image below, right.