
Owner's manual


14
Frequently Asked Questions
Q: My Windows computer doesn’t show the drive in My Computer. What’s up?
The default format on the PortaGig 62 is for the Macintosh, and Windows doesn’t recognize it. Once you have connected the
PortaGig 62 to your Windows PC, you have to re-initialize it for use with Windows. For Windows XP/2000/Vista/7, that’s going to
be NTFS format; for Win98/SE, that will be FAT32 format (Windows XP and 2000 can also read FAT32). Detailed instructions for
re-initializing your drive are on the Glyph web site, or you may choose to follow the quick Windows formatting directions in the
previous section.
Q: My Macintosh OS X computer shows the drive on the Desktop but it says I can’t write to it. What’s up?
If you have formatted the PortaGig 62 for Windows (NTFS), Mac OS X will recognize it as an NTFS drive, but can only read from it
and can’t write to it. Once you have connected the PortaGig 62 to your Mac OS X computer, you should re-initialize it for use with
Macintosh. Instructions for re-initializing your drive are on the Glyph web site.
Q: How do I know if I have the correct version of Glyph Manager?
To get the latest version of Glyph Manager, go to the support section of www.glyphtech.com and download the version for your
operating system.
Q: Do I need to have Glyph Manager installed to use the PortaGig 62?
No, Glyph Manager is used for conguration and monitoring only. It is required to change drive conguration or monitor drive
health. It is not necessary to install Glyph Manager, but it is recommended.
Q: Do I need any drivers to use the PortaGig 62?
No drivers are required to read and write to the drive using eSATA, FireWire or USB. A driver is required to use Glyph Manager to
change conguration or monitor drive health. All necessary drivers are installed as part of the Glyph Manager installation.
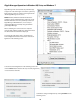
Mac OS 9 Formatting Instructions
Since Glyph drives come pre-formatted for Macintosh you don’t need to format them on installation. If you decide to reformat
or partition your drive at a later date, you can use the Erase Disk command in the Mac OS 9 operating system. This command will
erase all the data on a volume and create a new le system. Erase disk will not allow you to re-partition a FireWire drive or create a
dierent volume structure than what was previously there.
Caution: This procedure will destroy any data currently on the drive. Before formatting a drive, save any important data it contains.
1. Select the volume by clicking on it once in the Finder
2. Go to the Special menu and select Erase Disk... The Erase Disk dialog box opens to verify your decision to erase the disk.
3. In the Name eld, enter the new name for the disk or leave the name as it is.
4. In the Format drop-down menu, choose an Extended volume and click “Erase”.