
Owner's manual


8
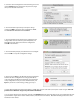
3. Un-mount the volume(s) associated with the unit you are conguring by dragging them to the trash in the Finder. This is very
important to ensure successful drive mode change because it forces Mac OS to “forget” the current conguration.
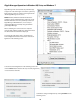
4. Click the Change Conguration button.
Glyph Manager Operation In Mac OS X
The PortaGig 62 ships in RAID 0 mode, and drive mode changes are done by using the Glyph Manager software utility (not the OS
X Disk Utility). Disk Utility is used to format the new device after drive mode changes are made.
READ THIS FIRST! Changing drive modes with Glyph Manager will require you to re-format the PortaGig 62, and result in erasing all of
the current data on the drive. Make sure you backup all data before doing so!
To change the drive mode, follow these steps:
1. Install Glyph Manager software.
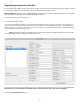
2. Connect the PortaGig 62 via FireWire or USB, and open Glyph Manager software. If you have more than one PortaGig 62 con-
nected, choose the desired unit from the list on the left. You can identify the units by their volume names, or by their PCBA serial
numbers, which are located on a sticker on the bottom of each unit. The serial number in Glyph Manager should match the last six
digits of the PCBA serial number on the sticker.
NOTE: To change drive modes, the PortaGig 62 must be connected via FireWire or USB. Glyph Manager will monitor an eSATA
connected PortaGig 62, but will not allow you to change drive modes.