
Owner manual


PAG E 6 I N S T RU CT IO N M A N UA L G D 9 5 20
Connect all four speakers as shown in the previous diagram.
Adjust the Fader control for the required front/rear balance.
If you wish to connect only two speakers, connect these to
the Rear speaker wires. The remaining speaker wires should
be insulated to ensure they cannot short circuit together or
to the vessel’s 12 Volt or negative electrical Bus. If using only
two speakers, adjust the Fader control to the rear speakers.
Antenna Connections
Connect an AM/FM marine antenna to the antenna
socket which extends from the rear of the GD9520. For
information on a suitable antenna, contact your nearest
GME branch or marine retailer.
Reset Button
When the installation is complete, remove the front panel
and press the Reset button using a paper clip or similar
object (see ‘INSTALLATION PRECAUTIONS’ on page 4).
This will ensure the GD9520 is ready to operate for the first
time. If at any time the controls do not seem to work (after
replacing the vessel’s battery for example), press the Reset
button to reset the microcomputer inside the GD9520.
FUSE REPLACEMENT
If any of the fuses blow, replace them with a standard
30 mm 3 AG type of the same rating, if the fuse blows a
second time contact your retailer.
The following fuse ratings are used:
-Yellow ‘Memory 12 V +’ lead: 15 Amp.
-Red ‘Ignition Switch ACC’ lead: 1 Amp.
OpEr aTiON
GENERAL FUNCTIONS
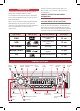
1
Power ON/OFF
To turn the GD9520
ON, press the PWR Button.
The unit
will resume the mode and settings that were selected when
last turned OFF.
To turn the GD9520 OFF, press the PWR button again,
note that when the G
D9520 is turned OFF the clock is
displayed without the backlight.
2
Audio/Volume Control
The Volume, Bass, Treble, Balance and Fader controls are
selected electronically. The default setting is the
Volume Control.
To select an alternative control, press the SEL button
3
until the desired function is displayed on the LCD. Each
press cycles to the next function in sequence. Adjustment of
the selected control function is made by the large
rotary knob
2
.
4
Loudness
Pressing the LOU button will provide a low frequency
(bass lift) boost to the audio output. To indicate selection
a ‘LOUD’ flag will be illuminated on the LCD. Pressing the
LOU button again will de-select the loudness function.
5
Mute
Pressing the MUT button will temporarily silence the
audio output. A flashing ‘MUTE’ is displayed on the LCD to
indicate the GD9520 has been muted. Pressing the MUT
button again will restore the previously selected audio level.
6
Clock
To display the current time, press the DSP button, after 5
seconds the display will automatically return to it’s
original status. The time is shown in the 24 hour format.
To set the clock, press and hold the DSP button until the
time display begins to flash.
The hour setting can then
be adjusted by rotating the Volume knob. To adjust the
minutes, press the DSP button a second time until the
minute segment begins to flash, then rotate the Volume
knob until the desired setting is obtained.
7
Mode
Pressing the MOD button will select the GD9520’s
operating mode. RADIO DISC or AUX IN modes are
sequentially selected as the MOD is pressed. When the
GD9520 is switched ON it will automatically return to the
mode it was in when switched OFF.
8
Local/Distance Control (RADIO mode only)
Pressing the LOC button selects an internal attenuator
which will help to reduce the interference and distortion
often associated with very strong local radio transmissions.
A ‘LOC ON’ or ‘LOC OFF’ message is briefly displayed on
the LCD to indicate selection or deselection of the Local
Distance Control.
9
Stereo/Mono Selector
Pressing the ST button selects either mono or stereo
reception. The unit will momentarily display ‘MONO’
or ‘STEREO’ when toggling the ST switch. The ST flag
is displayed when the GD9520 is in the stereo mode.
Selecting MONO improves reception when FM signals are
weak or noisy, by disabling stereo detection.
Select
stereo for normal listening on F
M radio bands, a
symbol is displayed when stereo signals are
being received.
RADIO OPERATION
10
Band Selector
To select the required radio band (AM1, AM2 FM1 FM2 or