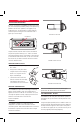
Gloss white art stock - 130gsm Trimmed document size: 148 mm (w) x 210 mm (h) 16 pages Book to be saddlestiched in 2 places Print 4 colour CMYK throughout Marine Stereo System GD9620W • GD9620B GD9640W • GD9640B I N s t r u c t i o n m a n u a l www.gme.net.
CONTENTS Features. . . . . . . . . . . . . . . . . . . . . . . . . . . . . . . . . . 2 CD/MP3/dvd operation. . . . . . . . . . . . . . . . . . . 10 ACCESSORIES SUPPLIED. . . . . . . . . . . . . . . . . . . . . . . 2 AUXILIARY INPUTS & OUTPUTS. . . . . . . . . . . . . . . . . 12 INTRODUCTION . . . . . . . . . . . . . . . . . . . . . . . . . . . . . 3 Front Panel Inputs. . . . . . . . . . . . . . . . . . . . . . . 12 Product Description and Model Designators. . . . . 3 Rear Outputs and Inputs.
Introduction Congratulations on the purchase of the GME GD9600 series Marine Stereo system, arguably the finest marine audio product available today. Your GD9600 has been designed with both the music buff and boat owner in mind. The GD9600 series has been developed by utilising a combination of the very latest in digital electronic technology and the design expertise gained by GME engineers over several decades of marine product development.
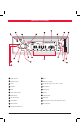
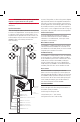
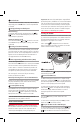
CONTROL LOCATIONS 17 5 16 1 8 4 21 7 14 9 3 12 6 10 19 20 11 2 15 18 13 1 2 3 4 5 6 Power On/Off 12 Eject Volume Control 13 Auto Music Search Select 14 EQ settings (Flat, Classic, Rock + POP) Loudness 15 Reset Button Mute 16 LCD Display CD Slot Clock/Time Selector 17 7 Mode Switch 18 8 LOC/DX Selector 19 USB Input 9 Stereo/Mono 20 Preset memory Keys and CD/MP3 functions.
INSTALLATION INSTALLATION PRECAUTIONS If you are connecting your GD9600 for the first time or have just reconnected your boat battery and you are experiencing problems with the unit’s operation, we suggest you try resetting the unit. The reset button is located under the volume face panel. Gently press the reset button with a paper clip or similar object.
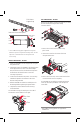
Flush Mount Support Strap Flush mounting - gD9640 Although the GD9640 is a bracket mounted unit, it can be flush mounted by following the disassembly instructions below. Rear centre Screw with Spacers Rubber gasket Screw Screw Strap Screw Screw * Use the rubber mounting gasket supplied. Place the gasket between the plastic housing and the mounting surface. This will improve the contact between the mounting surface and stereo housing. 1. Remove the 4 screws from each cable clamp panel at rear. 2.
Removing the Clear Cover If your GD9600 will be mounted in a dry protected location away from the possibility of water ingress, the front clear cover can be permanently removed. 3. Connect the Black wire to the battery’s negative terminal or to the common negative bus in the electrical system. NEG 1. Remove the 4 screws from the top and bottom inside edge of the mount frame as shown above. Remove top latch assembly and clear cover. Screw Caps YELLOW 15 AMP RED 0.
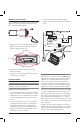
Caution: The GD9600 is a four-speaker system that requires 2 separate wires for each speaker. A range of GME speakers are available from your local GME retailer. Speaker Connections When connecting the speakers, observe the correct polarity as shown in the diagram below. Incorrect polarity will result in a reduction of bass response and stereo effect.
7 OPERATION GENERAL FUNCTIONS 1 Power ON/OFF To turn the GD9600 on, press the PWR Button. The unit will resume the mode and settings that were selected when last turned off. While the GD9600 is switched on, briefly press the power button to change the brightness of the back lighting. There are three levels of back lighting available. To turn the GD9600 OFF, press and hold the PWR button again. Note that when the GD9600 is turned OFF the clock is displayed without the backlight.
Band Selector To select the radio band (AM1, AM2, FM1, FM2 or FM3) sequentially press the BND button until the required band is selected. 11 Tuning/Selecting Tracks/Chapters Manual Tuning To tune the radio manually, momentarily press the or button to select the desired frequency. Each press will step the frequency by 50 kHz. Automatic Tuning (Seek) or buttons for 3 seconds. Press and hold either the The GD9600 will stop seeking when a strong, clear station is detected.
To step immediately to the start of the track currently being played, press the button once. The current track will immediately restart. Press the button repeatedly to locate the start of previous tracks. 11 Pause To pause playing the CD/DVD, press the button once. The disc symbol on the LCD will stop rotating when the pause function has been selected. Press the button again to resume playing the CD/DVD.
Precautions for CD-R and CD-RW Discs AUXILIARY INPUTS & OUTPUTS The GD9600 will not play a CD/DVD that has not been finalised, please refer to the instruction manual of the software or the recorder you are using to write these CDs for the finalisation process. To maximise the owner’s listening flexibility and pleasure the GD9600 has several auxiliary inputs and outputs.
To make individual selections from the GD9600 controls press the AMS button. ‘Menu’ is displayed on the GD9600. During this time, press the AMS button to step back through the iPod screen menus, rotate the Volume control to highlight items on the iPod screen and press BND to make a selection. To exit the GD9600’s iPod ‘Menu’ function press SEL or wait a few seconds and the menu will time-out. Normal AMS, Volume and BND functions will resume. To select another song press back through the song list.
OPTIONAL ACCESSORIES There are a number of high quality GME accessories available to enhance your marine entertainment experience. These accessories are available through your local GME retailer, should you have any difficulty in obtaining any GME accessory, please call or email your local GME Sales Office (within Australia and New Zealand). Contact details are listed on the back page of this manual. International customers should also refer to the back page for details of your local importer or visit: www.
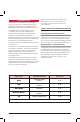
GD9600 Trouble Shooting Guide Symptom No Power. C ause Solution Vessel’s battery switch is not on. Check master switch if fitted. One of the fuses is blown. Replace the damaged fuse with the correct value. Error messages displayed on LCD or functions not operating. Microprocessor lock up. Press Reset Button. Poor radio reception. Damaged or incorrect type of antenna. Check antenna and replace if necessary. CD/DVD cannot be loaded. There is already a CD in the player.
WARRANTY GME AFTER SALES SERVICE GME limit this warranty to the original purchaser of the equipment. GME warrant this product to be free from defects in material and workmanship for a period of twelve (12) months from the date of purchase from their authorised retailer. Should the product require servicing during this period, all labour and parts used to effect repairs will be supplied free of charge.
GD9600 series flush mount cutting template 197 mm Outer edge of unit Inner edge of unit - Cut out 68 mm Part Number: 310390 Drawing Number: 43686-3