CONTENTS FEATURES
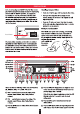
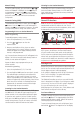
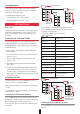
PRECAUTIONS Reset Button CONTROLS 1 2 5 3 6
or VOL buttons) to restore the output volume to normal levels. 14 The RPT (repeat) button causes the current track on the CD or MP3 to be played repeatedly. 7 Press the PWR button to turn the GR968 ON or OFF. 15 8 Press the SEL button briefly to select the next available control. The options available are Volume, Bass, Treble, Balance and Fader. Press the SHF (shuffle) button to play all the tracks on the CD or MP3 in random order.
Refitting 1. Make sure the face panel is the right way up, as it cannot be attached upside down. 2. Fit the right-hand end of the face panel into the tabs inside the right hand end of the unit. 3. Gently press the left-hand end of the face panel into place until it clicks. Only light pressure is required. OPERATION GENERAL FUNCTIONS Power ON/OFF To turn the radio ON, press the PWR button. The unit will resume the mode that was selected when last turned off. To turn the unit off, press the PWR button again.
Manual Tuning Selecting Pre-Set Station Memories To tune the radio manually, press and hold the or button until ‘Manual’ is displayed. Use the button to step downward in frequency and to step upward in frequency. If the and tune buttons have not been pressed for several seconds it will return to automatic tuning mode. To manually select a pre-set station memory, briefly press the desired station memory button 1 – 6.
will decrease rapidly. Release the button to continue playing the present track at the normal speed. Note: If the ejected disc is left in the slot it will be drawn back into the player automatically after 10 seconds for protection. Step to the Next Track SETTING THE CLOCK To step immediately to the start of the next track, press the button once. The next selected track will begin playing. Press the button repeatedly to advance to the start of successive tracks. The GR968 has a built in 24-hour clock.
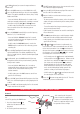
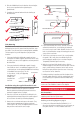
MOUNTING BRACKET 4. Slide the GR968 back into the bracket slots and adjust for the correct position before tightening the gimbal knobs. NUT 5. Complete the antenna lead and electrical wiring as described later. NUT PERFORATED STRIP OR ESCUTCHEON FLUSH MOUNT 30˚ 30˚ MOUNTING BRACKET 30˚ 30˚ IMPORTANT DRAW AROUND THIS EDGE 70 mm 200 mm OVERHEAD MOUNT ON DASH MOUNT Flush Mounting 4.
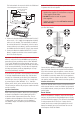
This lead maintains the memories within the GR968 and is the main power source for the unit. Caution: The GR968 is a four-speaker system that requires 2 separate wires for each speaker. External Aux. Switch (Optional) • DO NOT connect the negative (-ve) terminals of the speaker wires together or connect them to any part of the negative electrical Bus. Memory 12 V+ NEG • DO NOT short the +ve and –ve speaker wires together.
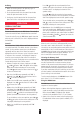
Fuse Replacement Root Directory If any of the fuses blow, replace them with a standard 30 mm 3 AG type of the same rating, if the fuse blows a second time contact your Dealer. Directory The following fuse ratings are used: - Yellow ‘Memory 12 V +’ lead: 15 Amp. - Red ‘Ignition Switch ACC’ lead: 1 Amp.
Enter in the name or part of the name of the file or directory using the corresponding buttons in the table, using the SEL button to select each character, and press the ENTER button to begin the search. displayed followed by the name of the current file being played. Press the and buttons to search for the file. Press the ENTER button to play the selected file. The unit will search for files or directories that have the same characters that you have entered.
SPECIFICATIONS AUDIO AMPLIFIER FM RADIO Frequency range: Frequency Step: Intermediate Frequency: Sensitivity (30 dB S/N): Channel Separation: Station Memories: Audio Output: (4 Channels x 25 W Peak = 100 W Peak) @ 10% THD Speaker Impedance: 4 Ohm Frequency Response: 40 Hz – 18 kHz Bass Adjustment Range: +/- 10 dB @ 100 kHz Treble Adjustment Range: +/- 10 dB @ 10 kHz 87.5 – 108 MHz 50 kHz 10.