CD/MP3 Player AM/FM Radio INSTRUCTION MANUAL
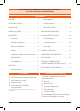
GME STRONGLY RECOMMENDS THAT YOU KEEP THIS MANUAL IN A SAFE PLACE FOR FUTURE REFERENCE CONTENTS FEATURES. . . . . . . . . . . . . . . . . . . . . . . . . . . . . . . . 2 Radio Operation. . . . . . . . . . . . . . . . . . . . . . . . 7 ACCESSORIES SUPPLIED. . . . . . . . . . . . . . . . . . . . . 2 CD/MP3 Operation. . . . . . . . . . . . . . . . . . . . . . 8 INTRODUCTION . . . . . . . . . . . . .
INTRODUCTION Congratulations on your purchase of the GME RC900 CD/MP3 Player/ AM FM Radio, arguably the finest audio product available today. Your RC900 has been designed with the music buff in mind. By way of a host of features never before found in a in vehicle stereo system, the RC900 offers music enthusiasts the same level of audio quality normally reserved for high end home systems.
LOCATION INSTALLATION PRECAUTIONS If you are connecting your RC900 for the first time or have just reconnected your vehicle battery and you are experiencing problems with the unit’s operation, we suggest you try resetting the unit. The reset button is located on the front panel below the volume control. Gently press the reset button with a paper clip or similar object.
6. Insert the RC900 in the Mounting Frame. 3. Connect the BLACK wire to the battery’s negative terminal or to the common negative bus in the electrical system. 7. Attach the support strap provided to the rear of the RC900 and fastened strap to dash framework or added support. BLUE AUTO ANTENNA 12 V+ OUT Screw Strap Screw 8. Reattach the front panel surround.
FRONT RIGHT + GREY FRONT RIGHT – GREY/BLACK REAR RIGHT + PURPLE REAR RIGHT – PURPLE/BLACK REAR LEFT – GREEN/BLACK REAR LEFT + GREEN FRONT LEFT – WHITE/BLACK FRONT LEFT + WHITE Ipod WHITE Lch WHITE Rch RED GREY REAR AUDIO OUT Lch WHITE Rch RED BLACK FRONT AUDIO OUT work (after replacing the vehicle’s battery for example), press the Reset button to reset the microcomputer inside the RC900. FUSE REPLACEMENT If any of the fuses blow, replace them with a standard 30 mm 3 AG type of the same rating.
4 RADIO OPERATION Loudness Pressing the LOU button will provide a low frequency (bass lift) boost to the audio output. To indicate the selection ‘LOUD’ will be illuminated on the LCD. Pressing the LOU button again will de-select the loudness function. 5 Mute Pressing the MUT button will temporarily silence the audio output. ‘MUTE ON’ is displayed on the LCD to indicate the RC900 has been muted. Pressing the MUT button again will restore the previously selected audio level.
14 Scan 11 In the TUNER mode, press and hold the SCAN button for 1 second. The RC900 will scan the selected radio band for all available stations, pausing briefly at each to let you decide whether you wish to listen to this particular station. To exit the Scan mode, press the SCAN button again. Manually Selecting the Preset Station Memories Briefly press the desired station memory 1- 6. The RC900 will jump immediately to that station and the memory number will appear on the LCD.
4. With the required folder selected, press the SEL button’ to confirm. The LCD will display the total number of tracks (e.g. TOL 10) in your selected folder. MP3 MUSIC SEARCH Track Search To search for a specific track (from 1 – 999); 1. Press the AMS button once. ‘TRK SCH’ is displayed. 2. Rotate the volume knob to select the first digit (1-9) of the required track, then wait for 2-3 seconds until the next digit flashes. Repeat to select up to 3 digits. 3.
CONFIGURATION MENU TABLE Function Options Description Beep On I Off Enables/disables confirmation beeps on key presses Audio Response User Set I Flat I Classic I Rock I Pop Selects preset audio responses for various music styles. Select ‘User Set’ if you prefer to manually adjust the audio response using the Bass/Treble controls. Volume Last I Default Set the volume level used when the radio is turned on. Select ‘Last’ to restore the volume to the last used setting.
to highlight items on the iPod screen and press BND to make a selection. To exit the RC900’s iPod ‘Menu’ function press SEL or wait a few seconds and the menu will time-out. Normal AMS, Volume and BND functions will resume. To select another song press back through the song list. or REAR OUTPUT The RC900 series has front and rear, right and left channel, low level audio output lines. Owners may use these outputs to drive external booster amplifiers should they require supplementary audio output power.
RC900 TROUBLE SHOOTING GUIDE S Y M P TO M No Power. C AU S E SOLUTION Vehicles battery switch is not on. Check master switch if fitted. One of the fuses is blown. Replace the damaged fuse with the correct value. Error messages displayed on LCD or functions not operating. Microprocessor lock up. Press Reset button. Poor radio reception. Damaged or incorrect type of antenna. Check antenna and replace if necessary. CD cannot be loaded. There is already a CD in the player.
SPECIFICATIONS* FM RADIO AUDIO AMPLIFIER Frequency Range: 87.5 - 108 MHz (Eu./Aust./N.Z.) 87.5 - 107.9 MHz (U.S.A.) Frequency Step: 50 kHz (Eu./Aust./NZ) 200 kHz /USA Audio Output: (4 channels x 45 W Peak = 180 W Peak) @ 10% THD. Speaker Impedance: 4 Ohm Bass Adjustment Range: +/- 10 dB Intermediate Frequency: 10.
STANDARD COMMUNICATIONS WARRANTY AGAINST DEFECTS This warranty against defects is given by Standard Communications Pty Ltd ACN 000 346 814 (We, us, our or GME). Our contact details are set out in clause 2.7. This warranty statement only applies to products purchased in Australia. Please contact your local GME distributor for products sold outside of Australia. Local distributor details at www.gme.net.au/export. 1. Consumer guarantees 1.
Flush Mount Cutting Template 184 mm 178 mm 55 mm 49 mm 6 mm drill 6 mm drill
Part No: 310519 Drawing No: 45428-5 INSTRUC TION MANUAL RC900 SERIES