
User manual

10.7 Documentation
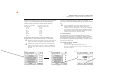
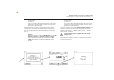
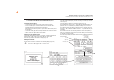
After pressing the [OK] button, the display changes to the ‘Test result’
screen (Fig. 27).
Here you can see all the measurement results with the related limit values.
If the measurement results of the electrical values, the visual inspection and
the function test were all in order, the following message appears:
‘Test OK’.
If the test was not successful the message says:
‘Test not OK!’.
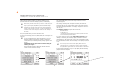
At this point you can cancel the test with the [Cancel] button (the display
goes back to the ‘Settings for measuring’ screen) or switch to the ‘Memory
menu’ with the [->Next] button.
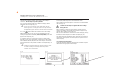
In the ‘Memory menu’ (Fig. 28) you can use the function button [Change
memory] to switch the storage location for measurement results between
the device-internal memory and the MMC memory card.
The current setting is shown in the menu headline.
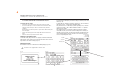
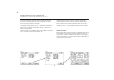
With the [Save] button the display changes to ‘Enter appliance identification’.
Here you can enter a max. 10-character test object ID number or read it in
from the barcode label with the optionally available barcode scanner (Fig. 29).
The barcode scanner is connected to the RS232 socket of the
tester
Fig. 27 Fig. 28 Fig. 29
27
Operating manual for the TG uni 1 appliance tester
Conducting tests in accordance with VDE 0701 and 0702 - PC I
f
f
f
f
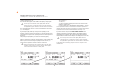
Symbols for memory settings:
- internal memory
- MMC memory card
&&
&&
&