
User Manual


5
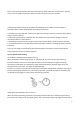
Note: To ensure the best possible operation of the Airlink 2 always make sure it is placed out in the open
with a clear line-of-sight between the Airlink 2 and the hearing instruments to be fitted.
3) Performing a wireless fitting can sometimes be challenged due to number of factors related to
equipment setup, and the physical layout of the fitting environment.
• Place Airlink 2 on the table with a clear line of sight to the hearing instruments, which should be within a
range of 10 feet (3 meters).
• Avoid placing the Airlink 2 in a USB hub with other USB devices (e.g. Bluetooth dongle), as this can
decrease the efficiency of the Airlink 2.
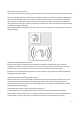
• When fitting hearing instruments inside a sound booth place the Airlink 2 inside or close to the booth.
• It is recommended not to use USB cables between the Airlink 2 and the PC exceeding a length of 10 feet
(3 meters).
4) You are now ready to start fitting wireless ReSound, Beltone and Interton products using ReSound
Aventa, Beltone Solus Pro and Interton Appraise.
Tips for optimal wireless fitting
Let the battery breathe/oxygenize before inserting
When performing a wireless fitting, always use new batteries. The most common type of hearing
instrument batteries are zinc-air. These types of batteries are activated by the oxygen in the air. By
removing the small sticker from the battery, oxygen activates the battery. Because oxygen must pass
through fine holes and a filter, the oxygen is absorbed slowly.
Therefore, it is important to wait 2 full minutes after removing the battery sticker and before inserting the
battery and closing the battery door on the hearing instrument. If inserted prematurely, the battery may
not absorb enough oxygen to properly power the hearing instrument.
Always open/close the battery door to connect
When connecting the hearing instruments to the fitting software make sure to always bring the hearing
instruments into “Fitting mode” by rebooting them. This is done by opening and closing the battery door of