
User Manual


3
Checking the system
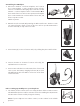
7. Switch on the headset connection by pressing the link button (VIII) on the
remote unit. The on-line indicator (III) on front of base unit will light up and
the on-line indicator (V) on top of remote unit starts flashing. The system is
now working.
If the lights are off, the system is in handset mode. Press the link button
(VIII) once to switch to headset mode. If the on-line indicator does not flash,
recheck assembly from Step 1.
Setting up GN Ellipse to your telephone
Do not use the Link button during the set-up. Lift of the handset manually (or, if
available on your telephone, press the headset button).
8. Put on your headset.
9. Lift the handset of the telephone manually (or, if avail-
able on your telephone, press the headset button)
and listen for a dial tone in your headset.
10. If there is no dial tone, adjust the telephone termination switch (II) at the rear
of base unit. Move from A to G until the dial tone is clear. If the dial tone is just
as clear in position A as in G, leave switch in position A.
Adjusting microphone volume
11. Put on your headset. Lift the handset of the telephone manually
(or, if available on your telephone, press the headset button) and listen for
a dial tone in your headset.
12. Call someone and ask the person to help you evaluate the volume of your
voice.
13. Adjust the microphone volume control (I) from 1 to 8 by talking in the headset
in each position. When the person you are talking to finds the sound level
good, you have the correct setting. If the best setting is 7 or 8, you may have
to move the telephone termination switch (A-G) to G.
Functions on the remote unit
Adjusting the volume
14. To turn up or reduce volume in your headset, press successively towards + or
– on the volume control (VI) on the remote unit. When the volume reaches
maximum or minimum, you will hear a signal in your headset (see Technical
Data).