ENG Guide for additional functions GN Netcom (UK) Ltd. Sales office Runnymede House 96/97 High Street, Egham GN Netcom, Inc. 77 Northeastern Boulevard Nashua, NH 03062 USA Surrey TW20 9HG United Kingdom Tel: (800) 826 4656 Tel: + 44 (0) 1784 220140 Fax: + 44 (0) 1784 220141 Tel: +1 603 598 1100 Fax: +1 603 598 1122 www.gnnetcom.com/US/EN www.gnnetcom.
GN 9350/GN 9330/GN 9330 USB Guide for additional functions This Guide for additional functions supplements the GN 9350/GN 9330/GN 9330 USB Guides for basic set-up and use. It provides instructions and information on the GN 9350’s/ GN 9330’s/GN 9330 USB’s additional functions, features, accessories and maintenance. The Guides for basic set-up and use provide the basic instructions for setting up and using your GN 9350/GN 9330/GN 9330 USB.
4. Operating the headset . . . . . . . . . . . . . . . . . . . . . . . . . . . . . . . . . . . . . . . . . . . . . . . . 10 4.1 Making/ending calls via telephone with RHL function . . . . . . . . . . . . . . . . . . . . . . . . . . . . . . . . . 4.2 Answering calls via telephone with RHL function . . . . . . . . . . . . . . . . . . . . . . . . . . . . . . . . . . . . . . 4.3 Conference calling. . . . . . . . . . . . . . . . . . . . . . . . . . . . . . . . . . . . . . . . . . . . . . . . . . . . . . . . . .
1. Product information The GN 9350/GN 9330/GN 9330 USB are fully wireless, robust headset solutions. They all share hands-free working efficiency, wireless mobility, useful features, and many customizing and accessory options.
2. Setting up This section contains set-up and connection instructions for your headset’s accessories and optional functions. Note: Your Guide for basic set-up and use contains the primary set-up and connection instructions. GN 9350 GN 9330 GN 9330 USB 2.1 Headset port If your telephone has a port for headset, it is recommended to leave the handset cord in the telephone. Connect the telephone’s headset port to the telephone port on the base.
GN 9350 GN 9330 GN 9330 USB 2.4 Connecting to external Online Indicator (OLI) (GN Netcom accessory) An external online indicator (accessory) can be placed on your desk or near your telephone to indicate when you’re on a call. To connect to an external OLI: Plug cord from OLI to base’s OLI port. GN 9350 GN 9330 GN 9330 USB 2.
3. Make a call to someone who will act as a test person. 4. Use 56 to scroll through 12-setting transmit volume menu confirms your voice is at the appropriate volume. 5. Press OK to confirm new setting. until your test person The transmit volume menu is the permanent default/start position for the LCD display. After adjusting any of the other settings via the display, it will revert to the transmit volume menu position. Important: For USB applications, the volume settings are fixed and need no adjustment.
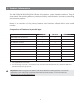
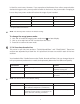
is ideal for most users. However, if you experience interference from other communication devices during your calls, you may want to switch to the Low or Very Low modes. Changing to Low or Very Low power modes will reduce the range of your headset. Power mode Range* DECT Range* US DECT Normal Up to 100 m Up to 300 ft Low Up to 50 m Up to 150 ft Very Low (V. low) Up to 20 m Up to 60 ft * In typical office environment Note: The Normal power mode is the default setting.
Note: Switch is the default setting. To change the sound mode: 1. Use 34to locate the sound mode menu on base display. 2. Use 56 to select one of the 3 modes from the menu, and choose between fixed/switched from the menu. 3. Press OK to confirm the setting. 2.5.5 Protection level selection Your headset offers a choice of 4 protection levels (plus its additional basic protection level).
Automatic volume adjustment and noise reduction Your headset offers two built-in features which give you optimum sound levels and quality. Both features operate automatically, so you need not make any adjustments to the headset. Automatic volume adjustment The automatic volume adjustment feature automatically sets the volume levels of all calls, so that each call is heard at the same, consistent volume you have set. Autovolume is not enabled in protection level 0.
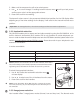
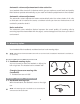
GN 9350 GN 9330 GN 9330 USB 3.3 Ear hook wearing styles You can choose to wear the headset on either the left or right ear. The headset can be rotated 360˚. Changing ear hook wearing side 1. Flip the ear hook over. 2. Rotate the ear hook 180°. GN 9350 GN 9330 GN 9330 USB 3.4 Changing wearing styles All wearing styles (headband, neckband and ear hook) are interchangeable. To change any wearing style (for example, from headband to ear hook): 1. Unclip headset from the current wearing style. 2.
1. Ensure telephone mode is selected. 2. Remove headset from base, or press headset’s talk button if already wearing it. –> RHL/EHS function will activate (handset lifts/telephone line connection opens). 3. Dial desired number. 4. Replace headset in base, or press the headset’s talk button. –> RHL/EHS function will deactivate (handset lowers/telephone line connection closes). GN 9350 GN 9330 GN 9330 USB 4.2 Answering calls via telephone with RHL/EHS function 1. The telephone rings. 2.
Important: Steps 2 to 4 may be repeated twice for 2 more secondary headset participants. 5. Use the primary headset’s telephone/VoIP application to dial desired number and initiate conference call. At any point during a call in progress, you may add secondary headsets to form a conference call. A maximum number of 4 headsets (1 master plus up to 3 secondary) may join a conference call. Ending conference calls for all participants 1. Place primary headset in its base, or press its talk button.
• • Press the headset’s talk button. Press the base’s telephone mode button. –> The headset’s link indicator will stop flashing to indicate that the headset-base link has been closed. Important: If using electronic hookswitch on your telephone, do not place the headset into the charging cradle, and do not press the headset´s talk button or press the base´s telephone mode button, as this will disconnect the call.
5. Use with DECT cordless telephones GN 9350 GN 9330 GN 9330 USB Your headset can also be used with DECT cordless telephones (Digital Enhanced Cordless Telecommunication), which are GAP-compatible (Generic Access Profile). You must first pair the headset to the base unit of the cordless telephone. Important: Your headset’s authentication code is 0000, which is the same code as for most DECT cordless telephones. Your headset will only work with cordless telephones with the 0000 code.
GN 9350 GN 9330 GN 9330 USB 6.2 Replacing the battery pack The headset’s battery pack can be changed when required. To replace the battery pack on a wearing style: 1. Unclip the wearing style from the battery pack. 2. Slide the battery pack off the headset. 3. Slide the new battery pack (from the extra battery charging facility) onto the headset. The headset’s link indicator will light for 2 seconds to confirm successful replacement of the battery pack. 4. Replace the wearing style. 5.
GN 9350 GN 9330 GN 9330 USB 7.2 Headset’s visual indicators Visual indication Headset action Link indicator (blue) Flashing when linked up Lit for 2 seconds Successful pairing, including adding headsets in conference mode Lit (during adjustment) Receive volume reorientation (+/-) is being adjusted Flashing rapidly Headset in DECT/GAP mode GN 9350 GN 9330 GN 9330 USB 7.
8. Troubleshooting GN 9350 GN 9330 GN 9330 USB Q: Nothing happens when I try to adjust the clear dialtone. A: Make sure the base is set for telephone mode and the link is established (telephone button’s indicator on base is flashing). Also ensure that the telephone is activated (handset is off the hook or line button is pressed). Q: I am getting a buzzing sound on my headset. A: If the unit has been correctly set-up, your telephone may not be fully immune to the radio signals the headset uses.
Q: My telephone should be able to operate with the EHS version of GN Netcom, but I cannot make it work. A: Please refer to www.gnnetcom.com/gn9300/support for more information, including compatibility and the correct, clear dialtone switch setting. 9. Maintenance, safety and disposal Maintenance The headband, boom arm and ear hook can be wiped with a dry or slightly damp cloth. The cords and base unit can be dry-dusted as required. The leatherette ear cushion(s) can be cleaned or replaced.