
User Manual


[page 4] | gpelectric.com
®
Welcome to the Go Power! Portable Solar Kit Installation Guide. Please read all instructions contained within this manual to gain a full
understanding of how to install and use this product. Please visit gpelectric.com for the most current version of this manual.
Visit our Go Power! By Carmanah YouTube channel to watch a two minute video on setting up a portable solar kit.
Veuillez visiter gpelectric.com pour la version française de ce manuel de l’utilisateur
Visite gpelectric.com para la versión en español de este manual del usuario
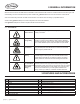
2.1 WARNINGS
Disconnect all
power sources
Electricity can be very dangerous. Take appropriate caution when
making connections.
Battery and
wiring safety
Observe all safety precautions of the battery manufacturer when
handling or working around batteries. When charging, batteries
produce hydrogen gas, which is highly explosive. Ensure batteries
are in a well-ventilated space, away from sparks for open ames.
Wiring
connections
Ensure all connections are tight and secure. Loose connections
may generate sparks and heat. Be sure to check all connections
before using the portable solar kit.
Observe correct
polarity
Reverse polarity of the battery terminals and array will cause the
controller to give a warning tone. The controller will not function
unless battery terminals are connected to a battery with proper
polarity. Failure to correct this fault could damage the controller.
Do not exceed
the GP-PWM-10
amp current and
max voltage
ratings
The current rating of the solar system is the sum of the
Maximum Power Current (Imp) of the solar PV strings in parallel.
The resulting system Imp current is not to exceed 10A. The voltage
of the array is the rated open circuit voltage (Voc) of the PV array
and is not to exceed 28V. If your solar system exceeds these
ratings, contact your dealer for a suitable controller alternative.
2.GENERAL INFORMATION
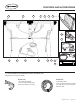
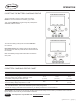
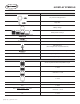
3.FEATURES AND ACCESSORIES
Description No Description
1 Handle 10 Fuse
2 Latches 11 Protective carrying case
3 Aluminum frame 12 Corner protection
4 Aluminum support legs 13 Protective feet
5 Solar charge controller 14 Quick connect dust cover
6 Junction box 15 Ring terminals (for permanent mounting)
7 Cables 16 SAE Solar Plug (for connecting to RVs)
8 Battery clamps 17 2-Pin XLR Connector to Anderson Connector
9 Quick connect cable