
User Manual


[page 6] | gpelectric.com
®
When the Portable Solar Kit is connected to the battery, the
controller will go into Power Up mode.
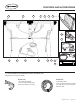
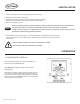
1. Locate a sunlit area, free from overhanging branches or obstructions.
2. Remove solar panel kit from carrying case.
3. Unclip the two latches on the side of the unit and fold the two panels outward.
Extend the two support legs to their maximum length and lock in position.
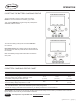
4. Place solar panel facing the sun.
Avoid any shading no matter how small. An object as small as a broomstick held across the solar module may
cause the power output to be reduced. Overcast days may also cut the power output of the module.
To obtain maximum output it is suggested that the panel’s direction be frequently adjusted to track the sun’s
movement throughout the day (southerly exposure).
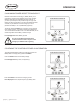
5. Connect battery clamps to the positive (red, +) and negative (black, -) battery terminals. Ensure that the
connection is secure. Connect the battery clamp cable to the rest of the solar panel cable using the quick
connect cable.
Ensure the battery clamps do not come in contact with one another.
Do not let water come into contact with the controller.
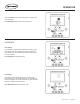
5.1 CONTROLLER POWER UP
Icons Displayed: All segments of the numerical display;
Backlight blinks
Depending on the battery voltage when the GP-PWM-10 Power
Up occurs, the controller may do a Boost Charge or quickly go
into Float Charge. The Charging Prole selected will commence
the following day after a Power Up (refer to the Charging Prole
Chart on page 4 for more details).
Note
4.INSTALLATION
5.OPERATION