
Owners manual
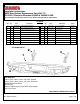

REV. DATE: 4/8/2016 Page 2 of 6
Important Installation Notes and Suggestions
To maintain and care this product keep it clean and do not use abrasive cleaners or polish waxes.
Texture Painted Finish: Mild liquid detergent may be used. Polished Stainless & Semi-Gloss Painted Finishes: We
recommend using only non-abrasive automotive wax such as pure carnauba to avoid scratches and rust.
The spare tire winch access cover and lock in the factory bumper will not be reinstalled in the bumper
replacement, as the winch will now be accessed through the hole provided in the bumper replacement.
Read the installation instructions completely and verify that all of the parts listed are accounted for. If you have
defective, missing or damaged parts or need assistance, please contact Go Rhino Products for fast, friendly
customer service at: (888) 427-4466 or email: sales@gorhino.com
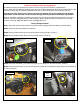
Factory Bumper Removal
Step-1 Lower and remove the spare tire to access the factory bumper attachment bolts and vehicle wiring.
Step-2 Disconnect the vehicle battery or batteries.
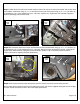
Step-3 Disconnect the trailer plug wiring harness from the factory bumper, (Photo 1).
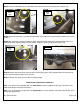
Step-4 Disconnect the bumper wiring harness from the vehicle, (Photo 2).
Step-5 Remove the M8 bolts (1) per side securing the factory bumper to the receiver hitch, (Photo 3).
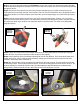
Step-6 Remove the M14 bolts (1) per side securing the receiver hitch and factory bumper bracket to the bottom of
the frame, (Photo 4).
#3
#4
Driver
Side
#1
#2