
Owners manual

REV. DATE: 4/8/2016 Page 4 of 6
Step-1 If the vehicle is equipped with rear Park Assist, remove each sensor from the bezel by gently spreading
the bezel tabs and pulling out on the back of the sensors. Note: Do not push on the front of the sensor as this may
damage the sensor.
Step 2 Remove the sensor bezels from the factory bumper by depressing the (4) tabs around the base and
pushing the bezel out through the front of the bumper. Note: The sensors and bezels have to be positioned in the
replacement bumper in the same location (inner and outer), (driver and passenger) as removed from the factory
bumper.
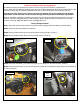
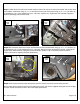
Step-3 Install the sensor bezels and sensors in the (inner and outer) bezel plates, (Photo 1 & 2). Line up the
protrusions on the bezel with the profile in the bezel plate; push the bezel through the profile in the plate until the
tabs around the base lock in position, then install the sensor in the bezel. Note: The notch in the bezel plate
designates the top.
Step-4 Prepare the inside surface of the bumper shell where the bezel plates will be mounted with Isopropyl
alcohol. A clean, dry surface is required in order for tape to stick properly.
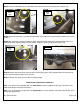
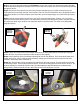
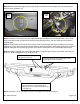
Step-5 Peel the backing off from the double sided tape to uncover the adhesive. From inside the bumper shell
position each bezel, sensor and bezel plate assembly, making sure the sensor bezel is centered in the hole
provided in the bumper shell, (Photo 3 & 4).
Step-6 Stick the assembly in place and apply firm pressure for about 30 seconds. The tape needs to bond with
the mounting surface, and it needs pressure to do this. The bezel mounting plate will seem like it is stuck on, but
continue pressing for at least 30 seconds. Note: At room temperature approximately 50% of ultimate bond
strength will be achieved after 20 minutes, 90% after 24 hours and 100% after 72 hours.
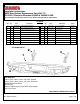
#1
Driver &
Passenger
Side Inner
#2
Passenger
Side Outer
#3
Passenger
Side Outer
#4
Passenger
Side outer