
Owners manual
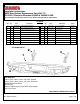

REV. DATE: 4/8/2016 Page 5 of 6
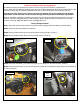
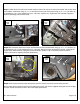
Step-7 Position the driver side frame bracket inside the frame rail and secure the frame bracket and receiver hitch
to the bottom of the frame using (1) ½” x 2” hex bolt and to the side of the frame using (2) ½” x 1 ½” hex bolts, (6)
½” flat washers, (3) ½” lock washers and (3) ½” Hex nuts, (Photo 5 & 6). Tighten the nuts and bolts. Repeat to
install the passenger side frame bracket.
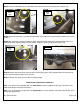
Step-8 With assistance attach the bumper shell brackets to each frame bracket using (2) ½” x 1 ½” hex bolts, (4)
½” flat washers, (2) ½” lock washers and (2) ½” Hex nuts, Align the bumper shell with the vehicle, verify that the
tailgate clears when lowered, and tighten all nuts and bolts, (Photo 7 & 8). If necessary loosen the frame /
receiver hitch bolts to adjust the bumper replacement.
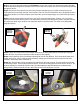
Step-9 Reconnect the factory bumper wiring harness to the sensors and to the vehicle wiring harness.
Secure (cable tie) the spare tire winch access tube to the frame, and use the supplied rectangular and round plug
to fill the unused access tube holes in the rear bumper replacement.
#7
Driver
Side
#8
Driver
Side
#5
Driver
Side
#6
Driver
Side