
Owners manual

REV. DATE: 4/8/2016 Page 6 of 6
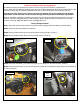
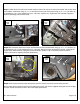
Step-10 Remove the trailer plug from the factory bumper and install it in the bumper shell, and reconnect the
wiring harness, (Photo 9 & 10).
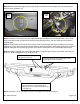
Step-11 Install the license plate using the supplied LED lights and fasteners to the bumper shell. Use a circuit
tester to find the hot and ground from the factory license plate light wiring, and then splice the wires from the
supplied lights.
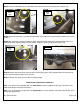
Step-12 The spare tire winch access cover and lock in the factory bumper will not be reinstalled in the bumper
replacement, as the winch will now be accessed through the hole provided in the bumper replacement. Install the
supplied rectangular and round plugs to fill the unused winch access tube holes in the bumper replacement.
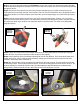
Step-13 Install the supplied flush mount light pods plates or optional light mounts to the bumper shell using (4)
10-32 x ¾” button head bolts and (4) 10-32 lock nuts.
Step-16 Remember to check and retighten all factory and supplied nuts and bolts periodically.
#9
Driver
Side
#10
Driver
Side
Install the license plate using the
LED lights and fasteners.
Install the rectangular and round plugs to fill the
unused winch access tube holes.
Install the flush mount light pods plates or
optional light mounts to the bumper shell
using (4) 10-32 x ¾” button head bolts and (4)
10-32 lock nuts.