
Installation Guide

HitchStep
™
Installation Instructions
�
™
/
\
™
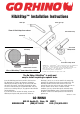
The Go Rhino HitchStep
™
is quick and
easy to install requiring no special tools.
Insert the Hitch Step post into the vehicle's hitch receiver.
The Hitch Step has 3 holes for alignment. Position the
HitchStep to your liking and align up the nearest hole with
the hole in the receiver. Push hitch pin through the holes
and secure with the hitch pin clip provided. Note: You may
prefer to use a locking hitch pin, any popular make will work
with the HitchStep.
If you need to use the receiver for towing, remove the
HitchStep and replace with your tow hitch. When the
HitchStep is not in use, it can be stored in the storage bag
provided. This will keep the inside of your vehicle clean. The
HitchStep should be cleaned and cared for in the same
manner that you clean and care for your vehicle. Do not use
abrasive cleaners on the finish. In extreme weather
conditions, you may wish to lubricate the antirattle clamp
knob thread with WD40 or grease. Thank you for choosing
Go Rhino. Check out our other products on our website at
gorhino.com.
© 2016 Go Rhino
GO RHINO
589 W. Apollo St.
Brea, CA 92821
GORHINO.COM (888) 427-4466
FAX: (714) 529-5252