DDV9355 SSC-DDV9355 USER’S GUIDE With • Multi-Brand Remote Control • 4-Head VCR x 4-Head VCR
DDV9355 User’s Guide Go-Video, Inc. A Division of Sensory Science Corp. 7835 East McClain Drive Scottsdale, Arizona USA 85260 www.govideo.com www.sensoryscience.
WARNING: CAUTION: To reduce the risk of fire or electric shock, do not expose this appliance to rain or moisture. Do not open the cabinet; dangerous high voltage is present. Refer servicing to qualified personnel only. This video cassette recorder should only be used with 120V, 60Hz (standard U.S. household) current. To prevent fire, shock hazard, or annoying interference, use only the recommended accessories.
Table of Contents Safety v Important Safety Instructions .............................................................................................................................................. v 1 - Basic Connections 1 First Things First .................................................................................................................................................................. 1 Connect Antenna/Basic Cable .........................................................................
4 - Tuner & Channel List 29 Tuner Band ....................................................................................................................................................................... 29 Auto Channel Search ........................................................................................................................................................ 30 Add Channel ..................................................................................................................
8 - Timer Recording 55 How to Set a Timer Recording .......................................................................................................................................... 55 Timer Recording Errors ..................................................................................................................................................... 60 9 - Editing Features 61 8-Scene Editor ......................................................................................................
Appendix B - Help 85 Frequently Asked Questions (FAQs) ................................................................................................................................. 85 Technical Specifications ................................................................................................................................................... 90 Dual-Deck VCR Limited Warranty .....................................................................................................................
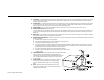
Safety Important Safety Instructions 1. 2. 3. 4. 5. 6. 7. 8. 8a. 9. 10. 11. 12. PORTABLE CART WARNING (Symbol provided by RETAC) 13. READ INSTRUCTIONS - All the safety and operating instructions should be read before the unit is operated. RETAIN INSTRUCTIONS - The safety and operating instructions should be retained for future reference. HEED WARNINGS - All warnings on the unit and in the operating instructions should be adhered to.
14. LIGHTNING - For added protection of this video unit during a lightning storm, or when it is left unattended and unused for long periods of time, unplug it from the wall outlet and disconnect the antenna or cable system. This will prevent damage to the video unit due to lightning and power line surges. 15. POWER LINES - An outside antenna system should not be located in the vicinity of overhead power lines or other electric light or power circuits, where it can fall into such power lines or circuits.
1 - Basic Connections First Things First Deck Deck Power Pause Rewind Play F. Forward Record Tape Deck Select POWER C Stop / Eject Copy Y T OP A SLOW 1 VCR 3 2 AUTO TRK TRK 4 •TV 6 5 SHUTTLE TV/VCR 7 8 9 REPEAT F.
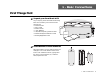
Connect Antenna/Basic Cable Follow these steps only if you are using an indoor/outdoor antenna or basic cable. If you have a: • Cable Box • Stereo Receiver • TV Monitor • Third VCR • Laserdisc Player • DVD Player • Camcorder • Satellite Receiver • Video Game ...or other advanced connection, please refer to Chapter 12. 1 2 Connect Antenna/Cable to VCR Connect the RF antenna cable from your indoor/outdoor antenna or cable wall outlet to the IN (FROM ANT.) jack on the back panel of the VCR.
POWER C Turn On VCR Press the Power button on the remote control or on the VCR’s front panel. SLOW 1 2 TRK 4 VCR 3 AUTO TRK 5 •TV 6 SHUTTLE 8 7 6 9 ON Tune TV to Channel 3 or 4 Be sure to select the same channel you used in Step 3. 8 Power TV/VCR Turn On TV Press the power button on your TV. 7 Y TAP OP E 5 Basic Connection is Complete! The Set Language menu will appear on your television screen. Please proceed with Auto Setup in Chapter 2.
4 DUAL-DECK USER’S GUIDE
2 - Initial Settings Auto Setup Set Language POWER C 1 Press 1, 2, or 3 to select English, French, or Spanish. To change the language at any other time, see page 6. SLOW 1 2 TRK 4 VCR 3 AUTO TRK 5 2 8 LANGUAGE / LANGUE / IDIOMA 1➔ English 2 : Français 3 : Español •TV 6 SHUTTLE 7 Y TAP OP E The first time you power on your Dual-Deck VCR, you will be prompted to select English, French, or Spanish for the onscreen menu system.
Set Language Manually 000 0 ER NT •E MENU ➔ / DECK2 MAIN MENU EZ Copy On Child Lock Off Timer Recording 8-Scene Edit List Setup Titler Message Language/Langue/Idioma ➔ To Select / To Move MENU to Quit Hold MENU Key For Setup ➔ Press the menu button on the remote control.
Set Clock Manually 1 Open “Setup Menu” 000 0 ER NT •E Press and hold the Menu button for 3 seconds. 1➔ 2 : 3 : 4 : 5 : MENU / C POWER Press 1.
5 Set the Time Use the number keys or the up/down arrow keys to set each of the following items. To skip an item, press the right arrow key: • Set Month — Enter the month as a 2-digit number; e.g. January = “01” • Set Year — Enter the year as a 2-digit number; e.g. 2000 = “00” • Set Day — Enter the day as a 2-digit number; e.g. the ninth = “09” • Set Hour — Enter the hour as a 2-digit number; e.g. 12:xx = “12” • Set Minute — Enter the minute as a 2digit number; e.g.
Set Daylight Savings Time Open the “Setup Menu” 000 0 ER NT •E Press and hold the menu button for 3 seconds. 1➔ 2 : 3 : 4 : 5 : MENU / Press 1.
Set Time Zone Open the “Setup Menu” 000 0 ER NT •E Press and hold the menu button for 3 seconds.
Set Auto Clock Set Channel 1 Open the “Setup Menu” 000 0 ER NT •E Press and hold the menu button for 3 seconds.
12 DUAL-DECK USER’S GUIDE
3 - The Dual-Deck System Remote Control Overview Copy Tape — Copies the tape in Deck 1 to the tape in Deck 2. *Power — Turns the VCR on and off. Note: Power will come on automatically when you insert a videotape (Auto Power On). VCR — Sets the remote to operate your VCR. Slow +/– — In Play mode, increases or decreases the speed of slow motion playback. *0-9 — Selects channels directly. In the Menu system, selects menu items. SLOW 1 Trk , Auto — In Play mode, allows you to manually adjust tracking.
TV View — Changes your view on the television between the Tuner, Deck 1, Deck 2 and Aux. This allows you to quickly jump between a TV show, videotape, DVD, etc.—at the touch of a button. Search/Index — From Stop, Play, F.Forward, or Rewind, opens the Search/Index Menu. While recording, places an Index mark on the tape. Clear — Resets the Tape Counter to 0:00:00. Also clears certain entries in the menu system. Scene/Title — Marks the beginning and ending points of scenes in the 8-Scene Editor.
Front Panel Overview Power — Turns the VCR on and off. Note: Power will come on automatically when you insert a videotape. Pause — Pauses the tape playing or recording in the active deck. Play — Plays the tape in the active deck. Press twice for Still. In menus, moves selection arrow up. Record — Starts recording in the active deck. Press repeatedly to activate One-Touch Recording. Deck TV/VCR — Switches between the TV’s tuner and the VCR’s tuner. Copy Tape — Copies the tape in Deck 1 to Deck 2.
Front Panel Auxiliary Input Use the Front Panel Auxiliary Input for easy connection to a camcorder or video game using standard RCA cables. Throughout the menu system, the front panel input is referred to as ”Aux.” Audio Input (White) — Use to connect the monaural (mono) audio signal from an external device, such as a camcorder or videogame, using an RCA cable.
Front Panel Display The Front Panel Display shows you the current status of your Dual-Deck VCR. Timer — Lights to show you that a Timer Recording is stored in memory. Blinks if there is a Timer Recording error. Copy — Lights to show you that a tape is being copied. Blinks if the Copy is Paused. Deck Two — Lights to show you that Deck 2 is active. VCR — Lights to show you that the Dual-Deck is in VCR mode; i.e.
Front Panel Display Settings 000 0 ER NT •E Press and hold the Menu button for 3 seconds. 1➔ 2 : 3 : 4 : 5 : MENU / C POWER Press 4. SLOW 1 2 TRK 4 VCR 3 AUTO TRK 5 DUAL-DECK USER’S GUIDE 9 POWER C Press 4 to select one of the following options: • Auto — Dims the Front Panel Display automatically between 10:00 PM and 6:00 AM. • On — Makes the Front Panel Display bright at all times.
Child Lock 000 0 ER NT •E 1➔ 2 : 3 : 4 : 5 : 6 : MENU ➔ / DECK2 DECK1 POWER SLOW 1 4 With Child Lock set to “On”: • Auto Power On is disabled - The VCR will not turn on automatically when a tape is inserted. • Auto Play is disabled - Tapes will not play automatically when you insert them, regardless of the Auto Play setting (see page 45). • Front panel buttons are disabled - You will still be able to use the remote control to operate all VCR functions.
Remote Eject 1 Open “Setup Menu” 000 0 ER NT •E 9 A With Remote Eject enabled, you can eject videotapes by pressing the Stop button on the remote control. Press and hold the Menu button for 3 seconds.
Main Menu Tree The On-Screen Menu System is the control center for your Dual-Deck VCR. It is divided into two sections: • Main Menu — Use for everyday functions, such as EZ Copy, Child Lock, and Timer Recording. • Setup Menu — Use for “set and forget” options, like Set Clock, Copy/Record Settings and Tuner & Channel List.
Setup Menu Tree The Setup Menu includes a variety of advanced options that allow you to customize your Dual-Deck VCR in virtually unlimited ways. Don’t forget to press and HOLD the Menu button for 3 seconds to access the Setup Menu. To access the Setup Menu, press and HOLD the Menu button for 3 seconds.
Menu Navigation - Remote Control Press and release to enter the Main Menu and adjust everyday functions. While in the menu system, press to save settings and exit. 000 0 ER NT •E 9 Right Arrow 000 0 ER NT •E Press to select and cycle through menu items. MENU MENU / / DECK2 DECK1 DECK2 DECK1 0–9 Y TAP OP C POWER / 000 0 ER NT •E 9 AUTO TRK TRK 4 •TV 6 5 SHUTTLE TV/VCR 7 8 REPEAT F.
Menu Navigation - Front Panel The following front panel buttons can also be used to enter and navigate within the menu system. Menu Press and release to enter the Main Menu and adjust everyday functions. While in the menu system, press to save settings and exit. Menu TV/VCR Channel Video Audio Menu TV/VCR Channel Video Audio Press and hold for 3 seconds to enter the Setup Menu and adjust “set and forget” functions. Press Stop/Eject to move down and Play to move up the list of menu items.
Reset Factory Settings 1 Open “Setup Menu” 000 0 ER NT •E 9 A Press and hold the Menu button on the remote control for 3 seconds. 1➔ 2 : 3 : 4 : 5 : MENU DECK2 DECK1 Press 5. SLOW 1 VCR 3 2 TRK 4 AUTO TRK •TV 6 5 SHUTTLE Decide What to Reset TV/VCR 8 7 POWER Press “1” if you want to reset everything except the clock and any saved Timer Recordings. Press “2” if you want to clear all settings.
On-Screen Display Overview 2 View On-Screen Display SEARCH/IND EX T V V IE W REC SLP SP/ Press Display.
On-Screen Display Elements TV View — Shows the source you are currently watching (Tuner, Aux, Deck 1, Deck 2). In Tuner View, shows the Channel Number. Deck Counter Position— Shows the current tape position or time remaining as set by the Clk/Ctr button. Deck 1 Stop - H : MM : SS SP TV VIEW Deck 2 Deck 2 Play - H : MM : SS SLP Deck Play/Record Speed— Shows current playback speed (SP, LP, SLP) or record speed (SP, SLP).
On-Screen Display (OSD) Settings Open “Setup Menu” 000 0 ER NT •E Press and hold the Menu button on the remote control for 3 seconds. 1➔ 2 : 3 : 4 : 5 : MENU / POWER Press 4.
4 - Tuner & Channel List Tuner Band 000 0 ER NT •E 9 Press and hold the Menu button for 3 seconds. 1➔ 2 : 3 : 4 : 5 : MENU / POWER C Select “Tuner & Channel List” Press 3.
Auto Channel Search 000 0 ER NT •E Press and hold the Menu button for 3 seconds. 1➔ 2 : 3 : 4 : 5 : MENU / POWER Press 3. SLOW 1 VCR 3 2 TRK AUTO TRK 4 / DECK2 DUAL-DECK USER’S GUIDE 000 0 ER NT •E 9 MENU / DECK1 DECK2 ____________________________________ / = Move ➔ = Sel MENU=Quit ➔ Press the right arrow to automatically search for all available channels in the selected Tuner Band. This procedure may take a few minutes to complete.
Add Channel 000 0 ER NT •E 9 MENU / Press 3. SLOW 1 VCR 3 2 AUTO TRK TRK 4 Select “Add Channel” 9 000 0 / Use the number keys (0-9) to enter the channel number, e.g. “1-1” for Channel 11. SLOW 1 VCR 3 2 AUTO TRK TRK 4 •TV 6 5 SHUTTLE 7 8 REPEAT F.
Remove Channel 000 0 ER NT •E MENU / POWER SLOW 1 VCR 3 2 AUTO TRK TRK 4 •TV 6 5 Select “Remove Channel” 000 0 ER NT •E Press the down arrow until Remove Channel is selected. 9 TUNER AND CHANNEL LIST CH ## Tuner Band Auto Auto Channel Search Add Channel ➔ Remove Channel Show Weak Channels No MENU / Tune the Channel 4 SHUTTLE 7 8 REPEAT F.
Show Weak Channels 000 0 ER NT •E 9 Press and hold the Menu button for 3 seconds. 1➔ 2 : 3 : 4 : 5 : MENU DECK2 DECK1 POWER C SLOW 1 VCR 3 2 AUTO TRK TRK 4 •TV 6 5 Select “Show Weak Channels” 000 0 ER NT •E Press the down arrow until Show Weak Channels is selected.
34 DUAL-DECK USER’S GUIDE
5 - Copy Features Basic Copying Note: The Dual-Deck VCR cannot duplicate copyprotected tapes. If you try to copy a protected tape, the message “Tape is Copy Protected” will appear on the onscreen display. 1 Insert Source Tape Put the tape you wish to copy in Deck 1 on the left side of the VCR. 2 Deck Stop / Eject Pause Rewind Play F. Forward Record Copy Tape Copy Tape Deck Select Insert Target Tape Deck Put your blank tape in Deck 2 on the right side of the VCR.
EZ Copy Open “Main Menu” MENU ➔ / DECK2 Set “EZ Copy” SLOW Note: If the tape runs out in Deck 2 before copying is complete, neither tape will rewind to alert you that a problem occurred. • Off — EZ Copy is disabled. See Basic Copying on page 35.
Copy Mode 1 Open “Setup Menu” 000 0 ER NT •E 9 A Press and hold the Menu button for 3 seconds. 1➔ 2 : 3 : 4 : 5 : MENU / Select “Copy/Record Settings” Press 2.
Speed Matching 1 Open “Setup Menu” 000 0 ER NT •E 9 A Press and hold the Menu button for 3 seconds. 1➔ 2 : 3 : 4 : 5 : MENU DECK2 DECK1 Select “Copy/Record Settings” POWER C Press 2.
Copy Audio Insert Open “Setup Menu” 000 0 ER NT •E 9 Press and hold the Menu button for 3 seconds. 1➔ 2 : 3 : 4 : 5 : MENU DECK2 DECK1 POWER C Select “Copy/Record Settings” Press 2. SLOW 1 2 TRK 4 VCR 3 AUTO TRK 5 •TV 6 8 POWER C Set “Copy Audio Insert” 9 Press 3 to select from the following options: SLOW 4 VCR 3 AUTO TRK 5 •TV 6 SHUTTLE 7 8 Off Aux ➔ • Off — Copy Audio Insert is disabled. No new audio track will be recorded.
4 Connect Audio Source Connect your external audio source to the front (Aux) input using a standard RCA audio cable. 5 Deck Deck Power Stop / Eject Copy Pause Rewind Play F. Forward Record Deck Select Cue Tapes Cue up your source tape in Deck 1, your target tape in Deck 2 and your new audio track. Copy New Audio Track C POWER Simultaneously press Copy Tape on the Dual-Deck VCR and Play on your external audio source. The new audio signal will copy in place of the source audio track.
6 - Playback Features Basic Playback To play a videotape, simply insert it in either deck and press the Play button. Tapes without Record Safety Tabs can be set to play automatically when inserted; see page 45. 1 Insert Tape Insert a standard VHS tape into Deck 1 or Deck 2. Deck Play Tape Stop / Eject Copy Pause Rewind Play F. Forward 000 0 ER NT •E Press Play on the remote control or the front panel.
Special Playback Features 000 0 ER NT •E Review 9 From Play mode, press Play/Still to freeze a single frame. MENU / DECK2 DECK1 Frame Advance From Still mode, press F.Adv/Skip to advance to the next frame. SHUTTLE 7 8 REPEAT F.ADV/SKIP TV/VCR 9 100+ 0 •LCV •MUTE •CH •VOL C POWER SLOW MENU / REPEAT 100+ 0 •LCV •MUTE TV/VCR 9 •CH •VOL 9 000 0 ER NT •E Repeat From Play mode, press Repeat to review the last 30 seconds of tape. SHUTTLE 7 8 REPEAT F.
Tracking Adjust Tracking Manually POWER C 1 During playback, press the TRK up/down arrow keys to move the white lines out of the picture. SLOW 1 2 TRK 4 VCR 3 AUTO TRK 5 •TV 6 SHUTTLE 8 7 TV/VCR 9 Resume Auto Tracking C POWER Press Auto to have the VCR adjust tracking automatically.
Sequential/Loop Playback Open “Setup Menu” 000 0 ER NT •E Press and hold the menu button on the remote control for 3 seconds. 1➔ 2 : 3 : 4 : 5 : MENU DECK2 DECK1 POWER C Select “Dual-Deck Features” Press 4.
Auto Play/Rewind Press and hold the menu button on the remote control for 3 seconds. 1➔ 2 : 3 : 4 : 5 : MENU / Press 4.
46 DUAL-DECK USER’S GUIDE
7 - Recording Features Basic Recording Insert Tape Deck Insert a blank VHS tape into either deck. Stop / Eject 2 Copy Pause Rewind Play F. Forward Record POWER VCR 3 2 AUTO TRK TRK 4 Start Recording T V V IE W SLP SP/ •CH •CH •VOL SEARCH/IND EX ER SCENE T TI M TIT LE •DIS PLA Y CLEAR CLK /CT 000 0 9A ER NT •E •VOL 9 REC SE 0 •MUTE R Press the Record button. For options while a recording is in progress, see Recording Options on the next page.
Recording Options To Stop Recording... 000 0 ER NT •E Press Stop. MENU / DECK2 DECK1 To Pause Recording... 000 0 MENU / DECK2 DECK1 POWER Press the TV/VCR Button on the remote or front panel to switch to TV mode (the VCR icon will disappear from the front panel display), then select a different channel using your TV’s tuner. 4 AUTO TRK 7 DUAL-DECK USER’S GUIDE TV/VCR 8 9 000 0 ER NT •E 9 MENU / DECK1 See One-Touch Recording (OTR) on page 49.
One-Touch Recording (OTR) One-Touch Recording (OTR) allows you to add recording time in 30minute increments (up to 9 hours and 30 minutes) at the touch of a button. 1 Start Recording Follow the instructions on page 47.
Record Speed You can adjust the Record Speed to fit more than 2 hours of programming on a T-120 tape. 1 Start Recording Follow the basic Recording instructions on page 47. 2 Set Record Speed T V V IE W SEARCH/IND EX REC SLP SP/ TIT LE 000 0 9A ER NT •E •DIS PLA Y CLEAR CLK /CT R Press the SP/SLP button on the remote control to switch the record speed between: SE ER SCENE T TI M • SP — Standard Play, for best quality. • SLP — Super Long Play, for maximum recording time (3 times SP).
Record Source Open “Setup Menu” 000 0 ER NT •E 9 Press and hold the Menu button for 3 seconds. 1➔ 2 : 3 : 4 : 5 : MENU / POWER C Select “Copy/Record Settings” Press 2.
Sequential/Loop Recording 1 Open “Setup Menu” 000 0 ER NT •E Press and hold the Menu button for 3 seconds.
Date/Time Stamp Open “Setup Menu” 000 0 ER NT •E Press and hold the Menu button for 3 seconds.
54 DUAL-DECK USER’S GUIDE
8 - Timer Recording How to Set a Timer Recording 000 ER NT •E 0 Or On Auto Auto Auto SELECT EVENT [1-16]: 01 1➔ - - : - - - -----/--H--M Ch-Deck - - ____________________________________ 2 : --:--------/-/ To Move ➔ To Select -H--M Ch-Deck - - MENU to Quit 3 : --:--------/--H--M Ch-Deck - - 4 : --:--------/--H--M Ch-Deck - - / = Move ➔ = Sel MENU=Quit ➔ SLOW 1 2 TRK 4 VCR 3 AUTO TRK 5 •TV 6 SHUTTLE 7 8 REPEAT F.
Use the number keys (1-4) to set how often the event will be recorded. The default setting is “1-Time.” 1 1-Time — The event will be recorded once only. 2 Monday-Friday — The event will be recorded every weekday. 3 Weekly — The event will be recorded once a week. 4 Always — The event will be recorded every single day. 56 DUAL-DECK USER’S GUIDE C 2 TRK 4 VCR 3 AUTO TRK 5 •TV 6 SHUTTLE 7 8 REPEAT F.
Use the number keys (1-2) to set the Record Source. The default setting is the current tuner (television) channel. 1 Ch## — Records from the Tuner. Use the number keys (0-9) or up/down arrow keys to set the channel number. 2 Aux — Records from the front line input.
C Confirm Settings When all settings are complete, press Menu to confirm the Timer event and view a summary of all programmed events. • To program another event, select another available event number. • To edit an existing event, select an event number that has already been programmed. • To delete an event, use the Up/Down arrow keys to select it, then press Clear. • To exit the Event Summary screen, press Menu.
Be sure your videotape has a Record Safety Tab. If it is missing, you can cover the opening with a small piece of tape. Warning: Do not cover this opening unless you are sure you want to record over the tape. Record Safety Tab 10 Insert Tape Insert a blank tape with a Record Safety Tab into the deck you designated in Step 7. 11 Deck Deck Power Stop / Eject Copy Pause Rewind Play F.
Timer Recording Errors If there is a problem with your Timer Recording, the word Timer will flash on the Front Panel Display and an error message will appear on the On-Screen Display. Once you correct the error, the event will begin if there is still time remaining for that event. Tape Missing Deck Deck Power There is no videotape in the recording deck. • Insert a videotape in the recording deck. Stop / Eject Copy Pause Rewind Play F.
9 - Editing Features 8-Scene Editor 1 Insert Source Tape Put the tape with your unedited source material in Deck 1. 2 Deck Stop / Eject Pause Rewind Play F. Forward Record Copy Tape Copy Tape Deck Select Insert Target Tape Deck Put your blank tape in Deck 2. To ensure quality edits, it is best to record on blank or pre-formatted tapes. Tip: You can preformat your tapes by recording the line input over the entire tape with no signal.
Press 4 to open the 8-Scene Edit List menu. The number “1” and “Begin” will flash.
Clear Unwanted Scenes S SCENE TIT LE •DIS PLA Y CLEAR CLK /CT 000 ER NT •E 0 9A 10 SLP SP/ MER E T TI R If you are not satisfied with a particular scene, use the Clear button to erase its beginning and ending points. Repeat Steps 6-8 to load up to 8 scenes at a time. SEARCH/IND EX T V V IE W REC Make a Tape POWER SLOW 1 2 TRK 4 Notes: • The Dual-Deck VCR will automatically copy each scene in order from the source tape to the target tape.
Sync Editing Sync (as in “synchronized”) Editing is useful if you only want to copy part of a tape, or if you want to cut commercials while copying a TV show. The Copy Tape button is the key to synchronizing the playback deck with the recording deck. 1 Before You Begin — • Turn off Auto Play; see page 45. • Turn off EZ Copy; see page 36. 2 Insert Source Tape Put the tape with your unedited source material in Deck 1. 3 Deck Deck Power Stop / Eject Pause Rewind Play Insert Target Tape F.
Play the tape in Deck 1 to the beginning of the scene you wish to copy, then press Still. Use the special playback functions to quickly find the position you want; see page 42. Copy will flash on the front panel display. Start Sync Edit 000 0 ER NT •E 9 MENU / DECK2 DECK1 POWER Press the Copy Tape button. The tape in Deck 1 will begin copying to Deck 2.
How to Cut Commercials with Skip Edit 1 Set Up a Sync Edit Follow Steps 1-6 on pages 64-65. 2 Preview Commercials As you position your source tape, note how many minutes the commercials are that you wish to cut. Start Sync Edit POWER Press Copy Tape to begin copying the source tape from Deck 1 to Deck 2. SLOW 1 2 TRK 4 VCR 3 AUTO TRK 5 •TV 6 SHUTTLE 7 4 Cut the Commercials When the commercials start, press F.Adv/ Skip once for every minute of commercials to be deleted.
On-Screen Titler 1 Open “Main Menu” 000 0 ER NT •E 9 A Press Menu on the remote control. 1➔ 2 : 3 : 4 : 5 : 6 : MENU ➔ / DECK2 DECK1 Select “Setup Titler Message” C POWER Press 5. SLOW 1 VCR 3 2 AUTO TRK TRK 4 •TV 6 5 SHUTTLE Compose Your Message / DECK2 DECK1 T V V IE W SEARCH/IND EX REC SLP SP/ SE ER SCENE T TI M TIT LE •DIS PLA Y CLEAR CLK /CT ER NT •E 000 ER NT •E 000 0 0 9 A When you are satisfied with your message, press Menu to save and quit.
Recording Titler Message Once you have set up your Titler Message, you can record it by pressing the Scene/Title button while a tape is recording in Deck 2. You can record the title for up to 20 seconds in 5-second increments. 1 Start Recording Insert your target tape in Deck 2 and initiate any Record mode, i.e., Record, One-Touch Record, Copy Tape, or Timer Record. See the corresponding chapters to activate any of these modes. Note: You must use Deck 2 to record Titler Messages.
10 - Search/Index Features Overview Clk/Ctr Button T V V IE W SLP SP/ Clock Shows you the current time as set in the Set Clock Menu. 2 Real-Time Tape Counter Shows you the current tape position in the active deck in hours, minutes, and seconds. 3 Time Remaining Shows you the amount of time left on the tape in the active deck, computed by subtracting the current tape position from the total tape length in hours and minutes.
Placing Index Marks Automatic Index Marks Manual Index Marks DUAL-DECK USER’S GUIDE S SCENE TIT LE 000 ER NT •E T V V IE W 0 SEARCH/IND EX REC SLP SP/ SE ER SCENE T TI M ER NT •E •DIS PLA Y CLEAR CLK /CT TIT LE •DIS PLA Y CLEAR CLK /CT 000 Deck 1 Stop - 0:20:45 SP TV VIEW Ch 12 Deck 2 INDEX - 1:32:08 SP 0 9A 70 SLP SP/ MER E T TI R You can place an Index Mark manually any time a tape is recording by pressing Search/ Index on the remote control.
Index Scan Open “Search Menu” From Stop or Play mode, press the Search/ Index button. SEARCH/IND EX T V V IE W REC SLP SP/ S MER E T TI SCENE TIT LE •DIS PLA Y 1➔ 2 : 3 : 4 : CLEAR CLK /CT 000 ER NT •E 0 9A SEARCH MENU Index Search / Scan Blank Search Direct Time Search Return to 0:00:00 ____________________________________ = Move = Sel MENU = Quit Select “Index Search/Scan” POWER C 2 Press 1.
Index Search 1 Open “Search Menu” S SLP SP/ MER E T TI SCENE TIT LE 000 ER NT •E 0 POWER C Select “Index Search/Scan” SLOW 1 SEARCH MENU Index Search / Scan Blank Search Direct Time Search Return to 0:00:00 VCR SHUTTLE TV/VCR 8 9 POWER Enter a number from 1 to 99; e.g. for “5” press “0-5”. SLOW 1 4 •TV 6 5 SHUTTLE Press Fast-Forward or Rewind to begin searching forward or backward for the specified Index Mark. When the VCR locates the Index Mark, it will play the tape.
Blank Search 1 Open “Search Menu” SEARCH/IND EX SLP SP/ SE ER SCENE T TI M TIT LE •DIS PLA Y CLEAR CLK /CT 000 ER NT •E 0 1➔ 2 : 3 : 4 : SEARCH MENU Index Search / Scan Blank Search Direct Time Search Return to 0:00:00 9A From Stop or Play mode, press the Search/ Index button. T V V IE W REC R ____________________________________ = Move = Sel MENU = Quit Select “Blank Search” DECK ONE BLANK SEARCH POWER Press 2.
Direct Time Search 1 Open “Search Menu” SLP SP/ S MER E T TI SCENE TIT LE 000 ER NT •E 0 2 Select “Direct Time Search” SLOW 1 SEARCH MENU Index Search / Scan Blank Search Direct Time Search Return to 0:00:00 4 3 Press 1 for positive or 2 for negative counter values. 4 Enter the Time AUTO TRK TRK 5 Start the Search TV/VCR 9 SLOW 1 4 7 8 REPEAT F.
Return to 0:00:00 1 Open “Search Menu” S SLP SP/ MER E T TI SCENE TIT LE •DIS PLA Y 1➔ 2 : 3 : 4 : CLEAR CLK /CT 000 ER NT •E 0 9A From Stop or Play mode, press the Search/ Index button. SEARCH/IND EX T V V IE W REC R SEARCH MENU Index Search / Scan Blank Search Direct Time Search Return to 0:00:00 ____________________________________ = Move = Sel MENU = Quit Select “Return to 0:00:00” POWER Press 4. The tape will rewind or fastforward to tape counter position 0:00:00.
76 DUAL-DECK USER’S GUIDE
11 - Advanced Connections Cable Box Hookup 1 Connect Cable to Cable Box Connect an RF antenna cable from your cable wall outlet to the “In from Cable” jack on the Cable Box. 2 4 OUT (TO TV) IN (FROM ANT.) LINE OUT RF From Cable Box AUDIO OUT (TO TV) CH 3 Connect VCR to TV Connect the supplied RF cable from the “OUT (TO TV)” jack on the back panel of the VCR to your television’s “Antenna In” jack.
6 Set VCR Output Channel Set the channel switch on the back panel of the VCR to 3 or 4, whichever is NOT used by your cable box. 7 78 DUAL-DECK USER’S GUIDE 3 4 Tune TV to the Same Channel Select the channel you used in step 6. 8 CH Connection is Complete! The Set Language menu will appear on your television screen. Please proceed with Auto Setup on page 5. Notes: • Use your cable box to select channels. • If you are not getting a good picture, repeat steps 6 and 7 using the other channel; i.e.
Audio Connections You can enjoy improved sound when watching movies and TV shows by connecting your Dual-Deck VCR to your home audio receiver or TV. 1 Connect VCR to Audio Receiver Connect an RCA cable from the Audio Output on the back of the VCR to one of the Auxiliary Inputs on your audio receiver or TV. If your television has a video input, you can also connect it to the VCR’s Video Output with an RCA cable. 2 IN (FROM ANT.
TV Monitor Connections Monitor-style televisions offer improved sound and picture over regular televisions because they receive the audio and video signals directly from the VCR through the auxiliary inputs. 1 Connect VCR to TV Monitor Connect RCA cables from the Audio and Video Outputs on the back of the VCR to the Audio and Video Inputs on your TV monitor. Note: A TV monitor is not the same as a computer monitor. 2 IN (FROM ANT.
Connecting Other Video Equipment 1 Connect Device to VCR Deck Connect RCA cables from the Audio and Video Outputs of your external device to the Audio and Video Inputs on the front or back of the VCR. Copy Menu TV/VCR Channel Video Tape Audio To Audio/Video Outputs of External Device 2 Watch Device T V V IE W SLP SP/ Press the TV View button until the playback from the Aux input appears on your TV screen.
82 DUAL-DECK USER’S GUIDE
Appendix A Multi-Brand Remote Setup 1 Turn On TV TV CODES ON Press the power button on your TV. Program Code POWER C 2 Press and hold down the TV button while entering the 2-digit code for your brand of television with the 0–9 keys (see table). Note: If there is more than one code for your brand of TV, try them all until one works. 3 Daewoo Emerson Hitachi JVC LG Y TAP OP E SLOW 1 2 AUTO TRK TRK 4 5 •TV 6 SHUTTLE 7 8 REPEAT F.
Multi-Brand Remote Operation This table shows which remote control buttons are available for various brands of television. Y TAP OP SLOW 1 4 7 8 REPEAT F.
Appendix B - Help Frequently Asked Questions (FAQs) The following are some of the most frequently asked questions about our Dual-Deck VCRs. If you don’t find the answers you need here, you can contact our Customer Service Department as follows: • Phone: (480) 922-0896 • Office hours: Monday-Friday, 6:00 a.m. to 9:00 p.m. MST Saturday-Sunday, 8:00 a.m. to 4:00 p.m. MST • E-Mail: “customerservice@ sensoryscience.com” • Web: “www.govideo.com” or “www.sensoryscience. com”.
Why isn’t my remote control working? • Make sure you are pointing the remote control directly at the VCR and that there are no obstacles between the remote control and VCR. Sunlight on the VCR front panel can sometimes interfere with the remote signal. • Make sure the batteries in your remote are fresh and installed properly. • The “TV” button may have been pressed by accident. This makes the remote control only operate the television. Press the VCR key on the remote and try again.
Why does my on-screen display show “Error”? This indicates a problem with the VCR tape mechanism. Turn the power off and on again to reset. If this does not clear the error, unplug the VCR from the power outlet and inspect both tape slots for foreign objects, or for jammed or crooked tapes. Why can’t I eject a tape using my remote? • Make sure Remote Eject is turned “On” in the Dual-Deck Features menu.
Why can’t I bring up the 8-Scene Edit List? • Insert a tape in Deck 1. The VCR must have a tape in Deck 1 for the 8-Scene Edit List to appear. • 8-Scene Edit List is not available during Copy Tape. Why aren’t the tape counters moving? If the VCR is playing a blank section of tape (only video noise, or “snow” appears on-screen), the tape counter cannot operate. The VCR requires a control track, which is only present on recorded tape, to provide counter information.
Why is my Copy Tape button blinking? This indicates that the deck is in Pause mode while copying a tape. See Sync Editing on page 64. Why won’t my remote operate all my TV functions? The remote control does not have a command for every function on your television. Some brands of television will only respond to a limited number of functions. See the table on page 84 for a list of common brands and functions.
Technical Specifications VIDEO SYSTEM TELEVISION SYSTEM AUDIO TRACK TAPE WIDTH TAPE SPEED PLAY/RECORD TIME FF/REW TIME HEADS Video: Audio: Control: Erase: VIDEO Input: Output: Horiz Res: S/N Ratio: AUDIO Input: Output: TV Tuner: S/N Ratio: RF MODULATION POWER REQUIREMENT CLOCK BACKUP TIME ENVIRONMENT DIMENSIONS WEIGHT 90 DUAL-DECK USER’S GUIDE 1/2-inch VHS system, 4 rotary head helical scanning; FM azimuth luminance; chrominance: converted sub system phase shift NTSC-type color signal EIA standard (525
Dual-Deck VCR Limited Warranty Who Provides the Limited Warranty During the warranty period, the Go-Video Warranty Administrator will honor Dual-Deck VCR service for 90 days labor, 1 year parts from the original date of consumer purchase. See below for Commercial, Industrial or Educational use coverage. Dual-Deck VCR remote controls are warranted for 90 days from the date of purchase. Who is Protected This warranty protects the original consumer owner of this Go-Video product.
Other Warranty Coverage Commercial, Industrial or Educational use has the same warranty coverage as stated in this warranty. What are the Exceptions This warranty does not cover: (1) Normal maintenance service, such as video head cleaning. (2) Damage from misuse, abuse neglect or accident, natural disasters or Acts of God. (3) Cabinetry, decorative parts, A/C adapters, knobs or buttons. (4) The foreign country use of this product.
Index Index Symbols 0–9 Buttons 23, 31, 32, 47 100+ Button 13 8-Scene Editor 61, 62 A Add Channel 31 AM/PM 8, 55 Antenna Cable (RF) 1, 2, 77 Antenna, Indoor/Outdoor 29 Audio Connections 79 Inputs 16, 81 Outputs 79, 81 Source 40 Auto Features Auto Channel Search 5, 30 Auto Clock Set 5, 7, 9, 11 Auto Copy Mode 37 Auto Play 19, 41, 45, 64 Auto Power Off 88 Auto Power On 13 Auto Setup 3, 5, 78 Auto Tracking (ATR) 43 Auto Tuner Detect 29 Aux Input 16, 26, 39, 57, 79, 81 B Batteries 1 Blank Search 73 C Cable T
F.
Quick Reference Guide 1 RF Antenna Cable 77 Right Arrow Key 23 R S Q RCA Cables 16, 79, 80, 81 Read Me First 1 Real-Time Tape Counter 69 Record Basic 47 Button 14, 15 Deck 57 From Other Equipment 81 Mode 49, 68 Options 48 Safety Tab 41, 47, 59 Source 27, 51, 57 Speed 17, 27, 38, 50 Titles 67 Registration Card 1 Remote Control Child Lock 19 Menu Navigation 23 Multibrand Setup 83 Overview 13 Remote Eject 20 Unpacking 1 Remove Channel 32 Repeat 42 Reset Factory Settings 25 Return to 0:00:00 75 Reverse Jet
Tuner 26, 28, 51 Tuner & Channel List 21, 32, 33 Tuner Band 29, 30 TV Button 13, 83 TV Mode 48 TV Monitor Connections 80 TV View Button 14, 26, 27, 81 TV/VCR Button 13, 15, 17, 47, 48, 80 W U XDS 11 Up/Down Arrows 23, 57 User’s Guide 1 Y V VCR 2, 3, 17, 19 VCR Mode 17, 83 VCR Output Channel 2, 78 VHF/UHF Antenna 29 VHS, Standard 41 Video 80 Video Equipment, Connecting Other 81 Video Line Input 16 Video Line Inputs 81 Video Outputs 79, 80, 81 Voice-Overs 39 Vol +/– 13 96 DUAL-DECK USER’S GUIDE Warra
7835 East McClain Drive Scottsdale, Arizona USA 85260 www.sensoryscience.com www.govideo.