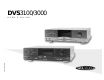
DVS3100/3000 SSC-DVS3100/3000 U S E R ’ S G U I D E
CAUTIONS WARNING: DVD PLAYERS USE AN INVISIBLE LASER BEAM WHICH CAN CAUSE HAZARDOUS RADIATION EXPOSURE IF DIRECTED. BE SURE TO OPERATE PLAYER CORRECTLY AS INSTRUCTED. To reduce the risk of fire or electric shock, do not expose this appliance to rain or moisture. Caution: To prevent electric shock, match wide blade of plug to wide slot, fully insert.
DVS3100/3000 User’s Guide Go-Video/Sensory Science 7835 East McClain Drive Scottsdale, Arizona USA 85260 www.sensoryscience.com www.govideo.
Go-Video is a registered trademark of Sensory Science Corporation. Dolby, Pro Logic, and the double-D symbol are trademarks of Dolby Laboratories Licensing Corp. DTS is a trademark of DTS Technology, LLC. All other brand and product names are trademarks or registered trademarks of their respective companies. Copyright ©1999 Sensory Science Corp. All rights reserved.
Table of Contents Table of Contents Important Safety Instructions ............................................................................................................................................. iii Care & Maintenance ........................................................................................................................................................... v 1 - Setup 1 Accessories ..................................................................................................
4 - Advanced Functions 27 Disc View ......................................................................................................................................................................... 27 Audio Selection ................................................................................................................................................................ 28 Subtitle Language .........................................................................................................
Safety Important Safety Instructions 1. Read Instructions - All the safety and operating instructions should be read before the unit is operated. 2. Retain Instructions - The safety and operating instructions should be retained for future reference. 3. Heed Warnings - All warnings on the unit and in the operating instructions should be adhered to. 4. Follow Instructions - All operating and maintenance instructions should be followed. 5. Cleaning - Unplug this unit from the wall outlet before cleaning.
13. Lightning - For added protection of this unit during a lightning storm, or when it is left unattended and unused for long periods of time, unplug it from the wall outlet. 14. Overloading - Do not overload wall outlets and extension cords as this can result in the risk of fire or electric shock. 15. Objects & Liquids - Never push objects of any kind into this unit through openings as they may touch dangerous voltage points or short out parts that could result in a fire or electric shock.
Care & Maintenance For trouble free operation, follow these handling, care and cleaning instructions. Handling Precautions Disc Storage • Before connecting other components to this system, be certain the system power and component power is off. • Be certain that speaker connections are secure and not shorted before turning on the system power. • Lower the system volume before switching between the DVD, VCR and AUX inputs and when changing discs.
vi DVS USER’S GUIDE
1 - Setup Accessories As you unpack, please check that the following items are included in your DVS packing case. • Remote Control • 2 AA Batteries (see installation instructions at right) • User’s Manual • Audio/Video Connection Cable • S-Video Cable 1 Open the battery cover 2 Insert two AA batteries Turn over the remote control, press down on the arrow and slide down to remove cover. Make sure the polarities (+ and -) are aligned correctly.
System Features The DVS3100/3000 is an all-in-one system that includes a DVD player, built-in Surround Sound decoders and a 5-channel amplifier.
on your home theater system from videotapes, CDs and many TV/Cable programs. With the Dolby Surround Pro Logic system you can even enhance the sound of nonencoded stereo and mono programs. Matrix Surround Sound The Matrix Surround Sound system enhances the sound of non-encoded stereo and mono programs. With the matrix system you can enjoy surround sound from all connected speakers while listening to mono or stereo sources. • Natural - Uses natural acoustical properties to simulate a small recital theater.
Disc Type & Characteristics The DVS3100/3000 is capable of playing the following types of discs, having the corresponding logos. Disc Types Logos Playback Types Disc Size Max. Playing Time 5 inches Single-sided 240 min. Double-sided 480 min. • Excellent sound and video due to Dolby Digital and MPEG2 system. 31/2 inches Single-sided 80 min. Double-sided 160 min. • Various screen and audio functions can be easily selected through the on-screen menu. 5 inches 74 min.
Front Panel Controls 1 Power On/Off • Button is IN - A/C power to system (normal operating mode; first time button is pressed, the system automatically turns on). • Button is OUT - No A/C power to system; use for extended off periods (vacation) or during adverse weather conditions (lightning). CAUTION: Be sure unit is in Standby mode (LED lit) before depressing to prevent loud pop and possible speaker damage.
Front Panel Display 1 2 3 4 5 6 7 8 9 10 14 1 2 3 4 5 6 7 6 DVS USER’S GUIDE 13 12 Disc Operation Rotary Indicator Disc Type Indicator (DVD, CD, VCD) Angle Indicator Repeat Indicator All Repeat Indicator A-B Repeat Indicator Program Play Indicator 11 8 9 10 11 12 13 14 Dolby Digital Indicator Linear PCM Indicator DTS Indicator (DVS3100 only) Chapter, Title, Track & Message Indicator Chapter Indicator Track Indicator Operation Indicator
Rear Panel Overview 1 Cooling Fan The cooling fan will operate automatically as needed to ensure the system does not overheat. Typically, the fan may operate during extended operation at high volume levels. When installing the system, be sure the fan area is unobstructed. 2 Speaker Connectors Connect the “Front Right” and “Front Left” outputs to your right and left speakers. Connect the “Center” outputs to your center speaker.
Tour of the Remote Control The DVS3100/3000 multibrand remote control allows you to operate the DVD player, as well as many popular brands of VCR and television. This tour demonstrates the buttons in four sets: System Control, DVD, TV, and VCR. System Control Buttons System Control buttons are used to set the remote control to operate the DVD, VCR or TV/AUX. The Mute and Volume buttons are mode independent, i.e. they adjust the system audio regardless of which mode you are in.
DVD Function Buttons A-B Repeat - Use to mark the beginning (A) and end (B) of a segment you wish to repeat in a continuous loop; see page 24. Angle - Use to watch movies from a variety of camera angles (not available on all DVDs); see page 30. Audio - Use to access various audio functions on a video disc. Press to change the Surround Sound mode when viewing the VCR, AUX/TV or listening to a CD; see page 28.
VCR Function Buttons Channel +/– - Use to scan the channel list on a compatible VCR. Fast Forward ( ) - Press to fast forward a tape in a compatible VCR. Number Keys - Use to select a channel on a compatible VCR. Play - Press to begin playback of a tape in a compatible VCR. Power - Press to turn a compatible VCR on and off. Rewind ( ) - Press to rewind a tape in a compatible VCR. Stop ( ) - Press to stop a tape in playback on a compatible VCR.
2 - Connections Connecting to a Stereo TV Choose one of three methods—Composite, S-Video, or Component—to connect the DVS to your stereo television. All 3 methods use the same audio connections. Always turn off the DVS3100/3000 system, TV, and other components before you connect or disconnect any cables.
Connection to an Audio System You can connect the DVS3100/ 3000 to a variety of home audio systems. Choose the method that matches your speaker configuration: 1 2-Channel (Stereo) Sound 2 3-Channel Sound 3 5-Channel Sound 4 5.1 Channel Sound 5 Dolby Pro Logic Receiver or Stereo Amplifier 1 2-Channel (Stereo) Sound Connect the DVS to two front speakers (RF, LF). 2 3-Channel Sound Connect the DVS to three front speakers (RF, C, LF).
5 Dolby Pro Logic Receiver or Stereo Amplifier Connect audio/video cables from the Audio Out jacks (R1/L1 or R2/L2) on the back of the DVS3100/ 3000 to the Audio In jacks on your Dolby Pro Logic Receiver or 2-channel Stereo Amplifier.
Connecting a VCR Follow these steps to connect a VCR to your DVS3100/ 3000. 1 2 3 VCR Connect Audio Connect audio/video cables from the Audio Out jack on the back of your VCR to the VCR IN jack (R, L) on the back of the DVS3100/3000. AUDIO OUT VIDEO OUT Connect Video Connect an audio/video cable from the Video Out jack on the back of your VCR to the VCR IN jack (V) on the back of the DVS3100/3000. 1 2 Select VCR Press the VCR button on the DVS front panel or remote control.
Connecting a TV/Aux Component Follow these steps to connect a television or other auxiliary component, such as a stereo, to your DVS3100/3000. 1 2 Connect Audio Connect audio/video cables from the Audio Out jack on the back of your television/auxiliary component to the AUX IN jack (R, L) on the back of the DVS3100/3000.
Connecting Headphones Headphones (not included) are easy to connect and enjoy with your DVS3100/3000. 1 Before connecting 2 Connect headphones Set headphone volume at minimum. Use a standard stereo plug to the headphone jack (stereo 1/4” phone plug). 3 Adjust volume Adjust to a suitable volume. NOTE: System speakers will not operate when headphones are connected.
3 - Basic Functions Operating the System Before you begin, check that you have properly completed the Speaker Setup (see page 35) and connected the DVS3100/3000 to your TV and other equipment following one of the methods described in Chapter 2. Now you are ready to plug in the unit, turn it on and set the onscreen language. 1 2 Plug in Unit If you have not yet plugged in the DVS, connect the AC cord to a standard 110V outlet observing the polarity of the plug.
Playing a Disc Playing your DVDs is a simple 3 step process. 1 Open the Disc Tray Press the OPEN/CLOSE button. Note: If the system is in Standby mode, the Standby indicator light will turn off and the tray will open. 2 Insert a Disc Place a DVD, VCD, or CD gently into the tray with the disc’s label facing up. 3 Play the Disc Press the PLAY/PAUSE button or OPEN/CLOSE button to close the disc tray. Playback will begin.
Special Playback Options While a disc is playing, you can stop, pause/still, view frame by frame, slow motion and resume playback. For search & skip features, see pages 20 and 21. 1 2 Press the STOP button during playback. • If the player is left in Stop mode for more than one minute, a screensaver will appear and the TV screen will fade in and fade out repeatedly. Press the PLAY button to resume normal play.
Search Features During playback, you can search quickly through a chapter at variable speeds. 1 Search a Chapter or Track 2 Variable Speed Search (DVD) While a disc is in Play mode, press the SEARCH buttons on the remote or press and hold the SKIP/SEARCH buttons on the front panel. Press the SEARCH buttons on the remote or press and hold the SKIP/SEARCH buttons on the front panel again to search at progressively faster speeds (2X-8X-16X-32X-normal speed).
Skip Features During playback, you can use the Skip function to jump quickly to the beginning of any chapter or track. 1 Skip a Track 2 DVD Skip Notes While a disc is in Play mode, press the SKIP buttons on the remote or press the SKIP/SEARCH buttons on the front panel. • Press forward SKIP to jump to the next chapter. • Press back SKIP to jump to the beginning of the chapter. • Press back SKIP again to jump to the beginning of the previous chapter. 3 1,2,3 VCD Skip Notes MENU OFF mode, VCD 1.
Display Feature The Display button serves two purposes: 1. Shows you the current status of your DVD, VCD or CD 2. Provides a shortcut to jump to any title, chapter, track or specific time counter position on the disc. Press Display twice to view audio and subtitle information.
Repeat Play Repeat Play allows you to repeat a title, chapter, track or even an entire disc. DVD repeats playback by chapter or title, CD and VCD repeat playback by track or disc. W H E N P L AY I N G A D V D 1 Show Repeat Play Status Press the REPEAT button once to display the current Repeat Play status. W H E N P L AY I N G A C D / V C D 1 Show Repeat Play Status 2 Repeat Track Press the REPEAT button once to display the current Repeat Play status.
A-B Repeat The A-B Repeat function allows you to repeat any segment of a movie over and over again. Simply mark the beginning (A) and the end (B) of the segment you want to review. 1 Mark the Starting Point 2 Mark the Ending Point In Play mode, press the A-B REPEAT button at the beginning of the segment you want to review (Point A). Press the A-B REPEAT button again at the end of the segment you want to review (Point B). The segment will begin repeating in a continuous loop.
Program Playback DVD DVD Program Playback lets you set a specific order for playback of titles or chapters on a DVD.
Program Playback CD/VCD CD/VCD Program Playback lets you set a custom order or random playback of tracks on a single disc. PROGRAM 01 02 03 04 05 06 07 08 09 RANDOM ------ ------ ------ RETURN 02 06 10 14 Open Program Menu 2 Select Program or Random 3 Program Track Order ENTER TRACKS 01 05 09 13 ------ 1 PROGRAM ORDER 03 04 07 08 11 12 15 03 ----- 02 ----- CLEAR LAST TRACK CLEAR ALL TRACKS PRESS PLAY TO START RETURN 01 ----- ------ ENTER In Stop mode, press the PROGRAM button.
4 - Advanced Functions Disc View Disc View is a preview feature activated by pressing the TITLE button: • DVD - Displays the DVD’s Title Menu if the disc has more than one title. • CD - Plays the first ten seconds of every track on the CD in sequence. • VCD - Previews the first few frames of each track. Also allows you to divide a track into 9 equal segments and see a preview of each segment. 4 2 3 5 6 INDEX VIEW (VCD) Displays the first few frames of each track and its corresponding track number.
Audio Selection Many DVDs provide multiple language and audio setup options. The AUDIO button provides a shortcut to view and select these options. If the disc has a menu system, you can also set soundtrack options via the MENU button. AUDIO: ▲ ENG ▼ DOLBY DIGITAL 5.1 CH W H E N P L AY I N G A DVD/VCD/CD 1 Open the Audio Menu 2 Select DVD Language During playback, press the AUDIO button.
Subtitle Language OFF USING THE SUBTITLE BUTTON 1 Open Subtitle Menu 2 Set Subtitle Language ▲ SUBTITLE: ▲ ENG ▼ ▲ Many DVDs provide subtitles in one or more languages. The SUBTITLE button provides a shortcut to view and select these options. If the disc has a menu system, you can also set subtitle options via the MENU button. 3 During playback, press the SUBTITLE button. Use the UP/DOWN button to select the desired subtitle language. • Subtitle languages are represented by abbreviations; i.e.
Screen Angle MARK: ON ▲ ANGLE: ▲ 1/6 ▼ ▲ Some DVDs allow you to view the same scene from different perspectives, or angles, while watching a movie. Press the ANGLE button to activate this feature. 1 Check for Angle Mark 2 Press Angle During playback, check to see if the ANGLE mark ( present at the upper right hand corner of the screen. ) is If is present, press the ANGLE button to view angle options. 3 Select Screen Angle Use the UP/DOWN button to select one of the available screen angles.
Bookmarks --- ▲ MARKER: ▲ You can insert up to three Bookmarks on your DVDs or VCDs (MENU OFF mode), so you can jump quickly to your favorite scene or song. MARK ENTER 1 2 During playback, press the BOOKMARK button on the remote. The “MARKER” header will appear on the screen. Select Placeholder Use the LEFT/RIGHT button to move to one of the three bookmark placeholders (- - -). 3 1 During playback, press the BOOKMARK button on the remote.
Zoom You can Zoom in 2 or 4 times normal magnification while watching a DVD or VCD. 1 Open Zoom Menu 2 Set Crosshairs During playback or pause mode, press the ZOOM button on the remote. The “crosshair icon” will be displayed on screen. Use the UP/DOWN or LEFT/RIGHT button to move the crosshairs to the position on the screen you want to magnify. 3 Zoom In Press the ENTER button as follows: • During DVD playback or pause mode, press ENTER repeatedly to zoom in 2X - 4X - normal.
5 - Setup Mode Using the Main Menu The Main Menu is used to set System preferences, such as audio options, display options, parental lock levels, and language preferences. To access the Main Menu, press the SETUP button on the remote control.
Audio Options The Audio Options menu allows you to set Dynamic Compression, Surround Mode, and Speaker Setup (see page 35). ▲▼ ▲ OFF NATURAL ▲ RETURN ▲ 1 DYNAMIC COMPRESSION 2 PRO LOGIC/SURROUND 3 SPEAKER SETUP ▲ AUDIO OPTIONS 1 Open “Main Menu” 2 Select “Audio Options” When in play or stop mode, press the SETUP button. Use the UP/DOWN button to select AUDIO OPTIONS, then press ENTER.
Speaker Setup The Speaker Setup allows you to customize the DVS3100/ 3000 for your surround sound setup, including speaker size, channel delays (see page 36) and channel balance (see page 37). The system is preset at the factory for a five (5) speaker configuration. For proper audio performance, you must setup the system to match your speaker configuration. 1 Open “Main Menu” 2 Select “Audio Options” When in play or stop mode, press the SETUP button.
Channel Delays Ideally all of your speakers will be the same distance from your primary listening area. If not, you can set Channel Delays for your center and surround speakers so all audio signals arrive at the same time. 1 2 Open “Speaker Setup” During playback of a DVD with 5.1 channel sound, press VOL. SETUP on the remote control. Set Center Channel Delay Use the UP/DOWN button to set the center channel delay from 0-5ms, in 1ms increments, then press ENTER.
Channel Balance If your center speaker, surround speakers, or subwoofer are too loud relative to your front speakers, you can lower their signal levels in 1 db increments. Use the built-in noise generator (labeled “TEST”) to check the balance among the six channels. 1 Open “Main Menu” 2 Select “Audio Options” When in play or stop mode, press the SETUP button. Press the UP/DOWN button to select AUDIO OPTIONS, then press ENTER.
Display Options Use the Display Options menu to set TV Aspect, Angle Mark, Still Mode, On Screen Messages, Display Brightness, and Black Level. DISPLAY OPTIONS ▲ 1 2 3 4 5 6 TV ASPECT ANGLE MARK STILL MODE ON SCREEN MESSAGES DISPLAY BRIGHTNESS BLACK LEVEL 4 X 3 PS ON AUTO ON AUTO OFF RETURN ▲▼ ENTER 1 Open “Main Menu” 2 Select “Display Options” 3 Set Display Options Press the SETUP button in play or stop mode. Use the UP/DOWN button to select DISPLAY OPTIONS. Then press the ENTER button.
Setting/Changing Password Rating Limit is a password protected parental lock which allows you to block playback of individual DVDs based on their content. This feature is compatible only with DVDs encoded with parental level ratings. PASSWORD CHECK S E T T I N G T H E PA S S W O R D 1 Open “Main Menu” 2 Select “Rating Limit” - - - - RETURN PRESS 0-9 3 5 Enter New Password Enter your new 4-digit password using the 0-9 buttons. Press the SETUP button when in play or stop mode.
Rating Limit Many DVD’s are encoded with a rating limit from 1 to 8 to help parents block unwanted content. The DVS3100/3000 will automatically detect the rating limit and prevent playback at the preset level.
Setting Default Languages The DVS3100/3000 offers a wide variety of language options. You can set default languages for the unit itself, the menus specific to each disc, and the soundtracks and subtitles of each DVD.
MAIN MENU 1 2 3 4 5 6 7 AUDIO OPTIONS DISPLAY OPTIONS RATING LIMIT PLAYER MENU DISC MENU AUDIO SUBTITLE RETURN UNLOCKED ENGLISH ENGLISH ENGLISH AUTOMATIC ▲▼ AUDIO LANGUAGE SUBTITLE LANGUAGE 1 1 Open “Main Menu” Press the SETUP button when in play or stop mode. 3 Select “Audio” Use the UP/DOWN button to select AUDIO, then press ENTER. Set Audio Language Use the UP/DOWN button to select the desired language, then press ENTER.
6 - Reference Controlling a TV with the Remote You can program the remote control to operate most brands of television. 1 2 Turn on TV Turn on the television and point the DVD remote at the television. Program Remote While holding down the POWER button, enter the code for your brand of television (see table at right).
Controlling a VCR with the Remote You can use the remote control to operate the most often used features of the Go-Video DDV9xxx Series Dual-Deck VCR. 1 Turn on your Dual-Deck VCR 2 Select VCR Mode Turn on the VCR and point the DVD remote at the VCR. Press the VCR button on the remote control. 3 Verify Operation 4 Operate the VCR • Press the Power button on the remote. If the VCR turns off, the remote will control the basic functions of the VCR.
Troubleshooting Guide The following are some of the most frequently asked questions about our DVS3100/3000. If you don’t find the answers you need here, you can contact our Customer Service Department by phone at (480) 922-0896. Office hours are Monday-Friday, 6:00 a.m. to 7:00 p.m. and 8:00 a.m. to 4:00 p.m. MST on Saturday. You can also contact us anytime at our e-mail address: “custsvc@sensoryscience.com.” Or refer to a listing of authorized Go-Video service centers on our Web site at “www.govideo.com.
Technical Specifications GENERAL Power Requirements Power Consumption Weight Dimensions Operating Temperature Range Operating Humidity Range CD - 31/2 inches (Compact Disc) AC 120V, 60 Hz 19 W min; 310 W max 21.5 lbs W 17” x D 14.5” x H 4.75” 41-95°F 10-75% DVS3100 COMBINANT DIGITAL AMPLIFIER F/L, F/R, C/T, R/L, R/R 8 Ω load: 75 watt x 5, 375 watt total (THD 0.7%) 4 Ω load: 100 watt x 5, 500 watt total (THD 2.7%) THD Max Output <3%; Half Output <0.
DVS Limited Warranty Who Provides the Limited Warranty During the warranty period, the Go-Video Warranty Administrator will honor DVS service for 90 days labor, 1 year parts from the original date of consumer purchase. See below for Commercial, Industrial or Educational use coverage. DVS remote controls are warranted for 90 days from the date of purchase. Who is Protected This warranty protects the original consumer owner of this Go-Video product.
Other Warranty Coverage Commercial, Industrial or Educational use has the same warranty coverage as stated in this warranty. What are the Exceptions This warranty does not cover: (1) Normal maintenance service. (2) Damage from misuse, abuse neglect or accident, natural disasters or Acts of God. (3) Cabinetry, decorative parts, knobs or buttons. (4) The foreign country use of this product.
7835 East McClain Drive Scottsdale, Arizona USA 85260 www.sensoryscience.com www.govideo.