Precautions 1 CAUTION RISK OF ELECTRIC SHOCK DO NOT OPEN CAUTION: TO PREVENT THE RISK OF ELECTRIC SHOCK, DO NOT REMOVE COVER (OR BACK). NO USER-SERVICEABLE PARTS INSIDE. REFER SERVICING TO QUALIFIED SERVICE PERSONNEL.
Precautions 11. POWER SOURCES - This product should be operated only from the type of power source 2 15. OVERLOADING - Do not overload wall outlets, extension cords, or integral convenience indicated on the making label. If you are not sure receptacles, as this can result in a risk of fire of the type of power supply to your home, or electric shock. consult your product dealer or local power 16. OBJECT AND LIQUID ENTRY - Never push company.
Precautions 3 Safety precautions This appliance is a Class I laser product. Direct exposure to beam may cause eye injury. Power requirement for this appliance is 120V, AC 60 Hz. Please ensure the power supply to your home is in this range before using the recorder. Operating precautions Please use the original packing case and materials when transporting this DVD recorder. The temperature of the top cover and rear panel of the recorder may be high after playing for a long period of time. This is normal.
Special Go Video Features 4 AutoPlay Tired of wading through confusing and inconsistent menus upon loading rented DVD discs? When the AutoPlay feature is active, the DVD+VCR will find the beginning of the movie on most discs and begin playing the movie automatically. To enable this feature, turn AutoPlay "On" in the recorder Setup menu. To enable the AutoPlay feature: 1. While DVD playback is stopped, press the SETUP button. 2. Use the buttons to select PLAY and press ENTER. 3.
Table of Contents 5 Precautions .................................................................................................................................................. 1-3 Special GoVideo Features.......................................................................................................................... 4 Table of Contents ..........................................................................................................................................5 Recorder Overview ..
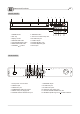
Names and functions 6 FRONT PANEL 1 2 3 4 OPEN/CLOSE 5 6 7 8 PLAY/PAUSE NEXT/PREV CHANNEL RECORD STOP 9 1. POWER button 2. Disc tray 3. Display window 8. RECORD button 9. Front AV connections flap door 10.S-VIDEO IN jack 4. OPEN/CLOSE button 5. PLAY/PAUSE/STOP button 6. NEXT/PREVIOUS button 7. CHANNEL / buttons 11.VIDEO IN jack 12.AUDIO IN(LEFT) jack 13.AUDIO IN(RIGHT) jack 14.DV IN jack 10 11 12 13 14 REAR PANEL 1 1. 2. 3. 4. 5. 6.
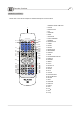
Recorder Overview 7 REMOTE CONTROL Please refer to the relevant chapters for detailed descriptions of these buttons: 1 2 OPEN/CLOSE SETUP DISPLAY 3 POWER 20 MENU TITLE 4 5 6 7 8 9 21 22 SUBTITLE RANDOM GO TO AUDIO PREV. NEXT PLAY PAUSE REW FF SLOW STOP/RETURN 10 11 12 13 14 15 16 17 18 19 23 24 25 26 27 28 29 30 ENTER ZOOM TIMER EDIT RECORD ADD/CLEAR ANGLE DISC OP. INPUT REPEAT BOOKMARK P.SCAN VIEW + VOL CH 31 32 33 34 35 36 37 38 1. REMOTE SIGNAL EMITTER 2.
Connections 8 AUDIO OUTPUT CONNECTIONS Dolby Pro Logic Surround Sound (GOOD) Enjoy Dolby Pro Logic Surround by connecting an amplifier and speaker system (right and left front speakers, a center speaker, and one or two rear speakers).
Connections 9 VIDEO OUTPUT CONNECTIONS GOOD BETTER Video cable S-Video cable TV TV Connect your recorder with an S-Video cable (not included), if your TV is equipped with an S-Video input. Do not connect the yellow video cable when using an S-Video cable. COMPONENT VIDEO OUTPUT (BEST) The Component Video output allows you to enjoy the best picture quality from a DVD video disc.
Connections 10 TV TUNER CONNECTIONS Outdoor Antenna DVD recorder Signal input Video cable Audio cables (L, R) Signal output TV NOTE Refer to your TV owner's manual if necessary. Turn off the power and unplug both the TV and DVD recorder before making connections. The ANTENNA OUT jack is for signal pass-thru only NOT FOR DVD PLAYBACK. Use the video, S-Video, or Component Video outputs for DVD playback.
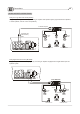
Connections 11 REAR A/V CONNECTIONS You can watch or record from an external source (such as a VCR or cable box) connected to the rear panel Audio/Video inputs. External Source S-VIDEO OUT VIDEO OUT AUDIO OUT LEFT RIGHT Use either S-Video or Video cable Audio cables (left, right) DVD recorder Video cable Audio cables (L, R) Signal output TV Connect your recorder with an S-Video cable (not included) if your external Source is equipped with an S-Video input.
Connections 12 FRONT A/V CONNECTIONS DVD recorder front panel PLAY/PAUSE OPEN/CLOSE NEXT/PREV CHANNEL RECORD STOP Use either S-Video or Video cable Audio cables (left, right) External Source S-VIDEO OUT Video cable VIDEO OUT AUDIO OUT LEFT RIGHT Audio cables (L, R) Signal output Connect your recorder with an S-Video cable (not included) if your external Source is equipped with an S-Video input. Do not connect the yellow video cable when using an S-Video cable.
Special features 13 The digital input connector, known as a 'firewire' or 'IEEE1394', is used to transmit digital broadband signals commonly used by digital video camcorders. Audio and video signals are transmitted using a special firewire cable. In addition to DVD and Hi8 camcorders, PCs with digital video outputs can be connected to this digital input. MP3 files are highly compressed music files, which compress standard CD audio files to ~1/10 of their original size.
Playing Discs 14 PLAYING A DVD-VIDEO DISC 1. Make sure all connections are made correctly, then plug the power cord into a wall outlet. Press POWER to power on your recorder. 2. Insert a DVD disc. 3. Use the arrow keys or 0-9 buttons to select the desired title. Title 1 Title 2 OPEN/CLOSE SETUP DISPLAY POWER POWER OPEN/ CLOSE MENU TITLE 0-9 SUBTITLE Title 3 Title 4 RANDOM 5. To remove the disc, press the OPEN/CLOSE button on the remote control of front panel. AUDIO PREV.
Playing Discs 15 PLAYING A DVD+RW OR DVD+R DISC DVD Index Screen 1. TITLE 01/01/03-12:14PM SP 00:00:20 2. TITLE 01/01/03-12:14PM HQ 00:00:20 3. TITLE 01/01/03-12:14PM SLP 00:00:20 4. TITLE 01/01/03-12:14PM HQ 00:00:20 5. TITLE 01/01/03-12:14PM SP 00:00:20 6. TITLE 01/01/03-12:14PM EP 00:00:20 PREV NEXT Description: The DVD Index Screen appears when you load a DVD+R or DVD+RW disc. 1. 2. 3. 4. 1. TITLE 01/01/03-12:14PM SP 00:00:20 1. 2. 3. 4.
Playing Discs 16 PLAYING A DVD+RW OR DVD+R DISC 3. Browse the DVD Index Screen. A picture will appear on screen for each recording on the DVD+R/+RW disc. 4. Use the ARROW keys (UP/DOWN/RIGHT/LEFT) to highlight the desired title. 5. Press ENTER or PLAY to start playback of the selected title. OPEN/CLOSE SETUP DISPLAY OPEN/ CLOSE POWER MENU Use the arrow keys to highlight PREV or NEXT on the screen and press ENTER to view the next or previous page of titles.
General features 17 The control bar provides a shortcut to all DVD playback options. During playback, press GO TO to display the control bar: Use the RIGHT/LEFT arrow keys to highlight the desired item, then press ENTER to select. Once the item is selected, use the UP/DOWN arrow keys to set it and press ENTER to confirm. Press STOP/RETURN to exit the control bar. Playback mode Set your preferred playback mode, including NORMAL, PROGRAM, RANDOM or one of four REPEAT modes.
General features 18 1. Fast forward Press FF during normal playback. The speed will cycle with each press as follows: FF2, FF4, FF16, FF32 or PLAY. Press PLAY to resume normal playback. 2. Fast reverse Press REW during normal playback. The speed will cycle with each press as follows: FR2, FR4, FR16, FR32 or PLAY. Press PLAY to resume normal playback. OPEN/CLOSE SETUP DISPLAY POWER MENU TITLE 3. Pause Press PAUSE during normal playback to pause playback. Press PLAY to resume normal playback. 4.
Locating a Specific Title, Chapter or Track 19 DVD VIDEO DISCS ARE NORMALLY DIVIDED INTO TITLES AND SUB-DIVIDED INTO CHAPTERS. SIMILARLY, CD'S (AUDIO, HDCD, and MP3) ARE DIVIDED INTO TRACKS. YOU CAN CONVENIENTLY LOCATE ANY SPECIFIC TITLE, CHAPTER, OR TRACK WITH THIS DVD PLAYER. TITLE1 CHAPTER1 TITLE2 CHAPTER2 CHAPTER1 CHAPTER2 DVD DISCS TRACK1 TRACK2 TRACK3 TRACK4 TRACK5 CD DISCS LOCATING A TITLE You can locate a specific title (if available on the disc) by pressing the TITLE button. 1.
Setting Repeat Options 20 YOU CAN REPEAT TITLES, CHAPTERS, TRACKS, OR SCENES DURING DVD PLAYBACK. REPEATING A TITLE, CHAPTER, OR TRACK 1. Press the REPEAT button during playback. The repeat mode changes each time you press the REPEAT button. Repeats the current chapter . OPEN/CLOSE SETUP DISPLAY POWER Repeats the current title. MENU TITLE Repeat the entire disc. SUBTITLE RANDOM GO TO AUDIO PREV. NEXT PLAY PAUSE REW FF SLOW STOP/RETURN Resumes normal playback.
Playing in Random Order/Bookmark 21 YOU CAN PLAY TITLES, CHAPTERS OR TRACKS IN RANDOM ORDER. PLAYING TITLES IN RANDOM ORDER 1. During normal playback press the RANDOM button. The disc will start playing in random order. OPEN/CLOSE SETUP DISPLAY POWER MENU TITLE SUBTITLE RANDOM GO TO AUDIO RANDOM PREV. NEXT PLAY PAUSE REW FF SLOW STOP/RETURN 2. Press RANDOM again to resume normal playback. ENTER NOTE: The PREV/NEXT buttons will skip to random tracks in RANDOM mode.
Selecting Camera Angles, Languages & Audio Settings 22 YOU CAN SELECT FROM MULTIPLE ANGLES AND LANGUAGES (IF AVAILABLE ON THE DISC). 1/4 2/4 Selecting a camera angle Selecting a language CHANGING THE CAMERA ANGLE If the video on the DVD was recorded with multiple angles, you have the option to change the camera angle of the scene you are watching. Press the ANGLE button while playing a scene recorded with multiple angles.
Playing in a Custom Order 23 YOU CAN PROGRAM A CUSTOM ORDER FOR DISC PLAYBACK (UP TO 99 TRACKS). PROGRAMMING A CUSTOM PLAYBACK ORDER 1. Press GO TO to display the control bar. 2. Use the RIGHT/LEFT keys to highlight , then press ENTER. 3. Use the UP/DOWN keys to select PROG, then press ENTER. Two windows will be displayed on the screen. The left window displays all titles available on the disc. OPEN/CLOSE SETUP DISPLAY POWER MENU FAVORITE/PROGRAM TITLE SUBTITLE RANDOM GO TO AUDIO PREV.
Selecting Subtitles 24 Some DVDs provide subtitles in one or more languages. You can use the SUBTITLE button to quickly view and change settings. HELLO Selecting a subtitle language DISPLAYING SUBTITLES OPEN/CLOSE SETUP DISPLAY POWER MENU Press the SUBTITLE button during playback to choose one of the subtitle languages available on the disc, or turn subtitles off. TITLE SUBTITLE SUBTITLE RANDOM GO TO AUDIO PREV.
Using the On-Screen Display 25 YOU CAN VIEW THE RECORDER'S STATUS AND DISC INFORMATION ON YOUR TV SCREEN. CHECKING STATUS OF THE RECORDER With this function, you can view the following information on your TV: - Current title number - Current chapter number - Title elapsed time - Title time remaining Press the DISPLAY button during DVD playback.
Setting the Parental Lock 26 PARENTAL LOCK IS A PASSWORD PROTECTED SYSTEM THAT ALLOWS YOU TO BLOCK PLAYBACK OF DISCS BASED ON THEIR RATING (NOT ALL DISCS ARE RATED). SETTING THE PARENTAL LOCK To enable the Parental Lock feature: 1. Press the STOP button twice during playback. SETUP OPEN/CLOSE SETUP DISPLAY 2. Press the SETUP button. POWER MENU TITLE 3. Use the RIGHT/LEFT keys to highlight then press ENTER. , SUBTITLE RANDOM GO TO AUDIO PREV.
Customizing Recorder Settings 27 YOU CAN USE THE SETUP MENU TO CUSTOMIZE THE RECORDER TO SUIT YOUR PERSONAL PREFERENCES. SETUP MENU GNRL PLAY REC LANG TUNER CLOCK DISPLAYING THE SETUP MENU The Setup menu includes six categories: General, Playback, Record, Language, Tuner and Clock Setup. General Setup 1. Press SETUP during stop mode. 2. Use the arrow keys to select the desired category and press ENTER. 3. Press SETUP to exit the setup menu.
Recording Options 28 SEARCHING FOR CHANNELS Before you can record TV programs, you must first scan for channels. 1. In STOP mode, press SETUP to access the Setup menu. 2. Use the RIGHT/LEFT keys to highlight the TUNER icon, then press ENTER. 3. Press ENTER then use the UP/DOWN arrow keys to select your input source: Air (Antenna) or Cable, Press ENTER again to confirm. 4. Use the RIGHT/LEFT arrow keys to highlight SCAN, then press ENTER. The recorder will automatically search for all available channels.
Recording Options 29 BASIC RECORDING 1. Connect the recorder as shown on pages 9-11. 2. Insert a recordable DVD+RW or DVD+R into the unit. 3. Press DISPLAY to access the control bar. 4. Use the RIGHT/LEFT arrow keys to highlight the "Video input source" icon , and press ENTER.
Recording Options ONE-TOUCH RECORDING 1. During normal recording, press RECORD again to record for exactly 30 minutes and then stop automatically. 2. Press RECORD repeatedly to continue adding recording time in 30-minute intervals. The length of the recording time is determined by disc capacity and record quality. If the recording time you set exceeds the capacity of the disc, then One-Touch Recording will be cancelled and the unit will switch to normal recording. 3. To stop recording, press STOP.
Recording Options 31 TIMER RECORDING 1. Make sure the clock is set accurately as shown on page 30. 2. Press the TIMER button to display the record scheduler. NOTE: To delete a programmed event, use the UP/DOWN arrow keys to highlight it and press ADD/CLEAR. 3. Use the UP/DOWN arrow keys to highlight an event and press ENTER. The Item Editor dialog box will be displayed as shown. While in the Item Editor, use the arrow keys and the ENTER button to select and set each option.
Editing 32 EDITING DVD+RW TITLE 1. Insert a recorded DVD+RW in the disc tray. The DVD Index Screen appears. 2. Use the arrow keys to highlight the title you want to edit, and press ENTER to start playback. Use the arrow keys to highlight PREV or NEXT on the screen and press ENTER to view the next or previous page of titles. 3. During playback, press EDIT to display the title edit bar. use the RIGHT/LEFT arrow keys to highlight one of the following icons and press ENTER.
Editing 33 EDITING CHAPTERS From the control bar, select the "Chapter Maker" icon, then use the UP/DOWN arrow keys to select from the following: When is selected by pressing ENTER, a new chapter marker will be added to the current point. When is selected by pressing ENTER, the marker for the current chapter will be deleted. When is selected by pressing ENTER, all of the chapter markers in the current title will be deleted.
Editing 34 SETTING TITLE ICONS AND TITLE NAMES From the control bar, select the "T-Icon" or "T-Name" icon, then use the UP/DOWN arrow keys to select from the following: To grab a frame from the currently playing title as the icon for that title, press ENTER with "T-Icon" selected. To rename the current title, press ENTER with "T-Name" selected. A virtual keyboard appears on your TV screen: Use the ARROW keys to highlight the letter or character you want to input, and press ENTER to confirm it.
Editing EDITING A DVD+RW DISC 1. Insert a DVD+RW in the disc tray. 2. Press DISC OP. to display the disc editing bar. 3. Use the RIGHT/LEFT arrow keys to highlight one of the icons shown above (Disc finalization, Delete title, Erase disc, Disc protection, etc.) and press ENTER. Then use the UP/DOWN and ENTER keys to make selections.
Editing 36 EDITING A DVD+RW OR DVD+R DISC Select to view information about the selected disc, including Disc type, Title numbers, Recorded time, Remaining time and Disc status. FINALIZE DISC (DVD+R only) Highlight the icon and press ENTER. It will take a few minutes to finalize the disc. NOTE: Finalizing makes your DVD+R disc compatible with other DVD players. Once a DVD+R has been finalized, you cannot record or edit the disc. T-DEL (DVD+RW only) Select to delete the currently selected title.
Specifications 37 DVD VIDEO PLAYER/OUTPUTS/SUPPLIED ACCESSORIES PERSONAL VIDEO RECORDER Power supply 120V AC 60 Hz Power consumption 28W Mass 11.5 Ibs (5.2 kg) External dimensions 17.
Troubleshooting Problem 38 Solution No power Connect the power plug into the wall outlet securely. No picture Verify the connection from the DVD video output to the TV video input. Make sure the correct video input is selected on your TV. Connect the video cable into the jacks securely. Refer to your television owners manual. No sound Connect the audio cables into the jacks securely. Verify the connection from the DVD audio output to the TV or receiver audio input.