
Product Manual


4
CHARGE ME: Keep your Goal Zero Yeti plugged in when not in use. For more tips and tricks
on keeping your battery healthy, see the BATTERY 101 section (pg. 14).
When charging your Goal Zero Yeti you will notice a battery segment blinking in the
display. This indicates the current charge status. Once your Goal Zero Yeti is fully
charged, all battery segments will be lit and remain solid. As long as there is more power
going into the Goal Zero Yeti than is being pulled from the output ports, the display will
also indicate an estimated time until fully charged. This is an estimated time based on
the power input and output numbers at that time; it will gradually adjust to a shorter or
longer time as the average charge or discharge rates fluctuate.
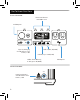
Charging from Solar
Your Goal Zero Yeti has two 8mm charging ports. One is located on the left side of the
faceplate. The other is located on the back in the bottom right hand corner. Both 8mm
ports are designed to work with Goal Zero solar panels and are capable of taking in
120W of solar.
NOTE: You can only use one 8mm input at a time to charge your Yeti. If you plug into both
8mm input ports at the same time, the Yeti will always default to the front 8mm port.
Charging Your Goal Zero Yeti
IMPORTANT NOTE: When solar charging your Goal Zero Yeti Lithium, take note of
the voltages of the solar panels and do not exceed 22V. Individual solar panels,
or solar panels chained in series in excess of 22V cannot be used with the Goal
Zero Yeti Lithium and can cause serious damage to the unit. For help on chaining
solar panels, call our Customer Solutions Center at 888-794-6250.