
Product Manual


5
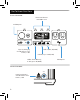
1. Place your solar panel where it will get as much direct sunlight as possible.
2. Insert the blue-ringed plug from the panel into either input port on the Yeti. You
will know the Yeti is charging when the blue LED light next to the input port lights
up, and the battery segments in the LCD battery display are blinking. The Yeti is fully
charged when all battery segments stop blinking and remain solid.
3. Some Goal Zero panels are chainable to provide more power to your Yeti and
reduce solar charge times. The input port is capable of taking in 120W of solar.
Charging from the Wall:
Using the included AC Wall Charger, plug your Goal Zero Yeti into any wall outlet. You will
know the Goal Zero Yeti is charging when the blue LED light next to the input port turns
on, and battery segments in the battery display are blinking. The Goal Zero Yeti is fully
charged when all battery segments stop blinking and remain solid. The Goal Zero Yeti
should recharge from the wall in about 9 hours.
1. The AC wall adapter comes in two pieces. Connect the two pieces by plugging the
cable into the box.
Charging from USB-C:
Charge your Yeti using the 60W USB-C PD input/output port by plugging into any USB-C
charger (sold separately).
NOTE: You can plug into both the 8mm input port and the USB-C input/output port at
the same time to receive up to a combined 180 watts.
NOTE: For additional charging options such as car charging and fast charging, visit
www.goalzero.com/shop/yeti-accessories.