
User Manual


After carrying (Do Not Drag) GameMaker bag to desired location,
place the bag on the ground, carefully unzipping the top and front
zippers. (Make sure not to place goal on concrete, rocks, or
other rough surfaces) Roll out the roll up tarp (Containing
GameMaker goal, Pump, and Hose) and remove the GameMaker from
the clear plastic bag. (You may throw this bag away) A quick setup
guide can be found connected to the inside of the GameMaker bag top.
Please do not lose it.
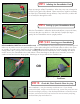
STEP 1:
Transporting the Gamemaker
goal onto a level surface.
Take your GameMaker and spread it out along the ground, making sure
that the net is not entangled in any way as shown.
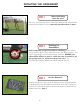
To inflate the GameMaker, first unscrew the cap located on the valve of
the GameMaker. Then grab the inflation valve (The piece with the red
stripe on the top) and push it inward. After doing this, it might be
possible to either twist it clockwise or counterclockwise. To inflate the
goal, turn counterclockwise and then release. The nozzle should spring
outwards. It is now in the inflate position. The valve will remain in this
position until it is time to deflate the goal.
STEP 2:
Pre-Inflation Position for
GameMaker Goal.
STEP 3:
Properly Setting the
Valve for Inflation.
4
Take the hose and place it into the “inflate” port on the pump (clearly
marked between the handles on top of the pump) and push (snug fit) the
other end into the GameMaker valve opening. The top of the pump
states which side is for inflation and deflation. The pump hose does
not need to be forcefully inserted into the opening, doing this
may damage your valve.
STEP 4:
Properly Setting the
Pump for Inflation.
INFLATING THE GAMEMAKER
Note: Models 4’x6’, 5’x8’ and FUTSAL do not have cantilever.
Cantilever