
User Manual


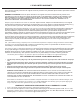

Carefully roll up the rollout tarp, starting at the pouch end, until it sits
comfortably in the GameMaker bag. It is okay to gently push and shift the
Gamemaker to achieve a more desirable fit. The bag can then be re-
zipped and shut using the Velcro strip. Use side pouch in bag to store
stakes. The GameMaker is now ready to be stored in a temperature
controlled environment. Do not store in a garage or car trunk as extreme
temperatures, especially cold, can be harmful to the GameMaker.
STEP 6:
Re-packing and Storage.
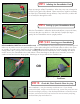
STEP 5:
Prepping the GameMaker
for Re-bagging.
Taking the rollout tarp from the bag, place it next to the deflated GameMaker. Carefully take the Gamemaker
and place one end into the pouch on the end of the tarp. Follow by laying the rest of the tubing along the
remainder of the tarp. Then take the pump and hose and lay it sideways on the tarp as close to the pouch as
possible. Failing to use the rollout tarp and following these directions can cause damage to the
GameMaker.
7
PLACE PUMP HERE
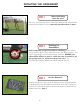
Remove the pump hose from the “inflate” port of the pump and attach it
to the “deflate” port (Located on the opposite side of the pump). The top
of the pump states which side is for inflation and deflation. Insert the
other end of the hose into the GameMaker valve. The pump hose
does not need to be forcefully inserted into the opening, doing
this may damage your valve. Proceed to pump air out of the goal
until deflated, do not forcefully deflate just remove as much air as
possible. Remove the hose from the valve, and set it back into the inflate
position by pushing in, twisting counterclockwise, and letting it pop out
STEP 4:
Properly Setting the
Pump for Deflation.
PLACE PUMP HERE
Close Up View