QUICK START GUIDE ENGLISH | POLSKI | ITALIANO FONE 450Q www.goclever.
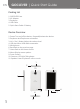
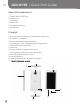
EN GOCLEVER | Quick Start Guide Packing List 1. GOCLEVER Fone 2. AC Adapter 3. Earphone 4. USB Cable 5. Quick Start Guide 6. Battery Device Overview 1. Power Turn on/off the device; Suspend/Activate the device. 2. Earphone Jack Earphones connection. 3. Vol +\ Vol - Button Adjust the volume level 4. USB port Micro USB cable connection. 5. Microphone 6. Back Back to the previous page. 7. Home Back to the Home screen. 8. Menu Display menu options. 9. Front Camera 10. Camera + LED light Take photos. 11.
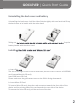
GOCLEVER | Quick Start Guide Uninstalling the back cover and battery Uninstalling the back cover: hold the side of device tightly with one hand and lift up the back cover at its buckle with the other hand. Taking out the battery: hold the side of device tightly with one hand and pull up the battery handle with the other hand. Installing the SIM cards and Micro SD card a.
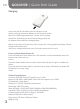
EN GOCLEVER | Quick Start Guide Charging Insert one end of USB cable into the USB port on the device and plug the power adapter to the electrical socket. Normally it takes approximately 3.5 hours to fully charge the device. Operating the device while charging with the AC adapter may extend the charging time. Notice: If you don’t use your phone for a long time, it will gradually discharge. Please charge it first before your next use or charge the phone every 3 months even you don’t use it.
GOCLEVER | Quick Start Guide CERTIFICATE OF CONFORMITY GOCLEVER Ltd. hereby declares under our sole responsibility that the product GOCLEVER FONE 450Q is in conformity with the essential requirements of the following Directives is declared: EMC DIRECTIVE 2004 / 108 / EC LVD DIRECTIVE 2006 / 95 / EC R&TTE DIRECTIVE 1999 / 5 / EC The full document with detailed information is available on our website: www.goclever.com. You should simply find the product sheet in the GOCLEVER product catalogue and the .
EN GOCLEVER | Quick Start Guide tions. Outdoor only channels 1 to 6 are allowed. This means that in Peer-to-Peer, the WLAN feature can only be used outside if the peer sets up the communication on an authorized channel (i.e., between 1 & 6). In infrastructure mode, please make sure the access point is configured to a channel from 1 to 6 before setting up the connection.
GOCLEVER | Quick Start Guide of production TFT LCD screens with sizes from 3,5” to 10,1” may have up to 5 faulty pixels (white, black or the so-called sub-pixels). 7. Warranty for accessories added to the device (e.g. holders, cables, etc.) is limited to 12 month from the date of sale and excludes mechanical damage. 8.
EN GOCLEVER | Quick Start Guide 20. The legal relations between the buyer and the device and the Guarantor is governed exclusively by the provisions of this warranty. Claims for compensation going further than that are excluded unless they result from mandatory provisions of law.. 21. This warranty has a supplementary character in relations to buyer’s rights towards the seller. Warranty does not exclude, nor limit, nor suspend buyer’s rights resulting from nonconformity of goods with the contract.
GOCLEVER | Quick Start Guide Central Service 4a Sianowska Street 60-431 Poznan, POLAND email: serwis@goclever.com tel.: +48 618488767 Technical Support UK tel.: 0844 8566848 email: uk@goclever.com Technical Support Ireland email: ireland@goclever.com Technical Support Spain tel: 902104953 email: rma@gocleverspain.com Technical and warranty support Canary Islands tel: 902 050 255 Partner Services Partner Services BELARUS 220053, Republic of Belarus, Minsk, V.Slutskoi 67-2 email: belarus@goclever.com tel.
PL GOCLEVER | Quick Start Guide Zawartość opakowania 1. Telefon GOCLEVER Fone 2. Adapter AC 3. Słuchawki 4. Kabel USB 5. Podręcznik skrócony 6. Akumulator Przegląd 1. Przycisk zasilania Włączanie / wyłączanie urządzenia; tryb uśpienia / aktywacji. 2. Złącze słuchawek Złącze słuchawek. 3. Przycisk [Vol +\ Vol -] Regulacja poziomu głośności. 4. Złącze USB Złącze microUSB. 5. Mikrofon 6. Powrót Powrót do poprzedniej strony. 7. Ekran główny Powrót do ekranu głównego. 8. Menu Wyświetlanie opcji menu. 9.
GOCLEVER | Quick Start Guide Demontaż pokrywy tylnej i wyjmowanie akumulatora Demontaż pokrywy tylnej: mocno przytrzymać jedną ręką bok urządzenia i podnieść drugą ręką pokrywę tylną przy zatrzasku. Wyjmowanie akumulatora: mocno przytrzymać jedną ręką bok urządzenia i wyciągnąć drugą ręką akumulator. Wkładanie kart SIM i karty microSD a. Wkładanie kart SIM Gniazdo prawe jest gniazdem karty 2 (karta GSM), natomiast gniazdo lewe jest przeznaczone dla karty 1 (karta 3G WCDMA), zgodnej ze standardem 2G.
PL GOCLEVER | Quick Start Guide Ładowanie Włożyć jeden koniec kabla USB do gniazda USB w urządzeniu, po czym włożyć adapter do gniazda elektrycznego. Pełne naładowanie akumulatora trwa około 3,5 godziny. Używanie urządzenia podczas ładowania za pomocą adaptera AC, może wydłużyć czas ładowania. Uwaga: Jeżeli telefon nie jest używany przez dłuższy czas, akumulator ulega stopniowemu rozładowaniu.
GOCLEVER | Quick Start Guide CERTYFIKAT ZGODNOŚCI – KRAJE UE Niniejszym GOCLEVER Sp. z o.o. oświadcza, że urządzenie GOCLEVER FONE 450Q jest zgodne z zasadniczymi wymaganiami oraz innymi stosownymi postanowieniami poniżej wymienionych dyrektyw: DYREKTYWA EMC 2004 / 108 / EC DYREKTYWA LVD 2006 / 95 / EC DYREKTYWA R&TTE 1999 / 5 / EC Pełen dokument ze szczegółowymi informacjami jest dostępny na naszej stronie internetowej: www.goclever.com w za kładce dotyczącej danego produktu w katalogu produktowym.
PL GOCLEVER | Quick Start Guide • Francja: Produkt może być użytkowany bez ograniczeń tylko wewnątrz pomieszczeń. Funkcja WLAN może być używana na zewnątrz jedynie w momencie ustawienia komunikacji na autoryzowane kanały (tj. między 1 i 6). Zatem przed rozpoczęciem konfiguracji połączenia internetowego upewnij się, że punkt dostępu jest skonfigurowany do kanału od 1 do 6. • Włochy: Używanie sieci RLAN reguluje „Kodeks komunikacji elektronicznej” z dnia 1.8.2003, numer 259.
GOCLEVER | Quick Start Guide 8. Wady ujawnione w okresie gwarancji będą usuwane bezpłatnie w możliwie najkrótszym terminie nieprzekraczającym 21 dni roboczych od przyjęcia urządzenia na serwis. W przypadku konieczności sprowadzenia części zamiennych z zagranicy, termin powyższy może ulec przedłużeniu o kolejne 30 dni. 9. Reklamujący zobowiązany jest zgłosić usterkę poprzez formularz reklamacyjny na stronie http://autorma.goclever.com/.
PL GOCLEVER | Quick Start Guide 20.Gwarant nie odpowiada za szkody powstałe w wyniku utraty danych na nośnikach magnetycznych, informujemy również, że mapy przywracane będą zgodne ze stanem produkcyjnym. 21. Stosunek prawny pomiędzy nabywcą urządzenia i Gwarantem regulowany jest wyłącznie postanowieniami niniejszej gwarancji. Dalej idące roszczenia odszkodowawcze są wyłączone chyba, że wynikają one z bezwzględnie obowiązujących przepisów prawa. 22.
GOCLEVER | Quick Start Guide Central Service 4a Sianowska Street 60-431 Poznan, POLAND email: serwis@goclever.com tel.: +48 618488767 Technical Support UK tel.: 0844 8566848 email: uk@goclever.com Technical Support Ireland email: ireland@goclever.com Technical Support Spain tel: 902104953 email: rma@gocleverspain.com Technical and warranty support Canary Islands tel: 902 050 255 Partner Services Partner Services BELARUS 220053, Republic of Belarus, Minsk, V.Slutskoi 67-2 email: belarus@goclever.com tel.
IT GOCLEVER | Quick Start Guide Contenuto della confezione 1. MultiPhone GOCLEVER Fone 2. Adattatore CA 3. Auricolare 4. Cavo USB 5. Guida di avvio rapido 6. Batteria Panoramica del dispositivo 1. Accensione Accende/spegne il dispositivo; Sospende/attiva il dispositivo. 2. Presa per auricolari Collegamento per gli auricolari. 3. Pulsante Vol +\ Vol- Regola il livello del volume 4. Porta USB Connessione cavo Micro USB. 5. Microfono 6. Indietro Consente di tornare alla pagina precedente. 7.
GOCLEVER | Quick Start Guide Disinstallazione del coperchio posteriore e della batteria Disinstallazione del coperchio posteriore: tenere saldamente il lato del dispositivo con una mano e sollevare il coperchio posteriore alla sua fibbia con l’altra mano. Estrazione della batteria: tenere saldamente il lato del dispositivo con una mano e tirare su l’impugnatura della batteria con l’altra mano. Installazione delle schede SIM e della scheda Micro SD a.
IT GOCLEVER | Quick Start Guide Caricamento Inserire un’estremità del cavo USB nella porta USB sul dispositivo e collegare l’adattatore di alimentazione alla presa elettrica. Il caricamento totale del dispositivo richiede solitamente 3,5 ore. L’utilizzo del dispositivo durante il caricamento con l’adattatore CA potrebbe allungare il tempo di caricamento. Avviso: se non si utilizza il telefono per un periodo prolungato, si scaricherà gradualmente.
GOCLEVER | Quick Start Guide CERTIFICATO DI CONFORMITA’ GOCLEVER dichiara sotto la propria responsabilità che il prodotto GOCLEVER FONE 450Q è conforme ai requisiti essenziali delle seguenti direttive: Direttiva EMC 2004/108 / EC LVD direttiva 2006/95 / EC R & TTE 1999/5 / EC Il documento completo con le informazioni dettagliate è disponibile sul nostro sito web: www.goclever.com. E’ possibile trovare la scheda prodotto nel catalogo prodotti GOCLEVER ed il file .pdf con la dichiarazione di conformità CE.
IT GOCLEVER | Quick Start Guide GARANZIA 1. GOCLEVER SP. Z O.O. con sede legale a Poznań (60-431), in ul. 4A Sianowskiej, di seguito denominato garante, assicura che il prodotto a marchio GoClever è privo di difetti di progettazione e di materiali, che potrebbero compromettere la sua funzionalità se è stato osservato quanto riportato nel manuale di istruzioni fornito con la conclusione del contratto. 2. La presente garanzia è valida solo per prodotti acquistati sul territorio italiano. 3.
GOCLEVER | Quick Start Guide del suo impiego; - danni derivanti da cause esterne, come ad esempio: danni meccanici, gli effetti dei fenomeni atmosferici, l’inquinamento, le inondazioni, sbalzi di tensione, ecc - malfunzionamento del software non autorizzato installato sul dispositivo - i danni causati durante il trasporto del prodotto dal punto vendita al cliente, da manomissione, adattamento o modifica, da uso contrario alle norme tecniche e o di sicurezza - i danni accidentali o causati da perdita di inform
IT GOCLEVER | Quick Start Guide Le spese di trasporto da e per il Centro di Assistenza sono a carico del cliente e comunque non rimborsabili, anche per interventi in garanzia. Eventuali danni subiti dal prodotto durante il trasporto, o per imballaggio inadeguato, non potranno essere considerati in garanzia. Eventuali reclami saranno accettati solo dietro la presentazione di documenti cartacei comprovanti precedenti interventi. Registrare un prodotto su register.goclever.
GOCLEVER | Quick Start Guide Central Service 4a Sianowska Street 60-431 Poznan, POLAND email: serwis@goclever.com tel.: +48 618488767 Technical Support UK tel.: 0844 8566848 email: uk@goclever.com Technical Support Ireland email: ireland@goclever.com Technical Support Spain tel: 902104953 email: rma@gocleverspain.com Technical and warranty support Canary Islands tel: 902 050 255 Partner Services Partner Services BELARUS 220053, Republic of Belarus, Minsk, V.Slutskoi 67-2 email: belarus@goclever.com tel.
WARRANTY CARD DATE OF SOLD: ........................................................................................................................................................................... DATE OF MANUFACTURED: ......................................................................................................................................................... BRAND NAME OD PRODUCT: …………….….…………….…..................................................……………………………………………… SERIAL NUMBER: ………...........
KARTA GWARANCYJNA DATA SPRZEDAŻY: ....................................................................................................................................................................... DATA PRODUKCJI: ...................................................................................................................................................................... NAZWA PRODUKTU: …..............………….….…………….…..................................................
SCHEDA DI GARANZIA DATA ACQUISTO: ....................................................................................................................................................................... DATA FABBRICAZIONE: ........................................................................................................................................................... NOME DEL PRODOTTO: …………….….…………….….........................................................……………………………………………… NUMERO SERIALE: ……….....
www.goclever.