Digital Radio User's Manual 335100417_RevA
To Users Thank you for purchasing our product! This Manual is designed to make you quickly grasp use of this device. In order to avoid physical injury or property loss due to improper operation, please read this Manual carefully before using this device. Notice The device meets the requirements of FCC PART 90, PART 97 and PART 15. Local laws and regulations shall be complied with when setting up or using the equipment, and corresponding qualifications and relevant procedures shall be obtained if necessary.
(1) this device may not cause harmful interference, and (2) this device must accept any interference received, including interference that may cause undesired operation. ISEDC RSS warning 2 Using Tips This product meets the applicable Industry Canada technical specifications. / Le présent matériel est conforme aux specifications techniques applicables d’Industrie Canada. This device complies with ISEDC RSS standard (s).
RF Radiation Information 1. This product is limited to occupational applications that can meet RF energy radiation requirements. The user must be fully aware of the RF radiation hazards and can take corresponding measures to meet the RF radiation limitation requirements. 2. Radio frequency (RF) refers to the electromagnetic frequency that can be radiated into space. It is a widely used technology in the fields of communication, medical treatment, and food processing.
·Please turn off the radio before approaching the blasting area and the detonator area. ·Do not use the radio with damaged antenna. A damaged antenna may cause minor burns when it comes into contact with the skin. ·Do not expose the radio to direct sunlight for a long time or place it near the heating Radio. ·If you wear a portable radio, make sure the antenna is at least 2.5 cm away from your body when the radio is transmitting.
Using Tips transferred to other users. • Do not use this device if the operational requirements described herein are not met. Operating Instructions: • Transmit no more than the rated duty factor of 50% of the time. To transmit (talk), push the Push-To-Talk (PTT) button. To receive calls, release the PTT button. Transmitting 50 % of the time, or less, is important because this radio generates measurable RF energy exposure only when transmitting (in terms of measuring for standards compliance).
• For a list approved accessories please consult your local dealer for information. European Union (EU) Waste of Electrical and Electronic Equipment (WEEE) directive: The European Union's WEEE directive requires that products sold into EU countries must have the crossed out trash bin label on the product (or the package in some cases). As defined by the WEEE directive, this cross-out trash bin label means that customers and end-users in EU countries.
Using Tips • Tenez la radio en position verticale devant le visage avec le microphone (et les autres parties de la radio, y compris l'antenne) à au moins 2,5 cm du nez. Garder la radio à la bonne distance est important car les expositions RF diminuent avec la distance de l'antenne. L'antenne doit être tenue à l'écart des yeux. • Lorsqu'il est porté sur le corps, placez toujours la radio dans un clip, un support, un étui, un étui ou un harnais de corps approuvé pour ce produit.
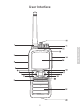
User Interface Know the Radio 8
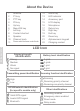
About the Device 1 2 3 4 5 6 7 8 9 10 11 Antenna P1 key PTT key P2 key Up key Menu/OK key Left key Contact shortcut Speaker Channel knob 12 13 14 15 16 17 18 19 20 21 22 Power switch/volume control knob Alarm key LED indicator Accessory port LCD display Microphone Return key Right key Exit key Down key Alphanumeric keypad Charging contact Know the Radio LCD Icon Signal strength identification Battery level identification Strong Medium Weak No signal 3 grids 2 grids 1 grid 0 grid Transmitting power
Radio LED Indicators Radio Status LED Indication Standby Green Slow Flash Low Battery Red Fast Flash Transmit (TX) Solid Red Receive (RX) Solid Green Programming Mode (Read Red Fast Flash from Radio) Programming Mode (Write to Radio) Green Fast Flash Power on/off: Turn the power switch knob to turn on/off the radio normally. Note: The battery needs to be charged, otherwise the radio cannot be turned on under low power state. The startup screen will be displayed after start up.
Battery Installation Note: If you need to remove the battery, please turn off the radio first, then lift up the bottom battery latch and take out the battery pack. Antenna Installation Know the Radio Note: Do not hold the radio by its antenna; otherwise, the performance and service life of radio may be affected. Belt Clip Installation Step 1: Remove the belt clip screws from the device. Step 2: Align the radio screw holes on the belt clip, and then tighten the screws.
Accessory Installation Step 1: Open the accessory connector cover. Step 2: Align the plug of the accessory (matching headset or programming cable) with the accessory connector. Step 3: Insert the accessory properly into the accessory connector. Charging Function Device charging Battery pack charging Charging precautions: ·Please use the original charger tray of the model for charging. · When charging, it is recommended that the radio remain powered off during charging.
the battery pack life. When the battery is fully charged, please stop charging in time. · The charger can only be used to charge the battery pack of the product. Do not use it to charge other battery packs, otherwise the charger and battery pack may be damaged. · The battery pack should be stored in a cool and dry place after being fully charged. Do not expose the battery pack near the fire or to the sun, otherwise there are safety risks. ·During charging, it is not recommended to transmit the radio.
required zone, and press [OK] key to switch to the selected zone. P1/P2: If the dealer has configured [Zone Up]/[Zone Down] shortcut keys for user, the shortcut key can be used to switch to the require zone. (Function not confirmed) Note: 1. Configure the required zone through programming software. 2. Configure channel for each zone through programming software.
Transmitting/Receiving After starting up successfully, the user can conduct various call operations. Precautions for radio use: ·When the radio is transmitting, keep the radio in a vertical position, and keep the microphone 2.5-5 cm away from the mouth. When transmitting, the radio should be at least 2.5 cm away from the head or body. ·Do not turn on/off the radio repeatedly during use, and adjust the volume to a level suitable for your hearing. Precautions for radio operation: 功能 介绍 Features 1.
2. The [P1/P2] key includes the following functions: Scan On/Off, High/ Low Power Switch, VOX On/Off, DM On/Off, One Touch Call, Zone Selection, Emergency Alarm, etc. 3. Write the set parameters to the radio and press the corresponding programmable key to enter the corresponding function. Device Name Configuration and Modification Device ID 1. The device ID is related to the private call contact, and the ID range is 1 to 16776415. 2.
enter the new password to rewrite. 5. When you forget the password, you can perform factory reset or reprogram it. Sub-Code Frequency Configuration 1. The sub-code frequency supports CTCSS, DCS positive code, DCS reverse code, standard sub-code and non-standard sub-code. 2. Only when the transmitting sub-code and receiving sub-code are the same can they communicate to each other. 3. A radio with sub-code can transmit to radio without, but cannot receive signal without sub-code.
3. Turn on/off the scan list through menu operation or the preset [P1/ P2] key. 4. After scanning is turned on, a scan icon will flash on the screen. 5. During scanning, the channels scanned include the channels in the scan list and the current main channel. 6. When any channel in the scan list is transmitting a signal, it will stay on that channel upon signal detection. High/Low Power DTMF Configuration 1.
2. 3. 4. 5. software, such as alarm channel, re-transmission times, and alarm type. Emergency call supports the digital channel and analog channel. Set the side button as the“Emergency Call” button in the “programmable button”. When Analog or Digital channel triggers emergency call, an emergency call code will be sent. Emergency call will be automatically transmitted after remaining re-transmit call becomes 0, and automatic emergency calls will repeat transmit twice.
Contacts Short Message 1. Modify the default quick message content to other characters by programming software. 2. You can delete the quick message content by programming software. 3. Up to 8 quick messages are supported. 4. New short message content can be created through the radio menu. 5. You can send a quick message to a private call contact. 6. You can send a quick message to the group call contact, and all the radios in the group can receive the message. 7.
Call Alert (Private call only) 功能 介绍 Features Call alert can be used to get a hold of someone quickly for requesting the recipient to call back. Call alert are repeated until response to. To respond, the recipient can talk back. 1. The methods of sending “Call Alert” are as follows: ·Enter “Menu” – “Contacts” – “Contact List”, select the contact to whom a call alert will be sent for confirmation, enter “Server”, and select “Call Alert” for sending.
whom the remote monitor will be sent for confirmation, enter “Server”, and select “Remote Monitor” for sending. ·Enter “Menu” – “Contacts” – “Dial”, enter the other party’s device ID for confirmation, and select “Remote Monitor” for sending. ·Press “#” on the standby interface to enter the dial-up interface, enter the other party’s device ID under the private call type for confirmation, and select “Remote Monitor” for sending. ·Configure “One touch call” through CPS and send “Remote Monitor”.
功能 介绍 Features by execute “Rad Disable” command. 1. The methods of sending “Kill” are as follows: ·Enter “Menu” – “Contacts” – “Contact List”, select the contact to whom will be sent for confirmation, enter “Server”, and select “Rad Disable” for sending. ·Enter “Menu” – “Contacts” – “Dial”, enter the other party’s device ID for confirmation, and select “Rad Disable” for sending.
3. After receiving “Rad Enable”, the remotely inhibited device will automatically restart and return to normal. After receiving “Rad Enable”, the device that is not remotely inhibited will have no other reaction except for automatic reply. VOX Function TOT Function In order to prevent some users from occupying the same channel for a long time, users can set to enable the TOT function.
the set time, the radio will stop transmitting and the speaker will give a time-limit prompt tone. You can set the time limit for transmitting by programming software. 0~180 seconds are available. When 0 is selected, the user can keep on transmitting. Squelch Step (SQ) 1. SQ is only valid for analog channels. 2 After SQ is set to 0, the speaker will automatically turn on and be in the monitoring state. 3. The higher the SQ step, the better the noise floor suppression effect. 4.
3. Roger beep tone elimination can also be enabled directly through the radio menu. Power saving function Language Selection Supported language: Chinese and English. 1. Language can be set by programming software and radio menu. 2. After switching the language, all menu options will be changed to the selected language. 3. The radio voice announcement is defaulted to English. Backlight Time 1.
4. Backlight time can be written directly by programming software or set by radio menu. LCD Screen Brightness LCD screen brightness can be set from level 1 to 6, where 1 is the darkest and 6 is the brightest. Equalizer 功能 介绍 Features 1. The radio supports equalizer function, which means the radio will perform gain processing for the audio signal received, so as to get better call results. 2.
the previous recording will be automatically overwritten. 4. TF card recording is not supported. GPS Function (for specific models only) 1. After turning on GPS, you can get the latitude, longitude, current time, date, number of satellites, speed, etc. of the current time zone in the open field. 2. During outdoor sports, GPS information will be updated automatically during buffer time. 3.
Vibration Function (for specific models only) You can set whether to enable the vibration function, which will be applicable to short message, private call prompt, call prompt, etc. Factory Reset 1. After restoring factory settings, all functions of the radio will become default setting. 2. Enter the radio menu to directly perform restoring operation. 3. The previous setting data of the radio will be lost after restoring factory settings, so please be careful in using this function.
Model Number: Telephone: Post Code: User’s Name: Chop b y Dealer 4.Warranty void if seal broken. 5.1 year guarantee for product, 6 months for charger,battery and antenna . 6.The user can get repairing service from the following ways: a.Go to the shop where you buy the machine b.Our local repairing agent REMARKS: 1.This guarantee card to be kept by the user ,no replenishment if lost. 2.This guarantee card to be filled & chopped by the dealer,or it is invalid. 3.
+