MX20/MX30/MX30i MOBILE PRINTER USER MANUAL User Manual : MX20/MX30/MX30i series Version : Rev. 1.0 Issue Date : 2014.09.29 P/N : 920-015211-00 Ver. 2.
MX20/MX30/MX30i USER MANUAL CONTENTS 1 Mobile Printer 001 1.1 Box Content 001 1.2 Getting to Know Your Printer 002 2 Printer Setup 004 2.1 Battery Installation 004 2.2 Paper Installation 005 2.3 Battery Charging 007 2.4 Belt Strap & Shoulder Strap Usage 008 2.5 Wizard CD Standard Installation 009 2.6 Wizard CD Other Choice Installation 012 3 Setting and Control for Operation Panel 015 3.1 Operation Panel 015 3.2 LCD Interface Introduction 017 3.
MX20/MX30/MX30i USER MANUAL FCC COMPLIANCE STATEMENT FOR AMERICAN USERS Federal Communication Commission Interference Statement This equipment has been tested and found to comply with the limits for a Class B digital device, pursuant to Part 15 of the FCC Rules. These limits are designed to provide reasonable protection against harmful interference in a residential installation.
MX20/MX30/MX30i USER MANUAL Battery Safety Precautions Make sure to review the user manual carefully prior to product use. Neglecting to heed the following instructions can result in battery overheating, combustion, explosion, damage and/or decline in performance and product life. 1. Do not allow water, seawater or moisture to enter or leak into the battery.
1 Mobile Printer 1.1 Box Content Please check that all of the following items are included with your printer. Charge the battery for at least 3 hours before use. MX20 / MX30 / MX30i Mobile Printer MX20 Thermal Paper MX30 MX30i Lithium Battery MX20 / MX30 / MX30i Series Quick Guide MX20 Series MX30 Series Belt Strap(MX20 Series) Power Supply Shoulder Strap(MX30 Series) USB Cable MX30i MX30/ MX20/ Series CD Including GoLabel software and MX series user’s manual.
1 Mobile Printer 1.
1 Mobile Printer The Internal View of the Printer (Take MX30i as an example) Platen Roller Label roll guide Tear BAR Power Jack RS232+USB Port This RS232 & USB Port only support signal transmission, no charge function.
2 2.1 Printer Setup Battery Installation Make sure to charge the battery for at least 3 hours prior to first use. Insert the battery on the rear side of the printer, aligning the battery hook properly. Push the battery into the slot until you hear a clicking sound.
2 Printer Setup 2.2 Paper Installation The printer is set to Direct thermal transfer so no ribbon is required. Place the printer on a flat surface and press the button. Top cover opened. Label roll guide can be adjusted according to label roll width.
2 Printer Setup Insert the paper as shown in the image. Pull the paper out and close the paper cover. Tear off any excess paper in the direction of the side of the printer. Note * When you move label roll guide, try to force near its bottom.
2 Printer Setup 2.3 Battery Charging 1. Please make sure that the printer is switched off. 2. Connect the jack of the power adapter to the printer and connect the plug of the power adapter to the socket of the wall. 3. Turn on the printer. The operator panel should now light up. Open the external interface cap. Note * Charge the battery around 3 hours before use please. Charging the ambient temperature at 0℃ ~ 40℃.
2 2.4 Printer Setup Belt Strap & Shoulder Strap Usage MX20 Series Use a coin to tighten the belt strap screw. $ MX30 Series Connect the clips of the shoulder strap to the printer.
2 Printer Setup 2.5 Wizard CD Standard Installation 1. Insert the Super Wizard CD in the CD/DVD drive of the host computer and the installation program should pop up automatically. You will see the Welcome screen first. On the Welcome screen, choose “STANDARD INSTALLATION”. 2. The wizard will then ask you to make sure your USB and power cables are connected and that the power is turned on. Then click “NEXT”. 3. The next screen you will see is, “Install the GoLabel Software and Windows driver”.
2 4. Printer Setup As the printer driver and GoLabel are installing, a screen will display a progress bar. While downloading completed you will see Installation completed. Click “NEXT” to continue. 5. You can also print a test label. If don’t print a test label, the screen display as step 6. Note * If you need more resources, tools or reference documents, you can also find them on Super Wizard CD. Just click “Other Choices” on the Welcome Screen to access the files.
2 6. Printer Setup Once the installation is complete, you can start to make and print labels with GoLabel or through the printer driver.
2 Printer Setup 2.6 Wizard CD Other Choice Installation 1. Click “OTHER CHOICES” to next screen and select “PRINTER DRIVERS”. 2. Click “INSTALL SEAGULL SCIENTIFIC WINDOWS DRIVER” to next screen, and click “NEXT”. 3. Select “I accept the terms in the license agreement”, and click ”Next”,then click ”Finish” to step 4.
2 Printer Setup 4. The Driver Wizard will guide you through the installation procedure. Select "Install printer drivers" and click “Next”. 5. With a USB connection, search models such as the right diagram printer device. Specify your printer model and click ”Next”. 6. Enter the printer name (you can use default), then click "Next" to display as right diagram. Click "Finish" button to start installation.
2 Printer Setup 7. Driver installation completed.
3 Setting and Control for Operation Panel 3.1 Operation Panel Power Button OPERATION PANEL Bluetooth Button FEED Button Up / Down Button Enter Button POWER Button Press the POWER button to turn on the printer, and the POWER LED signal lights appears. While hear one “Beep sound” , the LCD screen should display the message “GoDEX“ Logo on the screen. When printer is turned on, hold and press down the POWER button for 3 second will turn the printer off.
3 Setting and Control for Operation Panel 4 dual-color LED - Power On, Battery Capacity, Status Information (Wireless) , Status Information (Media): POWER BATTERY COMMUNICATION OFF ERROR Turn off POWER Turn on Without battery Power off OFF Battery power supply as normal Recharge finished BATTERY Standby Mode (5 sec flash one time) Battery is recharging Battery must be charged or replaced No connection No data transmission OFF COMMUNICATION Bluetooth ON Transferring data Automatic recovery afte
3 Setting and Control for Operation Panel 3.2 LCD Interface Introduction Getting Started Press the POWER button to turn on the printer, and the START UP SCREEN appears. Turn on the power After the printer starts, GoDEX Logo will appear on the LCD screen, which means that the printer is ready to print in the state. Use the printer's user interface can perform various operation, such action is set on the main screen.
3 Setting and Control for Operation Panel Operations on Setting Page On GoDEX page, press Enter Button, you will enter the SETTING PAGES for the function. Darkness Enter Button 19 Press Enter Button to enter the SETTING PAGES On SETTING PAGES, press Press to select the setting items,you will enter the SETTING VALUE PAGES for the function. back to previous page.
3 Setting and Control for Operation Panel 3.
3 Setting and Control for Operation Panel 3.4 Label Calibration and Self Test Label Calibration The printer can automatically detect and store label height. That means the host computer does not need to transmit the label height to the printer. Self Test Self-test function lets you check whether the printer is functioning normally. Here is how you run the label size calibration and self test. 1. Check that the label stock is loaded correctly. 2. Turn off the printer and pressing the FEED button. 3.
3 Setting and Control for Operation Panel 3.5 Active / Sleep / Shutdown / Charge Mode Sleep Mode = LED active. Power saving model. Active Mode: All functions active. On active mode, receiving a print job. Go to Sleep mode if no operation over 30~3600 seconds in Active mode. Sleep Mode: Only FEED button functions active. Go to Shutdown mode if no operation and over 30~3600 seconds to forever in Sleep mode. Shutdown Mode: All function off except Power button and battery charge.
3 Setting and Control for Operation Panel 3.6 Bluetooth Connection Terminal The printer can be connected to devices equipped with Bluetooth communication capability. 1. Press power button to turn on the printer. 2. Press Bluetooth button, bluetooth function is turned. So that the printer can be searched. Terminal Equipment (Bluetooth function of the device must be turned on) 22 Pair with another Bluetooth device.
4 Accessories 4.1 Charger 1. Connect the AC adpter to the Charger. 2. Insert the battery into the Charger as shown in the figure the below. 3. Gently slide the battery until it reaches the bottom of the charger. 4. Charging starts as soon as the battery is completely inserted.
4 Accessories 4.2 Car Charger and RS-232 Cable 1. Please make sure that the printer is switched off. (Connect the car charger to your car’s cigarette lighter jack.) 2. Open the external interface protection cap. 3. Connect the mini USB cable(battery charger) to the power connector. Power Connector 1 2 This RS232 & USB Port only support signal transmission, no charge function.
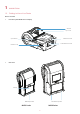
4 Accessories 4.3 Protective Case Unzip to open up the protective case and insert your printer into the protective case as shown in the figure on the below. 1 2 3 4 Open the paper discharger when using the printer. 25 Connect the clips of the leather case with the shoulder strap.
5 Maintenance and AdjustmentS 5.1 Cleaning the Thermal Print Head Dirt on the print head, or glue residue from the label stock may result in inadequate print quality. The printer cover must therefore always be closed during printing. Keeping dirt and dust away from the paper or labels ensures a good print quality and a longer lifespan of the print head. Cleaning Steps Here is how to clean the print head. 1. Turn off the printer. 2. Open the printer cover. 3.
5 Maintenance and Adjustment 5.2 Troubleshooting Problem The printer is switched on but the LED does not light up. The LED lights up red and printing is interrupted. The paper roll passes through the printer but no image is printed. Solution ♦ Check if the battery is full charged. ♦ Check the software settings (driver settings) or command codes. ♦ Look for the error alert in the table in Section Error Alerts. ♦ Check whether the print mechanism is closed correctly.
MX20/MX30/MX30i USER MANUAL APPENDIX PRODUCT SPECIFICATIONS MX20 GPOS simulation or EZPL / GZPL / GEPL simulations 5.1” (129.55 mm) 2.0“ (51 mm) 3.3” (84 mm) 0.72 lbs (325g, with Battery, without protective case) Options Shoulder Strap, Li-ion battery, Battery charger station, Car charger adapter, RS-232 cable, Protective case Notice Specifications are subject to change without notice. All company and/or product names are trademarks and/or registered trademarks of their respective owners.
MX20/MX30/MX30i USER MANUAL APPENDIX PRODUCT SPECIFICATIONS MX30 MX30i N/A Graphic OLED 128 x 64 dots with 3 buttons for Up, Down and Enter functions N/A Standard 1.45lbs (660g, with battery, without protective case) 1.47lbs (670g, with battery, without protective case) WiFi (IEEE 802.11b/g/n) RS-232 cable Li-ion battery Protective case Battery charger station、Car charger adapter NFC RFID R/W kit (factory install) Notice Specifications are subject to change without notice.
MX20/MX30/MX30i USER MANUAL APPENDIX INTERFACE Pinout Description USB Port (mini-B Type) Pin No.