
User's Manual


-21 - - 22 -
Setting the Transmitter
Using the Flash Trigger
4. As a Wireless Studio Flash Trigger or Speedlite
Trigger with PC Sync Socket
4.1 The connection method of the receiver can be
found in As a Wireless Studio Flash Trigger and
As a Wireless Speedlite Trigger section.
4.2 The transmitter will control the flash on the
receiver end to fire via using PC Sync Socket as
input by default.
4.3 Press the camera shutter and use the PC Sync
Socket’s signal to control the flash.
4.4 PC Sync Socket can also be set as output. Long
press the <CH> Button of the transmitter until
<Fn> is displayed on the panel. Then, set the
value of Fn 03 to 1, and the PC Sync Socket is
under output mode.
Setting the Transmitter
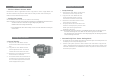
• Power Switch
Slide the Power Switch to ON, and the device is on and Status Indicator Lamp will not blink.
Note: In order to avoid power consumption, turn off the transmitter when not in use.
• Power Switch of AF Assist Beam
Slide the power switch to ON, and the AF lighting is allowed to output.
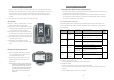
• Channel Setting
1. Short press the <CH> Button until the
channel amount blinks.
2. Turn the Select Dial to choose the
appropriate channel. Press the <CH>
Button again to confirm the setting.
3. This flash trigger contains 32 channels
which can be changed from 1 to 32. Set
the transmitter and the receiver to the
same channel before
usage.
• Mode Setting
1. Short press the <MODE> Button, and the
mode of the current group will change.
2. To NON-GR grouping mode, all the groups’
modes will be changed simultaneously by the
order of TTL/M, in accordance with Ratio flash
mode. To GR grouping mode, only the current
group’s mode will be changed by the order of
TTL/M/--.
• Current Group Settings
1. Short press the <GR> Button to set the
current group.
2. The current group settings will blink and turn
the Select Dial to change the settings.
3. When the current group is in the M mode, the
power output value is changeable from 1/1
full power to 1/128th power in 0.3 stop
increments. When the current group is in the
TTL mode, the FEC amount is changeable
from -3 to 3 in 0.3 stop increments. When the
current group is in the -- mode (flash off), the
amounts will not change.
4. Short press the <GR> Button again to confirm
the setting.
• Group Settings
1. Long press the <GR> Button to set all the
groups that in the same modes
simultaneously.
2. The settings of the groups which are in the same mode with the current group will blink.
Turn the Select Dial to change the settings.
3. If the current group is in the M mode, all the other groups which are in the M mode will
change their power output value simultaneously. The power output value is changeable
from 1/1 full power to 1/128th power in 0.3 stop increments, until one of the group’s setting
turns to the maximum(1/1) or the minimum(1/128). If the current