
How to Guide

AskForPurple.com
Drywall Finishing & Repair
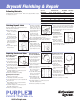
Sq. Ft. of Wallboard Size Ready Mix Joint Tape
Wall/Ceiling 4' x 8' 4' x 10' 4' x 12' /lbs. /ft.
100 4 3 3 14 35
200 7 5 5 26 70
300 10 8 7 42 105
400 13 10 9 56 140
500 16 13 11 70 175
1000 32 25 21 140 350
Repairing Cracks and Holes
Cracks/Holes smaller
than 1" diameter:
n
Cover with uniform layer
of joint compound.
n
Center and press paper
tape into the joint compound.
n
Cover with a thin uniform
layer of joint compound and let dry 24 hours.
n
Apply additional coats as needed and let dry
24 hours between coats.
n
Sand with sandpaper or a damp sponge and
blend with existing surface.
n
Prime before painting or decorating.
Repairing Torn Face Paper:
n
Remove loose face paper.
n
Coat damaged area with primer/sealer.
n
Cover with uniform layer of joint compound and
let dry 24 hours.
n
Apply additional coats as needed and let dry
24 hours between coats.
n
Sand with sandpaper or a damp sponge and
blend with existing surface.
n
Prime before painting or decorating.
Holes larger than 1"
to 2-1/2" in diameter:
n
Cover with uniform layer
of joint compound.
n
Center and press paper
tape horizontally into
joint compound.
n
Leave sufficient compound under tape for
adhesion to drywall.
n
Apply joint compound over the first piece of tape.
n
Place second piece of
tape over the first in a
criss-cross pattern.
n
Cover with a thin, uniform
layer of joint compound
and let dry 24 hours.
n
Apply additional coats
as needed and let dry
24 hours between coats.
n
Sand with sandpaper or a damp sponge and
blend with existing surface.
n
Prime before painting or decorating.
Repairing popped nails:
n
Drive a new nail 1-1/2"
above the popped nail
into the stud - indent
face paper without tear-
ing (called dimpling).
n
Drive and “dimple” the
popped nail.
n
Cover with a thin,
uniform layer of joint
compound and let dry 24
hours.
n
Apply additional coats as
needed and let dry 24
hours between coats.
n
Sand with sandpaper or a damp sponge and
blend with existing surface.
n
Prime before painting or decorating.
n
Apply a uniform layer,
4" wide, of compound to
the joints.
n
Center tape over the
joint and press firmly
into place with the knife.
n
Remove excess joint
compound, leaving a
sufficient amount under
tape for adhesion to
drywall.
n
Let joint dry for approxi-
mately 24 hours.
Finishing Drywall Joints
Finishing a drywall joint is relatively simple if you
follow these basic instructions:
n
First finish coat: Apply a
thin coat of compound.
Feather out 3" to 4" on
each side of the tape. Let
dry thoroughly (approxi-
mately 24 hours).
n
Second finish coat:
Apply a second thin
coat. Feather out 8" to 10" on each side of the
tape. Let dry approximately 24 hours.
n
Sand compound with a damp sponge and blend
with existing surface. Prime before decorating.
Inside Corners
n
Apply 2" band of joint
compound to both sides
of inside corner. Crease
tape along score line and
press firmly into corner.
n
Remove excess joint compound, leaving a suffi-
cient amount under tape for adhesion to drywall.
n
Apply finish coat to one side of corner. Allow to
dry. Then apply finish coat to the other side of
corner. Allow to dry.
Outside Corners
n
Cornerbead should be
fastened securely 8" o.c.
with fasteners on alter-
nating sides.
n
Apply joint compound
over the cornerbead
flange. First coat should
be approximately 4" wide; second coat 6" to 10"
wide on each side of corner.
Estimating Materials
Quickly determine how much ProForm
®
brand Joint Compound will be needed
to complete your project.