www.workoutwarehouse.com Model No. GGBE0969.0 Serial No. Write the serial number in the space above for reference. Serial Number Decal QUESTIONS? If you have questions, or if parts are damaged or missing, DO NOT CONTACT THE STORE; please contact Customer Care. IMPORTANT: Please register this product (see the limited warranty on the back cover of this manual) before contacting Customer Care. 1-877-776-4777 CALL TOLL-FREE: Mon.–Fri. 6 a.m.–6 p.m. MT Sat. 8 a.m.–4 p.m. MT ON THE WEB: www.
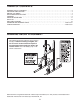
TABLE OF CONTENTS WARNING DECAL PLACEMENT . . . . . . . . . . . . . . . . . . . . . . . . . . . . . . . . . . . . . . . . . . . . . . . . . . . . . . . . . . . . . 2 IMPORTANT PRECAUTIONS . . . . . . . . . . . . . . . . . . . . . . . . . . . . . . . . . . . . . . . . . . . . . . . . . . . . . . . . . . . . . . . . 3 BEFORE YOU BEGIN . . . . . . . . . . . . . . . . . . . . . . . . . . . . . . . . . . . . . . . . . . . . . . . . . . . . . . . . . . . . . . . . . . . . . . 4 PART IDENTIFICATION CHART . . . .
IMPORTANT PRECAUTIONS WARNING: To reduce the risk of serious injury, read all important precautions and instructions in this manual and all warnings on the exercise rack before using the exercise rack. ICON assumes no responsibility for personal injury or property damage sustained by or through the use of this product. 1. Before beginning any exercise program, consult your physician. This is especially important for persons over age 35 or persons with pre-existing health problems. 7.
BEFORE YOU BEGIN Thank you for selecting the versatile GOLDʼS GYM® XR 10.9 exercise rack. The XR 10.9 exercise rack is designed to help you develop the major muscle groups of the upper body. Whether your goal is a shapely figure, a dramatic increase in muscle size and strength, or a healthier cardiovascular system, the exercise rack will help you achieve the specific results you want. reading this manual, please see the front cover of this manual.
PART IDENTIFICATION CHART See the drawings below to identify small parts used in assembly. The number in parentheses by each drawing is the key number of the part from the PART LIST near the end of this manual. Note: If a part is not in the hardware kit, check to see if it has been preattached.
ASSEMBLY • To identify small parts, use the PART IDENTIFICATION CHART on page 5. Make Assembly Easier • Tighten all parts as you assemble them, unless instructed to do otherwise. Everything in this manual is designed to ensure that the exercise rack can be assembled successfully by almost anyone. By setting aside plenty of time, assembly will go smoothly.
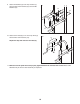
2. Attach an Upright Base (2) to one of the Stabilizers (1) with the indicated two M8 x 68mm Carriage Bolts (20) and two M8 Locknuts (22). Note: Attach the Upright Base so that the hexagonal holes are on the indicated side. Do not tighten the Locknuts yet. 2 Hexagonal holes on this side Attach the other Upright Base (not shown) to the other Stabilizer (not shown) in the same way. 2 22 22 1 3. Orient the Bottom Crossbar (10) so that the warning decal is on top.
4. Attach a Support (4) to one of the Stabilizers (1) with the two indicated M8 x 68mm Carriage Bolts (20) and two M8 Locknuts (22); do not tighten the Locknuts yet. 4 22 Next, attach the Support (4) to the Upright Base (2) with two M8 x 75mm Bolts (17), two M8 Washers (23), and two M8 Locknuts (22); do not tighten the Locknuts yet. 4 Attach the other Support (4) to the other Stabilizer (not shown) and the other Upright Base (2) in the same way. 2 1 4 20 5.
6. Attach a Dip Arm (5) to the right Upright (3) and the Upright Base (2) with two M8 x 77mm Bolts (28), a Support Plate (13), and two M8 Locknuts (22); do not tighten the Locknuts yet. 6 13 3 28 22 Repeat this step with the other Dip Arm (5) and the left Upright (not shown). 5 7. Attach the Top Crossbar (7) to one of the Dip Arms (5) with two M8 x 75mm Bolts (17), two M8 Washers (23), and two M8 Locknuts (22); do not tighten the Locknuts yet.
9. Attach the Backrest (8) to the Top Crossbar (7) with four M6 x 16mm Screws (27) and four M6 Washers (21). 9 21 7 27 27 21 8 10. Attach an Arm Pad (6) to one of the Dip Arms (5) with two M6 x 73mm Screws (18). 10 Repeat this step with the other Arm Pad (6). 6 5 18 6 11. Make sure that all parts have been properly tightened before the exercise rack is used. Note: Some hardware may be left over after assembly is completed.
EXERCISE GUIDELINES THE FOUR BASIC TYPES OF WORKOUTS The combination of strength training and aerobic exercise will reshape and strengthen your body, plus develop your heart and lungs. Muscle Building To increase the size and strength of your muscles, push them close to their maximum capacity. Your muscles will continually adapt and grow as you progressively increase the intensity of your exercise.
COOLING DOWN The repetitions in each set should be performed smoothly and without pausing. The exertion stroke of each repetition should last about half as long as the return stroke. Proper breathing is important. Exhale during the exertion stroke of each repetition and inhale during the return stroke. Never hold your breath. End each workout with 5 to 10 minutes of stretching. Include stretches for both your arms and legs. Move slowly as you stretch and do not bounce.
EXERCISE LOG Make copies of this page, and use the copies to schedule and record your strength and aerobic workouts. Scheduling and recording your workouts will help you to make exercise a regular and enjoyable part of your life. Strength Date: Exercise 1. Lbs. Sets Reps 2. 8. 4. Strength Date: 9. 5. 10. Exercise Exercise 1. Time Lbs. Sets Reps 2. Strength Date: Exercise 1. 6. 9. 5. Exercise Lbs. Sets Reps Exercise 8. 4. Aerobic Date: Distance Speed 7. 3. 10. Time Lbs.
PART LIST—Model No. GGBE0969.0 Key No. 1 2 3 4 5 6 7 8 9 10 11 12 13 14 15 Qty. 2 2 2 2 2 2 1 1 1 1 8 2 4 8 4 Description Stabilizer Upright Base Upright Support Dip Arm Arm Pad Top Crossbar Backrest Pull-up Bar Bottom Crossbar Handgrip Rubber Cap Support Plate 25mm Cap 60mm Cap Key No. 16 17 18 19 20 21 22 23 24 25 26 27 28 * * Qty.
EXPLODED DRAWING—Model No. GGBE0969.
ORDERING REPLACEMENT PARTS To order replacement parts, please see the front cover of this manual.