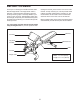
www.workoutwarehouse.com Model No. GGBE19615.0 Serial No. ___ Write the serial number in the space above for reference. Serial Number Decal (under seat) ACTIVATE YOUR WARRANTY To register your product and activate your warranty today, go to www.workoutwarehouse.com/ registration. CUSTOMER CARE For service at any time, go to www.workoutwarehouse.com. Or call 1-877-776-4777 Mon.–Fri. 6 a.m.–6 p.m. MT Sat. 8 a.m.–12 p.m. MT Please do not contact the store.
TABLE OF CONTENTS WARNING DECAL PLACEMENT . . . . . . . . . . . . . . . . . . . . . . . . . . . . . . . . . . . . . . . . . . . . . . . . . . . . . . . . . . . . . . .2 IMPORTANT PRECAUTIONS . . . . . . . . . . . . . . . . . . . . . . . . . . . . . . . . . . . . . . . . . . . . . . . . . . . . . . . . . . . . . . . . . . 3 BEFORE YOU BEGIN. . . . . . . . . . . . . . . . . . . . . . . . . . . . . . . . . . . . . . . . . . . . . . . . . . . . . . . . . . . . . . . . . . . . . . . .
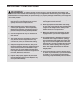
IMPORTANT PRECAUTIONS WARNING: To reduce the risk of serious injury, read all important precautions and instructions in this manual and all warnings on your weight bench before using your weight bench. ICON assumes no responsibility for personal injury or property damage sustained by or through the use of this product. 1. It is the responsibility of the owner to ensure that all users of the weight bench are adequately informed of all precautions. 7.
STANDARD SERVICE PLANS 4
BEFORE YOU BEGIN Thank you for selecting the versatile GOLD’S GYM® XRS 20 weight bench. The weight bench offers a selection of exercise stations designed to develop the major muscle groups of the body. Whether your goal is to tone your body, build dramatic muscle size and strength, or improve your cardiovascular system, the weight bench will help you to achieve the specific results you want. reading this manual, please see the front cover of this manual.
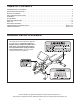
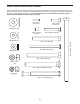
PART IDENTIFICATION CHART Use the drawings below to identify the small parts needed for assembly. The number in parentheses below each drawing is the key number of the part, from the PART LIST near the end of this manual. The number following the key number is the quantity needed for assembly. Note: If a part is not in the hardware kit, check to see if it has been preassembled. Extra parts may be included.
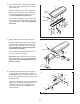
ASSEMBLY • To hire an authorized service technician to assemble the weight system, call 1-800-445-2480. • In addition to the included tool(s), assembly requires the following tool(s): • Assembly requires two persons. two adjustable wrenches • Because of its weight and size, assemble the weight bench in the location where it will be used. Make sure that there is enough clearance to walk around the weight bench.
3. Attach the Rear Stabilizer (3) to the Frame (1) with two M10 x 90mm Carriage Bolts (40) and two M10 Locknuts (12). Do not tighten the Locknuts yet. 3 Warning Decal 12 3 1 4. Attach the Seat (18) and the Seat Bracket (10) to the Frame (1) with two M6 x 80mm Screws (46) and two M6 Washers (38). 12 4 Wide End 18 10 38 1 38 46 5. Attach the Frame (1) to the Front Leg (4) with two M10 x 85mm Bolts (43), two M10 Washers (39), and an M10 Locknut (12). Do not tighten the Locknut yet.
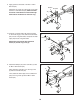
6. Using a plastic bag to keep your fingers clean, apply some of the included grease to an M10 x 165mm Bolt (49). 6 Attach the Backrest Post (15) to the Backrest Frames (16) with the M10 x 165mm Bolt (49), two M10 Washers (39), and an M10 Locknut (12). Do not tighten the Locknut yet. 19 Wide End 49 Then, attach the Backrest (19) to the Backrest Frames (16) with four M6 x 40mm Screws (48) and four M6 Washers (38). Do not tighten the Screws yet. 16 Grease 39 38 48 39 38 15 48 7.
9. Apply grease to the barrel of an M10 x 77mm Bolt Set (45). 9 Grease Attach the Leg Lever (5) to the Front Leg (4) with the M10 x 77mm Bolt Set (45). Make sure that the barrel of the Bolt Set is inserted through both sides of the bracket on the Front Leg. Bracket 45 5 4 10. Insert the Long Pad Tube (36) into the bracket on the Front Leg (4). Then, slide two Foam Pads (22) onto the Long Pad Tube, and press two Pad Caps (23) into the Long Pad Tube.
12. Attach the Curl Pad (20) to the Curl Post (6) with two M6 x 20mm Screws (47). 12 20 6 47 13. Make sure that all parts are properly tightened before you use the weight bench. To learn how to use the weight bench, see ADJUSTMENT below. ADJUSTMENT This section explains how to adjust the weight bench. See the EXERCISE GUIDELINES on page 13 for important information about how to get the most benefit from your exercise program.
ADJUSTING THE BACKREST 19 To adjust the position of the Backrest (19), lift the indicated handle on the Backrest Post (15), raise or lower the Backrest, and then set the Backrest Post in one of the slots in the Frame (1). Make sure that the Backrest Post is fully inserted into one of the slots. Handle 15 1 USING THE LEG LEVER To use the Leg Lever (5), slide a weight plate (not included) onto the Olympic Adapter (8) and secure it with the Weight Clip (41).
EXERCISE GUIDELINES FOUR TYPES OF STRENGTH WORKOUTS workout, and the numbers of repetitions and sets to complete. Progress at your own pace and be sensitive to your body’s signals. Follow each workout with at least one day of rest. Note: A “repetition” is one complete cycle of an exercise, such as one sit-up. A “set” is a series of repetitions. Warming Up—Start with 5 to 10 minutes of stretching and light exercise.
PART LIST Key No. Qty. 1 2 3 4 5 6 7 8 9 10 11 12 13 14 15 16 17 18 19 20 21 22 23 24 25 26 27 1 1 1 1 1 1 1 1 1 1 1 7 1 1 1 2 1 1 1 1 2 6 6 1 4 1 3 Model No. GGBE19615.0 R0515B Description Key No. Qty.
EXPLODED DRAWING Model No. GGBE19615.
ORDERING REPLACEMENT PARTS To order replacement parts, please see the front cover of this manual.