welcome Congratulations! You have in your possession one of the finest bicycle products in the world. The following pages will provide you with the information you need to properly use, adjust, maintain, and service your new bike, so you can get the most out of every ride! It is essential that you read this owner’s manual thoroughly before riding your bicycle. We know you’re anxious to ride, but trust us, it will only take a few minutes, and then you can unleash the full potential of your bicycle.
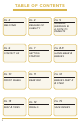
table of contents 3 pg. 2 pg. 4 welcome release of liability pg. 5 general warning & a note to parents pg. 6 pg. 7 pg. 8-9 contact us getting started handlebar & brakes pg. 10 pg. 11 pg. 12 front wheel rear rim brakes part 2 & stem pg. 13 pg. 14 pg.
release of liability Please Read Carefully. Biycle riding is a hazardous sport and/or activity. This bicycle bought from Innovative Sports Distribution and Zyclefix Bicycles Inc. or any of its authorized bicycle dealers and/or distributors is understood to be the consumer’s sole responsability and legal liability.
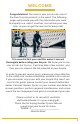
general warning Like any sport, bicycling involves risk of injury and damage. By choosing to ride a bicycle you assume the responsability for that risk; so you need to know and practice the rules of safe and responsible riding and proper use and maintenance, as this can reduce risk of injury. This guide contains many warnings and cautions, failure to follow these guidelines can lead to serious injury.
contact us Address: 1935 Santa Anita Ave. South El Monte, CA 91773 Phone: Web: (866)968-4642 goldenbicycles.com Email: Instagram: customerservice@isdist.net @goldenbicycles Important This manual contains important safety, performance and service information. Read it before you take the first ride, and keep it somewhere safe for reference. For your own safety and the safety of the bike we recommend you have this bicycle assembled by an experienced professional bicycle mechanic.
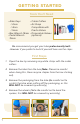
getting started Tools You’ll Need • Allen Keys • ✓ 2mm • ✓ 4mm ✓ 5mm • Box Wrench 15mm • • Pedal Wrench 15mm Cable Cutters Air Pump Compatible with Presta Valves Disposable Golves (optional) We reccommend you get your bike professionally built. However if you prefer to build it yourself here are the steps. First Steps 1. Open the box by removing any white straps with the cable cutters. 2.
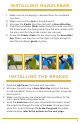
installing handlebar 1. Make sure all packaging is removed from the handlebar and stem. 2. Make sure that the stem is facing forward. 3. Unscrew the 4 bolts from the stem with a 4mm Allen Key 4. Insert the handlebar (Note: when doing this make sure that the brake levers are facing away from the bike, leveled with the grips and that the brake cables are crossed). 5. Screw the 4 levers back into the stem using the 4mm Allen Key.
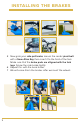
installing the brakes 5. Now grab your side pull brake, loosen the center pivot bolt with a 5mm Allen Key then insert it to the front of the fork. Make sure that the brake pads are alligned with the fork legs. Screw the side brake tightly. 6. Repeat this with the back brake. 7. We will come finish the brakes after we insert the wheels.
installing the front wheel 1. Loosen the axle nuts on the wheel with a 15mm Wrench or with your hand if possible. 2. Now place the wheel into the fork. Make sure that the wheel is centered. 3. Using a 15mm wrench screw the axle bolts back on. (Pro Tip: take turns tightening each bolt in slowly to make sure the wheel stays centered until the axle nuts are screwed on tight.) Important Information Underneath your bikes bottom bracket shell you will find the serial number.
installing the rear rim freewheel fixed gear You have the choice to ride freewheel or fixed gear 1. Loosen the axle nuts on the wheel with a 15mm Wrench 2. Loop the chain around the cog or the freewheel. Secure the chain on the cog or freewheel and the front chainring before mounting. 3. Insert the rear axle between the dropouts. 4. Use a 2mm Allen Key to put tension on the wheel tour’s rear of the bike. Do not overtighten the chain by tightening the dropouts too much.
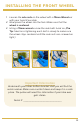
installing the brakes pt.2 1. Grab the brake wire, and insert it into the adjuster bolt, then slide it in between the centering screw behind the quick release switch. 2. Pinch the brake pads so they are holding the wheel into place, and tighten the centering screw while still pinching the brake pads. 3. Switch the quick release lever down. 4. Repeat this with the back brake. 5. Rotate the wheel and squeeze the lever. The wheel should stop.
installing the seat 1. Using a 5mm Allen Key, loosen the bolts on the seat clamp. 2. Insert the seat post into the seat tube. 3. Set the seat post at the desired height. We recommend that it is at the height of the riders hip. (Pro Tip: your knees should NOT go over your waist when riding.) 4. Use a 5mm Allen Key to re-tighten the seat clamp. inflating the tires 1. Remove the valve cap and then unscrew the presta valve nut. 2. If you have a Presta/French Pump, insert your pump head into the presto valve.
installing the pedals Open the accessory box that came with your bike. In there you will find the pedals. 1. To insert the pedals you will need a 15mm pedal wrench. 2. Make sure that the pedals are in the right side. The right pedal goes on the right and the left pedal goes on the left. For easier understanding the right side is the side where the chain is, also known as the driver side. The pedals are marked “R” for right and “L” for left, on the front side of the bolt.
safe riders...
IN GOLD WE TRUST