
Installation Sheet

Assembly Instructions: 0852-4P (Sabrina)
IMPORTANT:
• ALL INSTALLATION WORK SHOULD BE DONE BY ACCREDITED PROFESSIONAL.
• SHUT OFF POWER SUPPLY AT FUSE OR CIRCUIT BREAKER!
• USE ONLY THE SPECIFIED BULBS. DO NOT EXCEED THE MAXIMUM WATTAGE!
PREPARING FOR INSTALLATION
Remove all of the contents from the carton. See the important notes above. Shut
offthepoweratthecircuitbreakerandcompletelyremovetheoldxturefromthe
ceiling, including the old mounting strap.
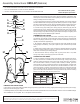
1. From the parts bag remove the mounting strap assembly. One end of nipple (F)
shouldbeattachedtomountingstrap(A)withwasher(C)andhexnut(D)inplace.
The other end should have canopy loop (H) attached. Attach mounting strap (A) to
thejunctionboxusingmountingscrews(B)andascrewdriver.Tightensecurely.
2. Unscrew canopy loop collar (I) from canopy loop (H). Pass canopy (G) over the
mountedcanopylooptotesttheheight.Approximatelyhalfofthecanopyloop’s
exteriorthreadsshouldbeexposed,andthecanopyloopcollarshouldtsnugly
onto the canopy loop. Remove canopy (G) and adjust the height of nipple (F) and
canopy loop (H) until the desired height is reached.
ASSEMBLING THE FIXTURE
3. Thread rod (N) into post (O) at the center of the lamp cluster. Top loop (L) is
connected to top cap (M). Pull the wires taut through top loop (L) and thread the
bottom of top loop (L) into the top of rod (N). Use thumb screws (Q) to connect top
cap(M)tothexture’scage/body(P).
4. By measuring, determine the correct number of chain links needed for proper
hangingheight.Ifnecessary,useapairofplierstoopenandremoveanyexcess
chain.
5. Attach chain connectors (K) to each end of chain (J) before attaching one end of
thechainconnector/chaintotoploop(L).Closethechainconnector.Connectthe
other chain connector (K) to canopy loop (H).
6. Pass the xture’s wires up through chain (J) (every three links or so). Slide
canopyloopcollar(I)andcanopy(G)ontothechain/wire.
CLEANING TIPS
Treat the xture gently! Regular cleaning will reduce the need for deep cleaning. For regular cleaning, turn off the light and wipe down the
xture with a clean lint-free cotton or microber cloth. Never spray cleaner directly onto the xture.
For Customer Service, please
contact the place of purchase.
CONNECTING THE WIRES
7.Haveanassistantsupporttheweightofthexturewhilecompletingthewiring.
Cut away excess wire. Thread the xture’s wires through canopy loop (H) and
nipple(F).Attachthexture’swirestothepowersupplywiresfromthejunction
box. Connect black to black (or smooth); white to white (or ribbed); ground to
ground (green or copper). Twist the ends of the wire pairs together, and then twist
on a wire connector. Make sure all twists are in the same direction. If there is no
groundwire(greenorcopper)comingfromthejunctionbox,locategroundscrew
(E) on mounting strap (A) and wrap the xture’s ground wire around the green
ground screw (E). Use a screwdriver to secure ground screw (E) onto the mounting
bracket.Tuckallwiresneatlyintothejunctionbox.
FINISHING THE INSTALLATION
8. Push canopy (G) up to the ceiling and slide canopy loop collar (I) up beneath the canopy. Tightly thread canopy loop collar (I) onto canopy
loop (H) to secure canopy (G) in place.
9.
Installlightbulbs(notprovided)inaccordancewiththexture’sspecications.Donotexceedthemaximumrecommendedwattage.
Yourinstallationisnowcomplete.Turnonthepowerandtestthexture.
House Wires
Fixture Wires
Hot
How to Identify the Fixture’s Wires
Hot Neutral Ground
Smooth
Ribbed
Bare Metal,
Green, or
Green Inner
Thread
Black
White
Black Inner
Thread
White Inner
Thread
A
C
B
D
E
F
H
I
G
J
K
L
M
N
O
P
Q