
Installation Guide

Assembly Instructions: 1270-09 (Multi-Family)
IMPORTANT:
• ALL INSTALLATION WORK SHOULD BE DONE BY ACCREDITED PROFESSIONAL.
• SHUT OFF POWER SUPPLY AT FUSE OR CIRCUIT BREAKER!
• USE ONLY THE SPECIFIED BULBS. DO NOT EXCEED THE MAXIMUM WATTAGE!
PREPARING FOR INSTALLATION
Please see the important notes above.
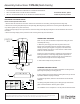
1.Removeallofthecontentsfromthecarton.Removetheoldxturefromtheceiling,includingtheoldmountingstrap.
2.Removethemountingstrapassemblyfromthepartsbag.(Mountingstrap(A)shouldhavemountingscrews(B)attached.You
mayneedtotightennuts(C)ontothescrews.)
3.Placemountingstrap(A)overthejunctionboxsothatmountingscrews(B)arepointingdownwiththethreadsofthescrewsat
the bottom.
4.Securemountingstrap(A)tothejunctionboxwithmountingscrews(D)andascrewdriver.
For Customer Service, please
contact the place of purchase.
CLEANING TIPS
Treat the xture gently! Regular cleaning will reduce the need for deep cleaning. For regular cleaning, turn off the light and wipe
down the xture with a clean lint-free cotton or microber cloth. Never spray cleaner directly onto the xture.
House Wires
Fixture Wires
Hot
How to Identify the Fixture’s Wires
Hot Neutral Ground
Smooth
Ribbed
Bare Metal,
Green, or
Green Inner
Thread
Black
White
Black Inner
Thread
White Inner
Thread
FINISHING THE INSTALLATION
7.Raiseceilingpan(G)totheceilingandpositionmountingscrews
(B)throughtheopeningsofceilingpan(G).
8.Secureceilingpan(G)intoplacebytwistingdeconuts(F)ontothe
exposedthreadsofmojntingscrews(B).
9.Installthelightbulbs.(Note:Donotexceedtherecommended
wattage.)
10.Gentlypushglassshade(H)uptoceilingpan(G)andtwistthe
glasscounterclockwisetolocktheglassinplace.
Yourinstallationisnowcomplete.Turnonthepowerandtestthexture.
CONNECTING THE WIRES
(Note:Youmayneedanassistanttohelpholdtheceilingpanwhile
completingthewiring.)
5.Attachthepowersupplywiresfromthejunctionboxtothe
xture’swires.Putblacktoblack(orsmooth);whitetowhite(or
ribbed);groundtoground(greenorcopper).Puttheendsofthe
wirepairstogether,thentwistonawireconnector.Makesureall
twistsareinthesamedirection.
(Ifthereisnogroundwire(greenorcopper)fromthejunctionbox,
locategroundscrewonmountingstrap(A)andwrapthexture
groundwirearoundgreengroundscrew(E).Useascrewdriverto
securegroundscrew(E)ontothemountingbracket.)
6.Tuckallwiresneatlyintothejunctionbox.
JUNCTION
BOX
A
B
D
C
F
G
H
E