Avenger Owner’s Manual Model GA 531 Model GA 541 401 Bridge Street, Old Forge, PA 18518 Tel: 800-624-6374 Fax: 570-451-7494 www.goldentech.
Avenger Owner’s Manual Your Avenger™ package should include the following items. If your package arrived without any of the following items, please contact us right away! 1) 2) 3) 4) 5) 6) Owners Manual Battery Charger Batteries (If ordered) Seat Arm Rests Keys Avenger™ Scooter DISCLAIMER Golden Technologies, Inc. is not and cannot be held responsible for any damage or injury incurred due to improper or unsafe use of the Golden Avenger™ scooter. Golden Technologies Inc.
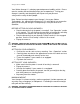
Avenger Owner’s Manual CONTENTS ________________________________________ I. II. III. IV. V. Introduction……………………………………………………… 4 Safety……………………………………………………………. 6 EMI/RFI…………………………………………………………. 9 Your Golden Avenger™…….………………………………….. 10 Operation………………………………………………………… 12 Hand Controls Seat Controls VI. Riding Your Avenger™……………………………………………16 Mounting Basic Driving Control Through Tight Spots Disassembly………………………………………………………… 20 Assembly……………………………………………………………. 25 Transporting Your Avenger™………………………………….
Avenger Owner’s Manual Congratulations on the purchase of your new Golden Avenger™ scooter! The Avenger™ combines cutting edge technology with attractive designs that are also highly functional in today’s world. We at Golden Technologies know that you have chosen a scooter that will give you years of dependable operation and will also enhance the quality of your life by providing you with the mobility to experience a more active daily lifestyle.
Avenger Owner’s Manual Your Golden Avenger™ is a battery-operated personal mobility vehicle. Please exercise caution and consideration when you are operating it. Driving your Avenger™ carefully and thoughtfully will help ensure your personal safety and the safety of other people. Note: Before learning to operate your Avenger™, have your Golden Technologies, Inc. representative determine if it is advisable for you to practice getting on and off your Avenger™ and operating it in the presence of an attendant.
Avenger Owner’s Manual SAFETY DRIVING ON AN INCLINE • • • • • • • • For maximum stability, lean forward in your Avenger™ seat while proceeding up ramps, slopes, curbs, or any low rise. Drive with caution when attempting to negotiate any incline, even handicap access ramps. Always climb or descend a gradient by driving straight up or straight down the face of the slope. Do not traverse or drive across the face of a gradient.
Avenger Owner’s Manual SAFETY Note: When using either of the following procedures to back down a slope, Golden Technologies strongly advises that you have the assistance of another person. Procedure 1 1. Set the key switch to the “Off” position. See “Operation” section. 2. Dismount your Avenger™. 3. Put your scooter in the freewheel mode. See “Disassembly” section. 4. While standing alongside the scooter, carefully manually maneuver it down the slope. 5.
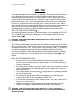
Avenger Owner’s Manual SAFTEY RULES FOR USE AND OTHER SAFETY CONSIDERATIONS • Read completely and understand this owner’s manual before assembling, operating, transporting, or disassembling your Golden Avenger™. • Always operate your Golden Avenger™ with thought, care and safety. • Do not attempt to use your Avenger™ on an escalator. Always use in an elevator. • Do not carry passengers under any circumstances. • Do not mount or dismount your Golden Avenger™ unless the brake is engaged.
Avenger Owner’s Manual EMI / RFI The rapid development of electronics, especially in the area of communications, has saturated our environment with electromagnetic (radio) waves that are emitted by television transmitters, cellular phones, citizen’s band radios (CBs) amateur radios (AM radios), wireless computers links, microwave transmitters, paging transmitters, etc. These electromagnetic (EM) waves are invisible and increase in strength the closer one gets to the source of transmission.
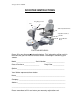
Avenger Owner’s Manual SCOOTER INSTRUCTIONS Wig-Wag Control Key Tiller Adjustment Knob Adjustable Seat Post Circuit Breaker Reset FOR YOUR RECORDS: Please fill in your Avenger™ information below. This information will be useful in the event that you ever need to contact Golden Technologies concerning your scooter.
Avenger Owner’s Manual TECHNICAL SPECIFICATIONS INFORMATION Specification Name Three-wheel model Four-wheel model Length Width Tires 51.5” 24.5” Pneumatic 10”x3.5” 13”x4” 500 pounds 7.5 mph 5” 10-15 miles 41” 12 VDC – 55AH Nf22 57.5” 24.5” Pneumatic 13”x4” 13”x4” 500 pounds 7.5 mph 4.5” 10-15 miles 48” 12 VDC – 55Ah Nf22 62.5 pounds pounds 62.
Avenger Owner’s Manual AVENGER™ OPERATION TruCharge Meter Headlight Switch Speed Adjustment Knob Key Horn Button Turn Indicator Switch Emergency Flashers (Reverse) Thumb Lever (Forward) Hand Controls Speed Adjustment Dial The speed adjustment dial allows you to pre-select the maximum top speed of your Golden Avenger™. • Turn the dial completely counterclockwise to operate your scooter at the lowest top speed. • Turn the dial clockwise to increase the operational speed of your scooter.
Avenger Owner’s Manual When the power to your Avenger™ is turned on the TruCharge volt meter/ diagnostics gauge will illuminate. This gauge is used for battery condition and diagnosing operational problems that may arise. See “Diagnostics” section. Horn Button Press this button to sound the horn. Thumb Lever Control This self-centering lever system controls your Avenger™ speed (up to the maximum speed set by the speed adjustment dial) as well as the forward and reverse direction.
Avenger Owner’s Manual OPERATION The TruCharge volt meter/ diagnostics gauge. This meter shows the amount of voltage in your Avenger™ batteries and is also the diagnostics gauge. • 10 bars lit indicates full battery charge. • 6 or 7 bars lit, charge your batteries. Note: Your scooter will automatically turn itself off if the battery output falls to 18 V DC or lower. Tiller Adjustment The tiller on your Avenger™ scooter employs an adjustment lever to provide you with infinite tiller angle settings.
Avenger Owner’s Manual OPERATION SEAT CONTROLS Armrest Height Adjustments can be made by removing the 2 screws on the back of the armrest and raising to a comfortable position and resetting the screws. The armrest can be raised 3” and by replacing only 1 screw. You can raise the armrest and replace both screws. You will require a 6mm allen wrench for this task. Armrest Width Adjustment To adjust the armrest width: 1. Loosen the (2) 6mm adjustment screws at the rear of each arm.
Avenger Owner’s Manual The Golden Avenger™ seat is available only in gray vinyl. RIDING YOUR AVENGER™ MOUNTING Note: For you first driving sessions, make certain that your Golden Avenger™ starts out on a level surface and that you will continue driving on a level surface. To get on Your Avenger™ 1. Stand behind your Avenger™ 2. Make certain that the brake handle is in the “Forward” position. 3. Pull up on the seat rotate lever. • This lever is normally located on the right-hand side of the seat.
Avenger Owner’s Manual a. If you wish to drive forward, position your right thumb on the right thumb lever and push forward. b. If you wish to drive in reverse, position your left thumb on the left thumb lever and push forward. 6. Press against the thumb lever to gently accelerate your Avenger™. 7. Release the lever to allow your Avenger™ to come gently to a full stop. 8.Practice these two basic functions until you feel that you have control of your scooter.
Avenger Owner’s Manual RIDING YOUR AVENGER™ Control through tight spots As you use your Avenger™ to increase your mobility, you will undoubtedly encounter some obstacles that will require practice to negotiate smoothly and safely. Below are some common obstacles that you may meet during the daily use of your scooter. Listed with those obstacles are some driving tips that should help you conquer those obstacles.
Avenger Owner’s Manual Because of the American Disabilities Act (ADA), many buildings are fitted with ramps that provide access for scooters and for other mobility vehicles. RIDING YOUR AVENGER™ When proceeding up any ramp, curb, or incline: • Lean forward in your seat to move your center of gravity forward for maximum stability and safety. If the ramp has a switchback, good cornering ability is required. • Maneuver your scooter so that the front wheels take wide swings around the corners of the ramp.
Avenger Owner’s Manual • • Feel free to use your Avenger™ on lawns or in park areas. Avoid long or high grass, which may wrap around your scooter’s axles. DISASSEMBLY Your Avenger™ scooter is designed to be disassembled in order to be transported. When disassembling your Avenger™, please be sure to follow these simple instructions. Step 1 - Place your scooter on a level surface.
Avenger Owner’s Manual DISASSEMBLY Step 4 - Remove the battery cover – This will give you access to the batteries, wire connections, and the main connection pin. Step 5 - Unplug the following connections (see photos on the following pages). 1. Unplug the two gray battery connectors. 2. Undo the two Velcro retaining straps and remove batteries. 3. Unplug the large white main cable connector. 4. Unplug the small white charger connector. 5. Unplug the gray rear lights connector.
Avenger Owner’s Manual .Step 5, Number 1: Unplug the two gray battery connectors. . DISASSEMBLY Step 5, Number 2: Undo the two Velcro retaining straps and remove the batteries. Step 5, Number 3: Unplug the large white main cable connector. Step 5, Number 4: Unplug the small white charger connector. Step 5, Number 5: Unplug the gray rear lights connector.
Avenger Owner’s Manual DISASSEMBLY Step 6: Remove the safety retaining clip from the ball detent pin and pull the pin out. Step 7: With one hand, grab the top of the seat post, with your other hand grab the curved rear support member. Lift and separate front half from rear.
Avenger Owner’s Manual DISASSEMBLY Now you are ready to load the scooter into your vehicle. Please note the Avenger will not fit into the trunk of a compact car. WARNING: DO NOT SIT ON YOUR AVENGER UNLESS THE BALL DETENT PIN IS INSERTED AND THE RETAINING CLIP IS RE-INSTALLED IN THE BALL DETENT PIN. WARNING: BE CAREFUL NOT TO PINCH YOUR FINGER(S) BETWEEN FRAME HALVES DURING RE-ASSEMBLY. ASSEMBLE IN REVERSE ORDER.
Avenger Owner’s Manual ASSEMBLING YOUR AVENGER™ Summary Sheet Before you begin to assemble your Avenger, make certain you have all of the parts in front of you, including the seat with armrests attached, the front component, rear component, and battery pack. Below are instructions with photos of how to assemble your Avenger’s frame. Step 1: Line up the front and rear components. WARNING: Watch finger placement! Be careful not to pinch your fingers! Look here to find your units serial number.
Avenger Owner’s Manual ASSEMBLING YOUR AVENGER™ Notice how the front component connects easily to the rear component. Step 3: Connect the ball detent pin. Make certain the ball detent pin is fully installed and tightened. Additional Steps to Re-assembling your Avenger™: Once you’ve joined the front and rear components and connected the ball detent pin, you must: 1. Install the battery pack in the proper location. 2. Connect the motor, brake, battery and charger connections. 3. Replace the battery cover.
Avenger Owner’s Manual Transporting Your AVENGER™ Note: Avenger™ scooters can be equipped with docking devices for loading into/onto a vehicle by means of mechanical lift or hoist. Golden Technologies does not sell this lifting equipment, however you may contact your local home health care dealer for more information. To transport your Avenger™ You will want to consider the best way for transportation.
Avenger Owner’s Manual DIAGNOSTICS SYSTEM TruCharge Battery Display Diagnostics NOTE: When the display is down to two (2) bars, the batteries must be charged before driving your Avenger.
Avenger Owner’s Manual This is the “LED” light that will flash in the event of a problem. CARE AND MAINTENANCE Main Circuit Breaker The 50-amp circuit breaker and exposed reset button AreA located under the battery cover. The button is visable through the battery cover. If your Avenger™ fails to operate, your main circuit breaker may have tripped. Circuit Breaker WARNING: DO NOT ATTEMPT ELECTRICAL REPAIRS. CONSULT GOLDEN TECHNOLOGIES OR YOUR AUTHORIZED GOLDEN DEALER.
Avenger Owner’s Manual NOTE: If the main circuit breaker continues to trip, there is an underlying electrical fault that needs professional attention. Please contact your local Golden Technologies Dealer. Note: Do not reset your main circuit breaker repeatedly. You must correct the underlying problem. Failure to correct the problem could cause injury or damage and will void the warranty.
Avenger Owner’s Manual CARE AND MAINTENANCE Wheels and Tires Your Avenger™ scooter is equipped with pneumatic tires with “split-rim” wheels. WARNING: NEVER DISASSEMBLE WHEELS UNLESS ALL OF THE AIR HAS BEEN RELEASED THROUGH VALVE STEMS. How to change a tire assembly: 1. Remove the center nut. 2. Remove the tire assembly from the scooter 3. Install a new tire assembly onto the axle. 4. Install and tighten the center nut. NOTE: All tires on your Avenger ™ are pneumatic.
Avenger Owner’s Manual CARE AND MAINTENANCE Charger and Batteries The Batterys are under the rear shroud. The charger is located in the pocket on the back of the scooter seat. To charge the batteries, plug the charger into the tiller and the other end into a standard wall outlet. To Charge the Batteries: 1. Make certain your key is in the “OFF” position. 2. Remove charger from pouch on the back of the seat. 3.
Avenger Owner’s Manual CARE AND MAINTENANCE WARNING: THE BATTERIES USED ON YOUR SCOOTER HOLD A SUBSTANTIAL AMOUNT OF POWER. SHORTING OF THE TERMINALS CAN RESULT IN BURNS OR OTHER INJURIES AND IN DAMAGE TO THE BATTERIES AND TO THE ELECTRONIC COMPONENTS OF YOUR AVENGER. ALWAYS USE CARE AND CAUTION WHEN HANDLING THE BATTERIES. Battery Charging Information Note: Your scooter may be equipped with either “GEL”, “Silicone”, or “AGM” batteries. These batteries do NOT have “Memory”.
Avenger Owner’s Manual CARE AND MAINTENANCE If the battery terminals become corroded: • Corrosion can cause a poor electrical connection and operational problems. • Clean corroded battery terminals with a stiff brush and a solution of baking soda and water. CLEANING YOUR AVENGER™ Tires • Clean the tires with ordinary kitchen-type cleaners and a damp cloth. • Do not use solvents on tires. Solvent can cause the tire material to break down or become too soft.
Avenger Owner’s Manual WARRANTY Life-Time Warranty The life-Time warranty includes the structural frame components listed below. • Main metal frame • Rear frame • Fork • Seat post • Frame welds Two Year Warranty The following parts are covered by Golden Technologies 2 Year warranty • Drive train (Transaxle assembly) • Battery charger • Controller This warranty excludes the following parts: • Batteries* • Tires* • ABS plastic shrouds.